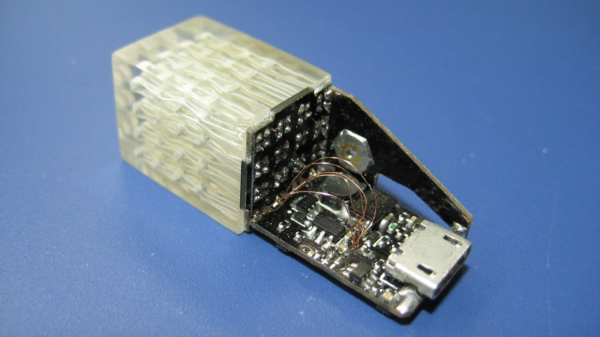
Keep Tabs On The Weather With Rpi_status

[Facelessloser] is interested in glanceable information. Glancable devices are things like your car’s dashboard, your wristwatch, or widgets on a smartphone lockscreen. The glanceable information distribution system in this case is rpi_status, [facelessloser’s] entry in the Enlightened Raspberry Pi Contest.

[Facelessloser] coupled a ring of eight WS2812 RGB LEDs with a small OLED screen managed by a the common ssd1306 controller. Since he was rolling his own board for this project, [faceless] some buttons and a BMP180 temperature sensor. Going with popular parts like this meant libraries like the Pimoroni unicorn hat library for the WS2812 were readily available.

A simple display like this can show just about anything – from status of a nightly software build, to traffic along your morning commute. [Facelessloser] is using it for weather data. His data source is Weather Underground’s API. Weather information is displayed on the OLED. The WS2812’s display the temperature. A single blue light means cold. The ring fills as the temperature warms up. After eight degrees of blue, the color changes to orange, followed by red.

Check out the video after the break for a short demo of the board.

Continue reading “Keep Tabs On The Weather With Rpi_status”

Colorful Display Keeps Track Of Your Network

So you’ve built out your complete home automation setup, with little network-connected “things” scattered all around your home. You’ve got net-connected TVs, weather stations, security cameras, and whatever else. More devices means more chances for failure. How do you know that they’re all online and doing what they should?

[WTH]’s solution is pretty simple: take a Raspberry Pi Zero, ping all the things, log, and display the status on an RGB LED strip. (And if that one-sentence summary was too many words for you, there’s a video embedded below the break.)

Continue reading “Colorful Display Keeps Track Of Your Network”

Real-Life Space Invaders With Drones And Lasers

We’ve seen a proliferation of real-life video game builds lately, but this one is a jaw-dropper! [Tomer Daniel] and his crew of twelve hackers, welders, and coders built a Space Invaders game for GeekCon 2016.

[Tomer] et al spent more time on the project than the writeup, so you’re going to have to content yourselves with the video, embedded below, and a raft of photos that they sent us. ([Tomer] wrote in and wanted to thank each of you, and his sponsors, by name, but that would be a couple paragraphs on its own. Condider yourselves all thanked!)
Continue reading “Real-Life Space Invaders With Drones And Lasers”

RGB LEDs: How To Master Gamma And Hue For Perfect Brightness

You would think that there’s nothing to know about RGB LEDs: just buy a (strip of) WS2812s with integrated 24-bit RGB drivers and start shuffling in your data. If you just want to make some shinies, and you don’t care about any sort of accurate color reproduction or consistent brightness, you’re all set.

But if you want to display video, encode data in colors, or just make some pretty art, you might want to think a little bit harder about those RGB values that you’re pushing down the wires. Any LED responds (almost) linearly to pulse-width modulation (PWM), putting out twice as much light when it’s on for twice as long, but the human eye is dramatically nonlinear. You might already know this from the one-LED case, but are you doing it right when you combine red, green, and blue?

It turns out that even getting a color-fade “right” is very tricky. Surprisingly, there’s been new science done on color perception in the last twenty years, even though both eyes and colors have been around approximately forever. In this shorty, I’ll work through just enough to get things 95% right: making yellows, magentas, and cyans about as bright as reds, greens, and blues. In the end, I’ll provide pointers to getting the last 5% right if you really want to geek out. If you’re ready to take your RGB blinkies to the next level, read on!

Continue reading “RGB LEDs: How To Master Gamma And Hue For Perfect Brightness”

Walnut Guitar Back Yields Wood For Classy Word Clock

Word clocks are cool, but getting them to function correctly and look good is all about paying attention to the details. One look at this elegant walnut-veneered word clock shows what you can accomplish when you think a project through.

Most word clocks that use laser-cut characters like [grahamvinyl]’s effort suffer from the dreaded “stencil effect” – the font has bridges to support the islands in the middle of characters like “A” and “Q”. While that can be an aesthetic choice and work perfectly well, like in this word clock we featured a few months back, [grahamvinyl] was going for a different look. The clock’s book-matched walnut guitar back was covered in tape before being laser cut; the tape held the letters and islands in place. After painstakingly picking out the cutouts and tweaking the islands, he used clear epoxy resin to hold everything in place. The result is a fantastic Art Deco font and a clean, sleek-looking panel to sit on top of an MDF light box for the RGB LED strips.

The braided cloth cable adds a vintage look to the power cord, and [grahamvinyl] mentions some potential upgrades, like auto-dimming and color shifting. This is very much a work in progress, but even at this point we think it looks fabulous.

[via r/diy]

Tiny Tiny RGB LED Displays

Hackaday.io contributor extraordinaire [al1] has been playing around with small LEDs a lot lately, which inevitably leads to playing around with large groups of small LEDs. Matrixes of tiny RGB LEDs, to be precise.

Where's the LED?
Where’s the LED?

First, he took 128 0404 SMD RGB LEDs (yes, 40 thousandths of an inch on each side) and crammed them onto a board that’s just under 37 mm x 24 mm. He calls the project 384:LED (after all, each of those 128 packages has three diodes inside). A microcontroller and the driver chips are located on a separate driver board, which piggy-backs via pin headers to the LED board. Of course, he had to use 0.05 inch headers, because this thing is really small.

Of course, no project is without its hitches. [al1] bought LEDs with the wrong footprint by mistake, so he had a bunch of (subtly different) 0404 LEDs left over. Time for an 8×8 matrix! 192:LED isn’t just the first project cut in half, though. It’s a complete re-design with a four-layer board and the microcontroller on the back-side. And as befits a scrounge project with lots of extreme soldering, he even pulled the microcontroller off of a cheap digital FM radio. Kudos!

We’re in awe of [al1]’s tiny, tiny hacking skills. Now it’s time to get some equally cool graphics up on those little displays.

Rainbow Cats Announce Engagement

[ANTALIFE] is going to tie the knot sometime in 2017. Instead of sending out paper announcements or just updating his Facebook status, he wanted to give their family members something lasting and memorable, like a small trinket with a pair of light-up cats.

This project is pretty simple in theory. A pair of RGB LEDs cycle through the colors of the rainbow with the help of an ATtiny25 and resistors carefully chosen for each LED. But there are several challenges at play here. [ANTALIFE] wanted to design something quite small that would last at least a day on a single CR2032 coin cell. This project was his first foray into SMD/SMT design and construction. We think that this warrants its own congratulations, especially since it looks as though he made at least a dozen of these things.

[ANTALIFE] made things much easier for himself with the purchase of a cheap hot air rework station and used a chip clip to program the ‘tiny. The cats are a design from Thingiverse, which he modified to turn them into bride and groom. Watch a whole line of them glow after the break. We sincerely hope that a larger version of these cats end up on top of the wedding cake.

For anyone with an undying love blinkenlights and impending nuptials, don’t forget the light-up invitations, wedding attire, and centerpieces.

Continue reading “Rainbow Cats Announce Engagement”