We see a fair few glitcher projects, especially the simpler voltage glitchers. Still, quite often due to their relative simplicity, they’re little more than a microcontroller board and a few components hanging off some wires. PicoGlitcher by Hackaday.IO user [Matthias Kesenheimer] is a simple voltage glitcher which aims to make the hardware setup a little more robust without getting caught up in the complexities of other techniques. Based on the Raspberry Pico (obviously!), the board has sufficient niceties to simplify glitching attacks in various situations, providing controllable host power if required.
A pair of 74LVC8T245 (according to the provided BoM) level shifters allow connecting to targets at voltages from 1.8 V to 5 V if powered by PicoGlitcher or anything in spec for the ‘245 if target power is being used. In addition to the expected RESET and TRIGGER signals, spare GPIOs are brought out to a header for whatever purpose is needed to control a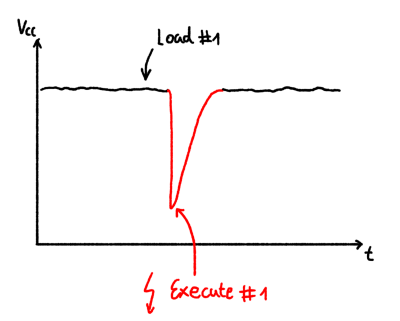 particular attack. If a programmed reset doesn’t get the job done, the target power is provided via a TPS2041 load switch to enable cold starts. The final part of the interface is an analog input provided by an SMA connector.
The glitching signal is also brought out to an SMA connector via a pair of transistors; an IRLML2502 NMOS performs ‘low power’ glitching by momentarily connecting the glitch output to ground. This ‘crowbarring’ causes a rapid dip in supply voltage and upsets the target, hopefully in a helpful way. An IRF7807 ‘NMOS device provides a higher power option, which can handle pulse loads of up to 66A. Which transistor you select in the Findus glitching toolchain depends on the type of load connected, particularly the amount of decoupling capacitance that needs to be discharged. For boards with heavier decoupling, use the beefy IRF7807 and accept the glitch won’t be as sharp as you’d like. For other hardware, the faster, smaller device is sufficient.
The software to drive PicoGlitcher and the hardware design files for KiCAD are provided on the project GitHub page. There also appears to be an Eagle project in there. You can’t have too much hardware documentation! For the software, check out the documentation for a quick overview of how it all works and some nice examples against some targets known to be susceptible to this type of attack.
For a cheap way to glitch an STM8, you can just use a pile of wires. But for something a bit more complicated, such as a Starlink user terminal, you need something a bit more robust. Finally, voltage glitching doesn’t always work, so the next tool you can reach for is a picoEMP.
Continue reading “Use PicoGlitcher For Voltage Glitching Attacks”