Arduino Astronomic Clock Automates Lights

ardAst

[Paulo’s] garden lights are probably a bit more accurately automated than anyone else’s on the block, because they use latitude and longitude clock to decide when to flip the switch. [Ed Note from the far future: this page no longer exists, but you can still read it on the Wayback Machine. The TimeLord library has also been superceded, so you’ll have some porting to do.]

Most commercial options (and hobbiest creations) rely on mechanical on/off timers that click on an off every day at the same time, or they use a photosensitive element to decide it’s dark enough. Neither is very accurate. One misplaced leaf obscuring your light-dependent resistor can turn things on unnecessarily, and considering the actual time of sunset fluctuates over the year, mechanical switches require constant adjustment.

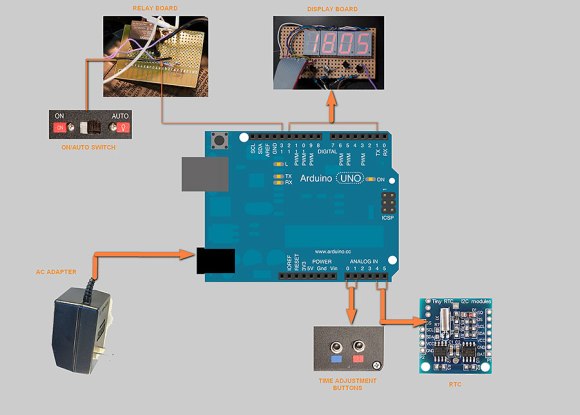
[Paulo’s] solution addresses all of these problems by instead relying on an algorithm to calculate both sunrise and sunset times, explained here, combined with swiftek’s Timelord library for the Arduino. The build features 4 7-segment displays that cycle through indicating the current time, time of sunset and of sunrise. Inside is a RTC (real time clock) with battery backup for timekeeping along with an Omron 5V relay to drive the garden lamps themselves. This particular relay comes with a switch that can force the lights on, just in case.

Check out [Paulo’s] project blog for the full write-up, links to code and more details, then take a look at some other home automation projects, like the SMS-based heater controller or occupancy-controlled room lighting.

An Elegant Timepiece From Paper And A Fistful Of Servos

papercraftClock

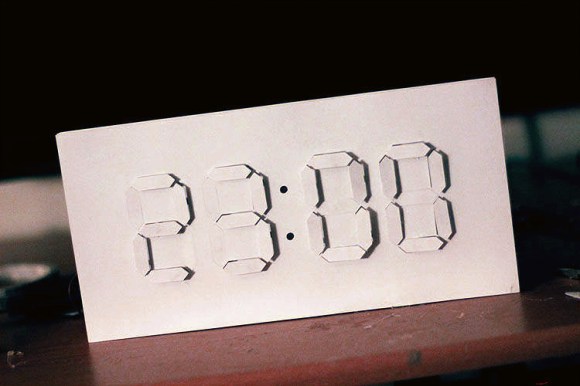
Segments rise from a sheer white surface to reveal the time in this papercraft digital / analog clock build by [Jacky Mok].

New York-based designer [Alvin Aronson] is responsible for the original, titled “D/A Clock,” which he built as a student at RISD using Corian instead of paper. [Aronson]’s design is also massive in comparison. It measures one meter wide by a half meter tall. Without access to either a 3D printer or to a laser cutter, [Jacky] instead reduces the scale of his interpretation and relies on cardstock as the primary construction material. His experience with papercraft typography leads to a design that anyone with an Exacto knife and a slice of patience should find manageable. [Jacky] ignores the Exacto option, however, and cuts his pieces with a tool we saw earlier this year: the Silhouette Portrait.

The clock’s electronics include an Arduino Uno, a servo motor controller, twenty-eight servos and an RTC breakout board that handles timekeeping. Each servo drives its own segment by sliding a paperclip forward or backward inside a small, hollow aluminum rod. Though we’re still holding out for a video of the finished papercraft build, you can watch a video of Aronson’s original clock after the break and see what inspired [Jacky’s] design.

Need another clock to envy? Last month’s build by [ebrithil] uses twenty-two servos to individually spin the segments. If you prefer that your clocks light up, [Aaron’s] o-scope transformation has you covered.

Continue reading “An Elegant Timepiece From Paper And A Fistful Of Servos”

Traffic Light Cufflinks

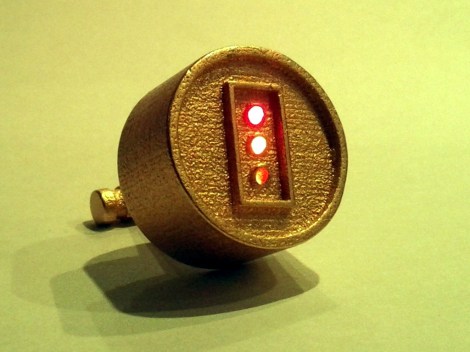
[Brendan Sleight] has been hard at work on this wearable piece of tech. He doesn’t wear much jewelry, but a wedding ring and some cufflinks are part of his look. To add some geek he designed a set of cufflinks that function like traffic lights. Since he still had some program space left he also rolled in extra features to compliment the traffic light display.

That link goes to his working prototype post, but you’ll want to look around a bit as his posts are peppered with info from every part of the development process. The coin-sized PCB hiding inside the case plays host to a red, amber, and green surface mount LED. To either side of them you’ll find an ATtiny45 and a RV-8564-C2. The latter is a surface mount RTC with integrated crystal oscillator, perfect for a project where space is very tight.

The design uses the case as a touch sensor. Every few seconds the ATtiny wakes up to see if the link is being touched. This ensures that the coin cell isn’t drained by constantly driving the LEDs. The touch-based menu system lets you run the links like a stop light, or display the time, date, or current temperature. See a quick demo clip after the break.

Continue reading “Traffic Light Cufflinks”

Wiring Up A Lot Of LED Segment Displays

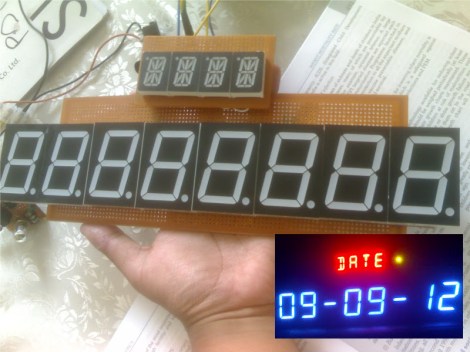
One look at this display and you know there’s a whole lot of pins that need to be wired up. Now look at what those display modules are mounted on. That’s right, [Kemley] is using point-to-point soldering to rig up this big display. It sports four sixteen segment modules on top for alpha-numeric information, and eight large seven segment modules for displaying numbers only.

We’re not certain as to how the electronics are arranged. When talking about the 16-segment modules he mentions that all four are in parallel with NPN transistors to switch the common anode of each. That’s easy enough to understand. But when you get a look at the transistor board you’ll see 24 of them in use. He’s included a 150 ohm resistor on the collector of each transistor. It must be set up to only allow one segment of each group to switch on at a time? We’d guess that each segment is divided into two (upper and lower pins are multiplexed separately), which would explain the double set of transistors. As for date and time, an Arduino board monitors a DS1307 RTC and manages the scanning of the display.

Wristwatch Measures Your Perception Of Time; Also Tells Time

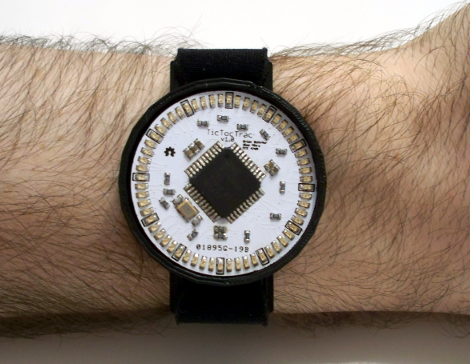
This wristwatch is hiding a lot of features in its hardware and its software. It’s called the TicTocTrac and it’s a Senior project for a pair of students at Cornell University. Judging from the sheer volume and quality of the project documentation we wonder if someone has a science writing career ahead of them? Be we digress… It’s a clock and we love it!

First off, this does more than just tell the time. In fact, that’s almost an ancillary function in this case. The wristwatch is more of a metering device to record your own time-based behaviors. Find yourself checking your watch frequently as the lunch break approaches? This watch records that activity and you can later graph the data. This allows you to analyze how you percieve the passage of time. The more often you check the time, the slower you feel time progressing. The documentation does a much better job of describing this than we have time for, so check it out.

On the hardware side of things we’re quite impressed. The housing is 3D printed. It hides two half-circle PCBs below the full-circle PCB face plate. The half-boards leave space for a tiny rechargeable battery, and host a vibrating motor and RTC chip. Instead of using buttons, there’s a piezo sensor which detects when you tap on the top of the watch.

Six-digit VFD Alarm Clock

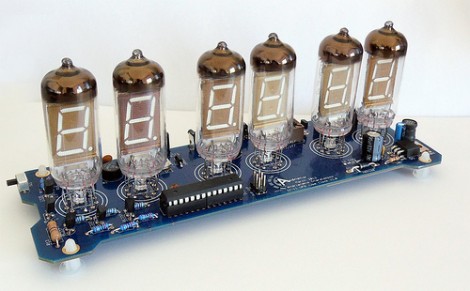
[Haris Andrianakis] just finished building this very clean-looking vacuum fluorescent display clock. It shows six digits using IV-11 tubes, and also has a half-dozen RGB LEDs to spice things up (check out the video after the break for an example). An ATmega168 drives the device, controlling the display and serving as a battery-backed real-time clock.

As with any tube-based clock there’s a fair amount of work that goes into driving the display. Each tube has a filament which requires 1.2V, and the segments themselves need 60 volts to light up. The microcontroller is not hard to protect; this is done with a series of transistor-based circuits used for switching. But the need for three voltages (to power microcontroller, filament, and segments) means a more complex PSU design. [Haris] chose to use a MAX6921 to simplify the process.

If you’re considering building something like this, we’d recommend looking for some 12-segment tubes. As we’ve seen before, they can display letters as well as numbers in case you wish to repurpose the device in the future.

Continue reading “Six-digit VFD Alarm Clock”

Auto-locking Pet Door Ensures That Your Outdoor Kitty Obeys Its Curfew

auto-locking-pet-door

If you’ve got a pet that roams freely in and out of your house, you may find yourself wanting to more closely regulate how they come and go. [tareker] was looking to keep his cat indoors at night when dangerous animals might be lurking in the neighborhood, but he didn’t want it to become a hassle.

He already had locking pet door on hand, which he hacked to regulate the egress and ingress of his cat automatically. He installed a pair of reed switches to determine if the door had been opened outwards (cat leaving) or inwards (cat returning), keeping track of the state using an Arduino Nano. A servo motor attached to the door’s frame locks the door whenever it detects the cat is safely inside after nightfall.

While he also added an RGB LED to reflect the status of the door, he’s considering connecting it to the Internet so that he can control and check the door from wherever he might be at the moment.