Abused Hard Drive Becomes POV Clock

We all know that there’s not much to do with an old hard drive. Once you render the platters unreadable and perhaps harvest those powerful magnets, there’s not much left of interest. Unless, of course, you turn the whole thing into a persistence-of-vision clock.

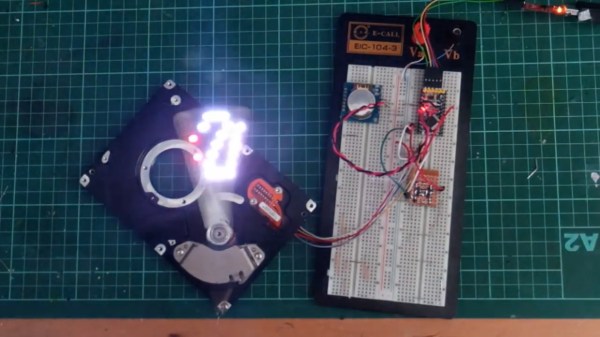
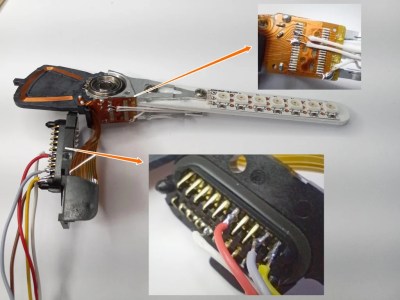
At least that’s what [Leo] did when he created “PendoLux”. The clock itself is pretty simple; like any POV project, it just requires a way to move an array of flashing LEDs back and forth rapidly enough that they can trick the eye into seeing a solid image. [Leo] put the read head mechanism of an old HDD into use for that, after stripping the platters and motor out of it first.

The voice coil and magnet of the head arm are left intact, while a 3D-printed arm carrying seven RGB LEDs replaces the old heads. [Leo] added a small spring to return the arm to a neutral position, and used an Arduino to drive the coil and flash the LEDs. Getting the timing just right was a matter of trial and error; he also needed to eschew the standard LED libraries because of his heavy use of interrupts and used direct addressing instead.

POV clocks may have dropped out of style lately — this hard drive POV clock and a CD-ROM version were posted years ago. But [Leo]’s clock is pretty good looking even for a work in progress, so maybe the style will be making a comeback.

Continue reading “Abused Hard Drive Becomes POV Clock”

Concentric Rings Keep This Calendar Perpetually Up To Date

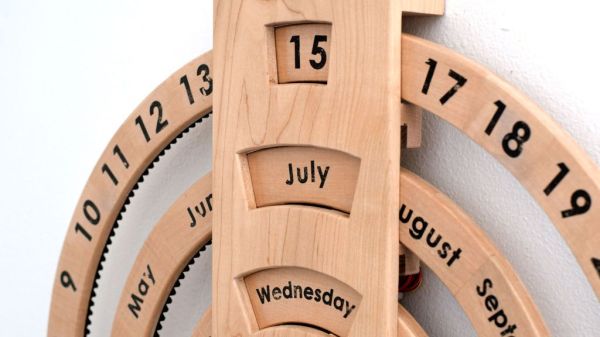
The variety of ways that people find to show the passage of time never ceases to amaze us. Just when you think you’ve seen them all, someone comes up with something new and unusual, like the concentric rings of this automated perpetual calendar.

What we really like about the design that [tomatoskins] came up with is both its simplicity and its mystery. By hiding the mechanism, which is just a 3D-printed internal ring gear attached to the back of each ring, it invites people in to check it out closely and discover more. Doing so reveals that each ring is hanging from a pinion gear on a small stepper motor, which rotates it to the right point once a day or once a month. Most of the clock is made from wood, with the rings themselves made using the same technique that woodturners use to create blanks for turning bowls — or a Death Star. We love the look the method yields, although it could be even cooler with contrasting colors and grains for each segment. And there’s nothing stopping someone from reproducing this with laser-cut parts, or adding rings to display the time too.

Another nice tip in this write up is the trick [tomatoskins] used to label the rings, by transferring laser-printed characters from paper to wood using nothing but water-based polyurethane wood finish. That’s one to file away for another day.

Cakeday Countdown Clock Is A Sweet Little Scroller

If you want strangers to give you well wishes on your birthday out in the real world, you have call attention to the occasion by wearing a pointy hat or a button that says ‘today is my birthday, gimme presents’. But on your reddit cakeday, aka the day you joined, you’re automatically singled out with the addition of a slice of 8-bit cake next to your username. The great thing about your cakeday is that you’re almost guaranteed to get some karma for once, especially if you make something cakeday related like [ScottyD]’s cakeday countdown clock. But plenty of people forget what their cakeday is and miss out on the fun.

This countdown clock works like you might expect — every day that isn’t your cakeday, a message scrolls by with the number of days remaining until your next one. When the big day comes, the message becomes TODAY IS YOUR CAKE DAY. Both messages are bookended by cute little pixelated cake slices that we would apply liberally to the day-of message if we made one of these.

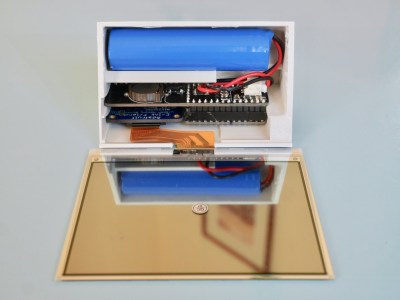
This simple but fun project shouldn’t put too big of a dent in your parts box, since it’s essentially an Arduino, a real-time clock module, and a 32×8 LED matrix to display the text. We love the uni-body design of the enclosure because it creates a shelf for the Arduino and gives easy access for gluing in the display from the rear. If for some reason you don’t reddit, then make one anyway and use it to count down to your IRL birthday or something. We’ve got the build video cut and plated for you to consume after the break.

We would understand if 2020 is supplying you with enough existential crises, but if not, consider building a clock that counts down the rest of your life expectancy.

Continue reading “Cakeday Countdown Clock Is A Sweet Little Scroller”

Measuring The Time Is A Breeze With This Air Flow Clock

If you’ve ever had surgery, and you’re over a certain age, chances are good you’re familiar with the dreaded incentive spirometer. It’s a little plastic device with one or more columns, each of which has a plastic ball in it. The idea is to blow into the thing to float the balls, to ensure that your lungs stay in good shape and reduce the chance of pneumonia. This unique air-powered clock reminds us a little of that device, without all the pain.

Like a spirometer, [Nir Tasher]’s clock has three calibrated tubes, each big enough to hold a foam ball loosely. At the bottom of each tube is a blower whose motor is under PWM control. A laser rangefinder sits below each ball and measures its height; the measurement is used by a PID loop to control the speed of each fan and thus the height of each ball. The video below shows that the balls are actually pretty steady, making the clock easy to read. It doesn’t, however, reveal what the clock sounds like; we’re going to go out on a limb here and guess that it’s pretty noisy. Still, we think it’s a fantastic way to keep time, and unique in the extreme.

[Nir]’s Air Flow clock is an early entry in the 2020 Hackaday Prize, the greatest hardware design contest on Earth. Everyone should enter something, or at least check out the cool things people are coming up with. It’s still early in the process, but there are so many neat projects already. What are you waiting for?

Continue reading “Measuring The Time Is A Breeze With This Air Flow Clock”

Dim Hallway Gets Lighting Upgrade

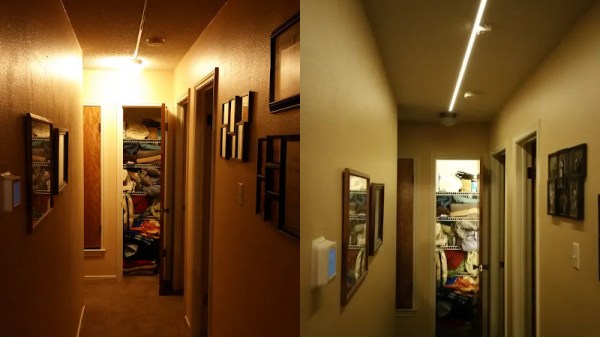
There’s nothing worse than a lightswitch that’s nowhere near where it should be, leaving you fumbling around in the dark. [supersquirrel72] had just this problem, and decided to put an Arduino to work instead.

Rather than using the original mains lighting that was poorly positioned and not enough to light the hall, instead 2 meters of white LED strip was chosen. The form factor is perfect for lighting a long, thin space – far better than running a series of seperate bulbs. The strip was rigged up to an Arduino Uno, that triggers the lights when movement is detected with a simple PIR motion sensor. After some feedback from the other occupants of the house, it was decided to tweak things further. An RTC was implemented to allow the Arduino to keep things dimmer after 9PM, so as to not wake others when making a trip to the kitchen for a midnight snack.

It’s a simple solution which brightens up the hallway nicely. We imagine this could just be the first step to a yet-more-integrated lighting solution in [supersquirrel72]’s house. Whether it’s IOT lights or something more festive, we can’t wait to see what’s next.

Passing The Time By Reading The Time

Binary clocks are a great way to confuse your non-technical peers when they ask the time from you — not that knowing about the binary system would magically give you quick reading skills of one yourself. In that case, they’re quite a nice little puzzle, and even a good alternative to the quarantine clocks we’ve come across a lot recently, since you can simply choose not to bother trying to figure out the exact time. But with enough training, you’ll eventually get the hang of it, and you might be in need for a new temporal challenge. Well, time to level up then, and the Cryptic Wall Clock built by [tomatoskins] will definitely keep you busy with that.

Example of the clock showing 08:44:47
Diagram of the clock showing 08:44:47

If you happen to be familiar with the Mengenlehreuhr in Berlin, this one here uses the same concept, but is built in a circular shape, giving it more of a natural clock look. And if you’re not familiar with the Mengenlehreuhr (a word so nice, we had to write it twice), the way [tomatoskins]’ clock works is to construct the time in 24-hour format by lighting up several sections in the five LED rings surrounding a center dot.

Starting from the innermost ring, each section of the rings represent intervals of 5h, 1h, 5m, 1m, and 2s, with 4, 4, 11, 4, and 29 sections per ring respectively. The center dot simply adds an additional second. The idea is to multiply each lit up section by the interval it represents, and add the time together that way. So if each ring has exactly one section lit up, the time is 06:06:02 without the dot, and 06:06:03 with the dot — but you will find some more elaborate examples in his detailed write-up.

This straightforward and yet delightfully unintuitive concept will definitely keep you scratching your head a bit, though you can always go weirder with the Roman numerals palm tree clock for example. But don’t worry, [tomatoskins] has also a more classic, nonetheless fascinating approach in his repertoire.

Servo-Powered 7-Segments Choreograph This Chronograph

Good clocks are generally those that keep time well. But we think the mark of a great clock is one that can lure the observer into watching time pass. It doesn’t really matter how technical a timepiece is — watching sand shimmy through an hourglass has its merits, too. But just when we were sure that there was nothing new to be done in the realm of 7-segment clocks, [thediylife] said ‘hold my beer’ and produced this beauty.

A total of 28 servos are used to independently control four displays’ worth of 3D-printed segments. The servos pivot each segment back and forth 90° between two points: upward and flat-faced to display the time when called upon, and then down on its side to rest while its not needed.

Circuit-wise, the clock’s not all that complicated, though it certainly looks like a time-consuming build. The servos are controlled by an Arduino through a pair of 16-channel servo drivers, divided up by HH and MM segments. The Arduino fetches the time from a DS1302 RTC module and splits the result up into four-digit time. Code-wise, each digit gets its own array, which stores the active and inactive positions for each servo. Demo and full explanation of the build and code are waiting after the break.

When it comes to 7-segment displays, we say the more the merrier. Here’s a clock that uses pretty much all of them.

Continue reading “Servo-Powered 7-Segments Choreograph This Chronograph”