An Arduino Controller For Hot Air Handles

In general, the cost of electronic components and the tools used to fiddle with them have been dropping steadily over the last decade or so. But there will always be bargain-hunting hackers who are looking to get things even cheaper. Case in point, hot air rework stations. You can pick up one of the common 858D stations for as little as $40 USD, but that didn’t keep [MakerBR] from creating an Arduino controller that can be used with its spare handles.

Now to be fair, it doesn’t sound like price was the only factor here. After all, a spare 858D handle costs about half as much as the whole station, so there’s not a lot of room for improvement cost-wise. Rather, [MakerBR] says the Arduino version is designed to be more efficient and reliable than the stock hardware.

The seven wires in the handle connector have already been mapped out by previous efforts, though [MakerBR] does go over the need to verify everything matches the provided circuit diagrams as some vendors might have fiddled with the pinout. All the real magic happens in the handle itself, the controller just needs to keep an eye on the various sensors and provide the fan and heating element with appropriate control signals. An Arduino Pro Mini is more than up to the task, and a custom PCB makes for a fairly neat installation.

This isn’t the first time we’ve seen somebody replace the controller on one of these entry-level hot air stations, but because there are so many different versions floating around, you should do some careful research before cracking yours open and performing a brain transplant.

Continue reading “An Arduino Controller For Hot Air Handles”

Single Piece 3D-Printed PCB Vise

Making full use of the capabilities and advantages of 3D printing requires a very different way of thinking compared to more traditional manufacturing methods. Often we see designs that do not really take these advantages into account, so we’re always on the lookout for interesting designs that embrace the nature of 3D-printed parts in interesting ways. [joopjoop]’s spring-loaded PCB vise is one such ingenious design that incorporates the spring action into the print itself.

This vise is designed to be printed as a single piece, with very little post-processing required if your printer is dialed in. There is a small gap between the base plate and the springs and clamping surfaces that need to be separated with a painters knife or putty knife. Two “handles” have contours for your fingers to operate the clamping surfaces. It opens quickly for inserting your latest custom PCB.

PLA can be surprisingly flexible if the right geometry is used, and these springs are an excellent example of this. In the video below [Chuck Hellebuyck] does a test and review of the design, and it looks like it works well for hand soldering (though it probably won’t hold up well with a hot air station). Last month our own [Tom Nardi] recently reviewed a similar concept that used spiral springs designed into the printed part. While these both get the job done, [Tom’s] overall verdict is that a design like this rubber-band actuated PCB vise is a better long-term option.

It takes some creativity to get right, but printing complete assemblies as a single part, is a very useful feature of 3D printing. Just be careful of trying to make it the solution for every mechanical problem.

The Simplest TS100 Upgrade Leads Down A Cable Testing Rabbit Hole

By now, I must have had my Miniware TS100 soldering iron for nearly three years. It redefined what could be expected from the decent end of the budget soldering iron spectrum when it came on the market, and it’s still the one to beat even after those years. Small, lightweight, powerful, and hackable, it has even spawned direct imitations.

If the TS100 has a fault, it comes not from the iron itself but from its cable. A high-grade iron will have an extra-flexible PVC or silicone cable, but the TS100 does not have a cable of its own. Instead it relies on whatever cable comes on its power supply, which is frequently a laptop unit built with portable computing rather than soldering in mind. So to use it is to be constantly battling against its noticable lack of flexibility, a minor worry but one that I find irksome. I determined to find a solution, making a DC extension cable more flexible than that on my power supply. Continue reading “The Simplest TS100 Upgrade Leads Down A Cable Testing Rabbit Hole”

A Dead Macbook GPU Shouldn’t Stop You, With This BGA Soldering Hack

On some 2011 Macbook Pro models, there is a tendency for the Radeon GPU to fail. This should mean game over for the computer, but surprisingly salvation is offered by its having not one but two GPUs on board. The Intel processor also has a GPU, and Apple use a pile of logic in an FPGA to switch at will between them. The community have produced fresh FPGA code to revive a dead Mac on its Intel GPU, but at the expense of losing brightness control. [Ayilm1] has brought back the brightness with a clever BGA reworking hack that gains access to a brightness control line present on the Intel BD82HM65 Platform Controller Hub chip but not used in the Macbook.

We’re used to impressive soldering work here at Hackaday, and we’ve seen our share of wiring direct to the balls on an upturned BGA chip. This is a similar idea but at another level, as a section of the top insulation on an in-place BGA is removed to expose the microvia above the ball carrying the required signal. A tiny wire is soldered to the exposed pad and taken to a piece of copper tape stuck down to provide mechanical strength, and a piece of enameled copper wire is run from that to the other side of the PCB where lies its destination. It comes with FPGA code to take advantage of it, but even for non-Macbook owners, it’s an extremely impressive piece of work. It’s not the first fine-soldering Macbook fix we’ve seen, either.

Thanks [lightpink784] for the tip.

3D-Printed Tools Make Circuit Sculpture A Little Easier

Having the tools needed to do a job is a powerful thing. Having the tools needed to make more tools for doing cool things is even better, though, and that’s where [Jiří Praus] took things with this 3D-printed jig for making his blooming tulip circuit sculpture.

If you haven’t seen [Jiří]’s tulip, check out our coverage from back when he first built it. The brass wire and tube mechanism and some clever linkages let a single servo open the Neopixel-adorned petals at a touch. But what started as a one-off romantic gesture for his wife on Valentine’s Day became something more, and what was a labor of love turned into just labor very quickly. [Jiří]’s solution, explained in the brief video below, is a 3D-printed jig that holds all the wires that form the tulip petals locked into position. The wire that defines the spine of the petal goes into a groove and gets held down with removable clips. The edge wires are held by rotating clips, and the veins of the petals just lay in place in grooves. The area around each joint is hollowed out so [Jiří] can solder easily without melting the plastic jig.

The best part comes at the end, when it’s time to release the completed petal. For that, a tool with pins that looks a little like a hedgehog is inserted from below, and pins that fit into each joint’s hole pop the finished petal off. We can see how this tool would greatly increase the production of his tulips, so if that’s his goal, he’s on track.

If you’re into circuit sculpture, you’re in the right place. Check out [Mohit Bhoite]’s Supercon talk on the subject, or some more of the tools [Jiří] has come up with to improve his art.

Continue reading “3D-Printed Tools Make Circuit Sculpture A Little Easier”

Strike A Solder Joint Behind Enemy Lines

Imagine you’re out behind enemy lines in WW2, setting up demolition charges that may save the lives of your fellow soldiers. How do we make a solid connection between wires that will last? One of the solutions that were used by the OSS and SOE, the predecessors to the CIA and British Secret Service, were self soldering sleeves that could be lit like a match. [ElementalMaker] managed to get his hands on a box of these sleeves, and found that they work incredibly well, even after more than half a century.

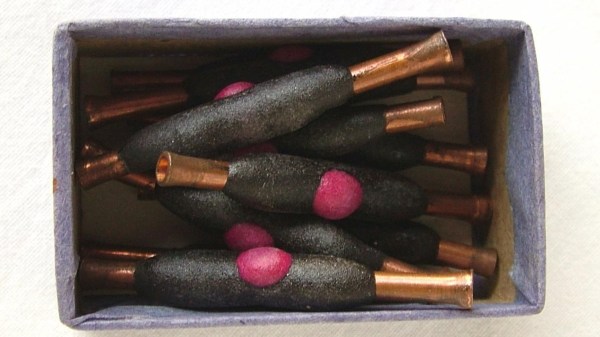
The sleeves consist of a copper tube with solder and flux inside, and wax-covered pyrotechnic compound around the outside. A small blob of striker compound similar to a match head is used to set the soldering process in motion, using the striker surface on the outside of the oversize matchbox that the sleeves are packed in. The pack that the [ElementalMaker] got was made in 1964, but is supposedly no different from those used in WW2.

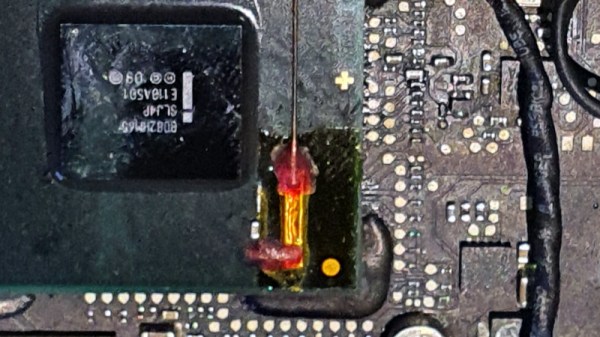
When lit, the pyrotechnic compound does not create any flame, it only smolders, probably to make it safer to use, and avoid detection at night. As the solder inside the sleeve melts, the operator is supposed to push the wires further into the tube to make them overlap. Although [ElementalMaker] didn’t cut open the sleeves, it definitely looks like a good joint, with solder oozing from the ends. Check out the video after the break! If you want to get your hands on a pack of these sleeves, it looks like a military surplus store in the UK managed to source some.

As horrible as war is, it’s undeniable that it inspires some creative innovations. Like soldiers hacking together parts from multiple guns to serve their immediate needs, or making guns shoot through spinning propellers without damaging them. Continue reading “Strike A Solder Joint Behind Enemy Lines”

Solder To Aluminum

If you’ve ever tried to solder to aluminum, you know it isn’t easy without some kind of special technique. [SimpleTronic] recently showed a method that chemically plates copper onto aluminum and allows you to solder easily. We aren’t chemists, so we aren’t sure if this is the best way or not, but the chemicals include salt, copper sulfate (found in pool stores), ferric chloride as you’d use for etching PCBs, and water.

Once you have bare aluminum, you prepare a solution from the copper sulfate and just a little bit of ferric chloride. Using salt with that solution apparently removes oxidation from the aluminum. Then using the same solution without the salt puts a copper coating on the metal that you can use for soldering. You can see a video of the process below.

Continue reading “Solder To Aluminum”