mohmmeter

The Mohmmeter: A Steampunk Multimeter

[Agatha] sent us this stunning multimeter she built as a gift for her mom. Dubbed the Mohmmeter — a playful nod to its ohmmeter function and her mom — this project combines technical ingenuity with heartfelt craftsmanship.

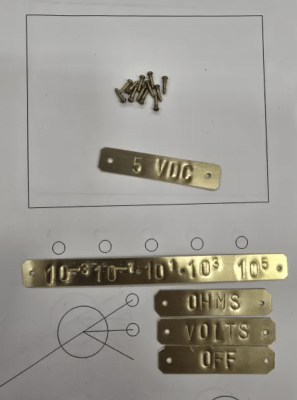
brass nameplates

At its core, a Raspberry Pi Pico microcontroller reads the selector knob, controls relays, and lights up LEDs on the front panel to show the meter’s active range. The Mohmmeter offers two main measurement modes, each with two sub-ranges for greater precision across a wide spectrum.

She also included circuitry protections against reverse polarity and over-voltage, ensuring durability. There was also a great deal of effort put into ensuring it was accurate, as the device was put though its paces using a calibrated meter as reference to ensure the final product was as useful as it was beautiful.

The enclosure is a work of art, crafted from colorful wooden panels meticulously jointed together. Stamped brass plates label the meter’s ranges and functions, adding a steampunk flair. This thoughtful design reflects her dedication to creating something truly special.

Want to build a meter for mom, but she’s more of the goth type? The blacked-out Hydameter might be more here style.

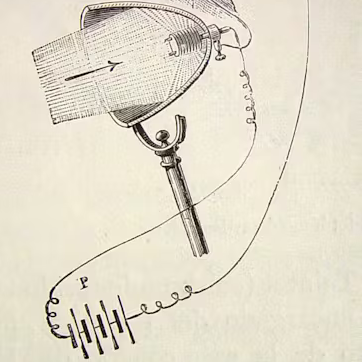
Engraving of Alexander Graham Bell's photophone, showing the receiver and its optics

Replica Of 1880 Wireless Telephone Is All Mirrors, No Smoke

If we asked you to name Alexander Graham Bell’s greatest invention, you would doubtless say “the telephone”; it’s probably the only one of his many, many inventions most people could bring to mind. If you asked Bell himself, though, he would tell you his greatest invention was the photophone, and if the prolific [Nick Bild] doesn’t agree he’s at least intrigued enough to produce a replica of this 1880-vintage wireless telephone. Yes, 1880. As in, only four years after the telephone was patented.

It obviously did not catch on, and is not the sort of thing that comes to mind when we think “wireless telephone”. In contrast to the RF of the 20th century version, as you might guess from the name the photophone used light– sunlight, to be specific. In the original design, the transmitter was totally passive– a tube with a mirror on one end, mounted to vibrate when someone spoke into the open end of the tube. That was it, aside from the necessary optics to focus sunlight onto said mirror. [Nick Bild] skips this and uses a laser as a handily coherent light source, which was obviously not an option in 1880. As [Nick] points out, if it was, Bell certainly would have made use of it.

Bell's selenium-based photophone receiver.
The photophone receiver, 1880 edition. Speaker not pictured.

The receiver is only slightly more complex, in that it does have electronic components– a selenium cell in the original, and in [Nick’s] case a modern photoresistor in series with a 10,000 ohm resistor. There’s also an optical difference, with [Nick] opting for a lens to focus the laser light on his photoresistor instead of the parabolic mirror of the original. In both cases vibration of the mirror at the transmitter disrupts line-of-sight with the receiver, creating an AM signal that is easily converted back into sound with an electromagnetic speaker.

The photophone never caught on, for obvious reasons — traditional copper-wire telephones worked beyond line of sight and on cloudy days–but we’re greatful to [Nick] for dredging up the history and for letting us know about it via the tip line. See his video about this project below.

The name [Nick Bild] might look familiar to regular readers. We’ve highlighted a few of his projects on Hackaday before.

Continue reading “Replica Of 1880 Wireless Telephone Is All Mirrors, No Smoke”

Antique-Style GPS Looks Like Steampunky Fun

These days, turn-by-turn GPS navigation isn’t considered special anymore. It’s in every smartphone and most cheap rental cars, and thus everybody expects you to figure out where you’re going. If you want a simpler and less robust navigation experience, you might like to try the rather fancy RadioScout.

The RadioScout is a build from [hardlyhumanfx]—a group of engineers and artists that collaborate on fun and whimsical projects. It looks like some kind of steampunk compass, and it kind of is—but at heart, it’s powered by GPS.

You program the RadioScout using the buttons on the front panel and a rotary phone dial to enter the latitude and longitude of your destination. It then uses an internal GPS receiver to compare that with your current location, and calculates a direct bearing to where you want to go. This bearing is displayed with a large compass-like needle run by a stepper motor, and you you can use it to guide yourself onwards.

It’s an attractive build that uses lots of neat parts. The team interfaced a microcontroller with a GPS receiver, a rotary dial, and 7-segment LEDs for the latitude and longitude display. The very real bell is neat, too. The whole thing is wrapped up in a brass and wooden case that would make you a star at just about any sci-fi convention. The build video is a little vague on the finer details, but experienced makers will be able to figure out how it all works.

You can actually buy a RadioScout if it’s something you must have, but one suspects the Hackaday set would probably prefer the homebrew route.

Continue reading “Antique-Style GPS Looks Like Steampunky Fun”

SteamPunk Factory Comes To Life With An Arduino

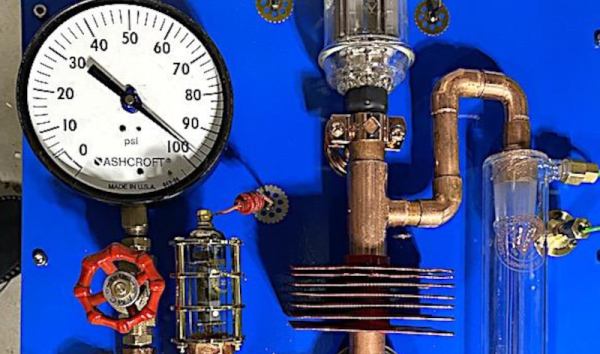
It is one thing to make an artistic steampunk display. But [CapeGeek] added an Arduino to make the display come alive. The display has plenty of tubes and wires. The pressure gauge dominates the display, but there are lots of other interesting bits. Check it out in the video below.

From the creator:

The back-story is a fictional factory that cycles through a multistage process. It starts up with lights and sounds starting in a small tube in one corner, the needle on a big gauge starts rising, then a larger tube at the top lights up in different colors. Finally, the tall, glass reactor vessel lights up to start cooking some process. All this time, as the sequence progresses, it is accompanied by factory motor sounds and bubbling processes. Finally, a loud glass break noise hints that the process has come to a catastrophic end! Then the sequence starts reversing, with lights sequentially shutting down, the needle jumps around randomly, then decreases, finally, all lights are off, indicating the factory shutting down.

Continue reading “SteamPunk Factory Comes To Life With An Arduino”

Dual Channel POV Display Also Has Nixie Tubes

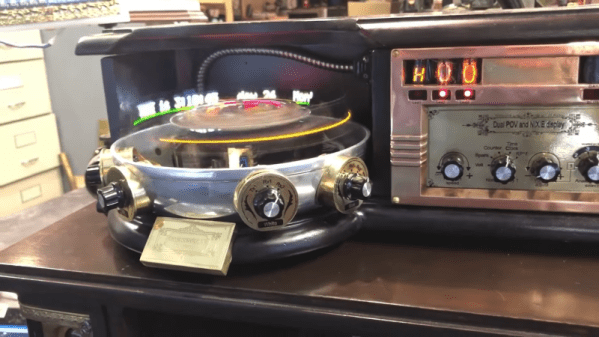
What’s a tachyscope? According to [Daniel Ross], it is an animated display from an alternate timeline circa 1880. The real ones, of course, didn’t have LEDs and microcontrollers. The control unit looks like an old-timey radio, complete with Nixie tubes. The spinning part has blue and white LEDs, each accepting data from one of two serial ports. You can select to see data from one port, the other, or both. You can see the amazing contraption in the video below.

The LEDs are surface mounted and placed inside a glass test tube. Each display has its own processor. The project appears to have a PCB, but it is just a piece of fiberglass with a color print on top of it and holes drilled with a rotary tool. The board has no actual conductors — everything is point-to-point wiring. The base of the unit is old cookware. The slip ring is pretty interesting, too. It uses an old video tape head, D-cell batteries cut up, and contacts from a relay.

You might remember [Daniel] from his steampunk Victorian computer project, including a punk teletype and a magic eye tube. If you want some theory on these kinds of displays, we can help. If you just want a simple display, it doesn’t have to cost much.

Continue reading “Dual Channel POV Display Also Has Nixie Tubes”

Typewriter Mashup Becomes 120-Year-Old Teletype

Vintage typewriters can be beautiful and elegant devices. But there’s a limit to their value if, as with the 1903 Remington owned by [Daniel Ross], they are fire-damaged and have a seized mechanism. What did he do with what was essentially a piece of scrap metal? Produce an unholy mashup of the vintage machine and a 1988 Sharp daisy wheel typewriter to make a steampunk-style teletype, of course!

Stripping down both machines was evidently no easy task, and the result he’s achieved has the Sharp’s printer mechanism at 90 degrees to its original orientation sitting below the roller in the space once occupied by the Remington’s type bars. We’re sad to see that the keyboard on the older machine appears to be inoperable, but on the other hand each letter does light up as it’s typed.

Meanwhile at the electronics side the components from the Sharp have been transferred to a custom PCB, and the whole can be driven from a 300-baud serial line. As can be seen from the video below the break, the result is an unholy love-child of two typewriters that could scarcely be more different, but somehow it works to make an impressive whole.

If this project looks a little familiar to Hackaday readers, it’s because we’ve mentioned it in passing before. It’s hooked up to his COSMAC Elf retrocomputer, and we saw it in passing a couple of years ago at a much earlier stage of construction before the custom PCB and light-up keyboard.

Continue reading “Typewriter Mashup Becomes 120-Year-Old Teletype”

The Times They Are A-Chaining

If [Bob Dylan] had seen [Pgeschwi]’s bike chain clock, it might have influenced the famous song. The clock uses a stepper motor and a bike chain to create a clock that has a decidedly steampunk vibe. Despite the low-tech look, the build uses 3D printing and, of course, a bike chain.

A full view of the bike chain clock.

The clock doesn’t just show the time. There is a contraption to show the day of the week, and a pendulum shows the current phase of the moon. The visible wiring is all old-school brass wire on the wood base. [Pgeschwi] is considering changing out all the 3D printed parts for brass ones, so this may be just an early prototype of the final product, but it still looks great.

The design used common tools, including Tinkercad and an online gear generation tool. There are a lot of details you wouldn’t suspect until you tried to build something like this yourself. For example, making the chain reliably go in both directions required a timing belt to synchronize the top gears. Getting the numbers on the chain to pass by the gears.

It is hard to tell from the picture, but there’s an LED under the 10-minute marks that shows the unit’s digits of the time. There are no markings for it yet,  but in the picture, the time is actually 4:09.

We love unusual clocks, and we see plenty of them. From Fibonacci clocks to magnetic field line clocks, we love them all.