Wimshurst

3D Printed Wimshurst Machine

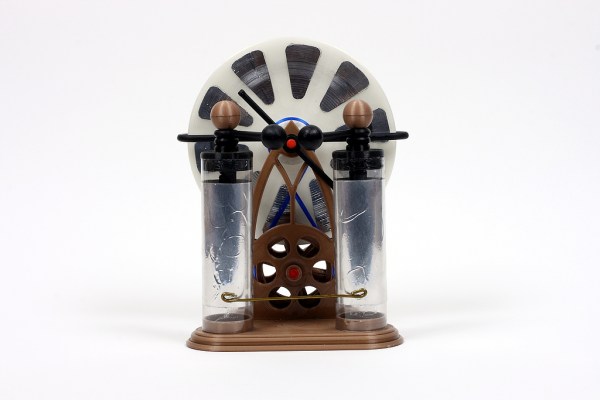
Steampunk extraordinaire [Jake von Slatt] has released his latest creation. This time he’s built a Wimshurst machine from mostly 3D printed parts. The Wimshurst machine is an electrostatic generator and was originally invented in the late 1800’s by James Wimshurst. It uses two counter-rotating disks to generate an electrostatic charge which is then stored in two Leyden jars. These jars are also connected to a spark gap. When the voltage raises high enough, the jars can discharge all at once by flashing a spark across the gap.

[Jake’s] machine has a sort of Gothic theme to it. He designed the parts using Autodesk’s 123D Design. They were initially printed in PLA. Skate bearings were used in the center of the disks to ensure a smooth rotation. The axle was made from the fiberglass shaft of a driveway reflector. The vertical supports were attached the base with machine screws.

The Leyden jars were made from sections of clear plastic tube. The caps for the jars were 3D printed and are designed to accept a short length of threaded 1/8″ pipe. Copper wire was used for the interior contacts and are held in place with electrical tape. The metal sectors on each disk were made from pieces of cut aluminum tape.

You may be wondering how this machine works if it’s almost entirely made out of plastic. [Jake] actually painted most of the parts with a carbon paint. This makes them electrically conductive and he can then use the parts to complete electrical circuits. Unfortunately he found this to be rather ineffective. The machine does work, but it only produces sparks up to 1/2″ in length. For comparison, his other machine is capable of 6″ sparks using similar sized Leyden jars.

[Jake] actually tried rebuilding this project using ABS, thinking that the PLA may have been collecting moisture from his breath, but the result is still only 1/2″ sparks. He suspects that the bumpy surface of the plastic parts may be causing the charge to slowly leak away, preventing a nice build up. He’s released all of his designs on Thingiverse in case any other hackers want to give it a whirl.

Hackaday Links Column Banner

Hackaday Links: November 2, 2014

Russians blowing up capacitors! As we all know, electronics only work because of blue smoke. [kreosan] is releasing this blue smoke from a few hundred caps. Fun times, even if they are a large number of inert tube shields in their collection of caps.

[mayhugh1] over on the home model engine machinist forum has built an 18 cylinder radial engine. It’s based on the Hodgson 9-cylinder radial engine that has been around for a while. The crank case is machined from a 5″ diameter rod of aluminum. There’s a Picassa album of the engine being constructed as well.

[Richard] wanted a Minecraft server, but not just any Minecraft server; this one demanded a custom case. A grass block was the inspiration, acrylic the medium, and a quad-core Mini-ITX the guts of the project.

Halloween was last Friday, and as always the tip line filled up with costume builds. [Leif] built a Ghostbusters costume complete with Muon trap, [Jeff] printed out some steampunk post-apocolyptic goggles, and [Green Gentleman] made a death-a-corn, although we’re struggling to figure out why the last one isn’t called an acorn-‘o-lantern.

[Matthias Wandel], a.k.a. the woodgears.ca dude,  is well-known in certain circles for being a wizard of wood. One of the first projects that put him on the map was a pantorouter – a router to cut mortises and tenons. He’s going back to his roots and building a bigger version. This version uses models of routers that are available outside North America, and in the latest video [Matthias] has it dialed in very well.

The Open Source Remote Control was an entry for The Hackaday Prize that didn’t make the final cut. It’s now an indiegogo project, and has some really cool tech we can’t wait to see in mainstream RC transmitters.

Hackaday Links: September 7, 2014

Like Adventure Time? Make your own BMO! It’s a little more expressive than the Adafruit version we saw earlier due to the Nokia LCD. It’s got audio playback too so it can talk to football.

A few years ago, [Matt] made a meat smoker with a PID controller and an SSR. Now the same controller is being used as a sous vide. PID controllers: the most useful kitchen gadget ever.

[Josh] keeps his server in a rack, and lacking a proper cable management solution, this means his rack is a mess. He adapted some Dell wire management arms to his system, using a PCI card bracket to attach the arm to the computer.

[Dr. Dampfpunk] has a lot of glowey things on his Youtube channel

Another [Josh] built a 3D tracking display for an IMU. It takes data off an IMU, sends it over Bluetooth, and displays the orientation of the device on a computer screen. This device also has a microphone and changes the visualization in response to noises.

Remember the pile of failure in a bowl of fraud that is the Scribble pen? Their second crowdfunding campaign was shut down. Don’t worry; they’re still seeking private investment, so there’s still a chance of thousands of people getting swindled. We have to give a shout-out to Tilt, Scribble’s second crowdfunding platform. Tilt has been far more forthcoming with information than Kickstarter ever has with any crowdfunding campaign.

Arduino-Powered Steampunk Steam Gauge

steampunkGauge

[Murphy’s_Lawyer] had some empty space on the wall in his kitchen, so he decided to fill it with a whirring Steampunk gizmo: an Arduino-driven steam gauge.

The build began as an old 10″ Ashcroft pressure gauge sourced from eBay, which [Murphy’s_Lawyer] dissected to determine the state of its guts. Finding the gauge’s Bourdon tube intact, he got to work constructing a method of generating motion without the need for actual steam. The solution was to mount a continuous rotation servo between the tube and the case. The servo lacked the strength to flex the tube on its own, so [Murphy’s_Lawyer] fashioned a simple lever out of brass to help it along.

The electronics consist of an Arduino Uno and an accompanying homemade PCB. The code for the Uno generates random motion for twirling the servo, and three LEDs built into the face reflect values generated for speed, pause and run time. The final upgrade came in the form of a new dial face, which provides some updated text as well as a cutout square that lets you see the previously obscured gears in action. Check out the video below, then see another Steampunk overhaul: the Edwardian Laptop.

Continue reading “Arduino-Powered Steampunk Steam Gauge”

Copper Electroplating The Cheap And Safe Way

[A_Steingrube] has posted a guide to his favorite method of copper electroplating. Plating copper onto other metals is popular with the steampunk crowd, but it does have other uses. Copper plate is often used as a prep step for plating other metals, such as nickel and silver. It also (usually) increases the conductivity of the metal to be plated. [A_Steingrube] is using the copper acetate method of plating. What is somewhat novel about his method is that he chose to make his own electrolyte solution from household chemicals. The copper acetate is created by mixing distilled vinegar and household hydrogen peroxide in a 50/50 ratio. The mixture is heated and then a piece of copper scouring pad is placed in. The scouring pad is partially dissolved, providing copper ions, and turning the solution blue.

The next step is to clean the material to be plated. [A_Steingrube] uses Cameo Aluminum and Stainless cleaner for this, though we think any good degreaser will work. The actual electroplating process consists of connecting a piece of copper to the positive terminal of a 6 volt battery. Copper scouring pad is again used for its high surface area. The material to be plated is connected to the negative side of the battery. He warns to keep the solution and the material being plated in constant motion to avoid heavy “burn spots”, which can flake off after the plating process. The results speak for themselves. As with any bare copper material, the electroplated layer will quickly oxidize if not protected.

A Binary Clock That Uses Bulbs

Based on his username, [Horatius.Steam], it’s not a surprise that he calls this project a “SteamPunk” style binary clock. But we think using neon  glow lamps in this binary clock is more of mid-century modern proposition. Either way, the finished look is sure to make it a conversation piece for your home.

He doesn’t give all that much information on the bulbs themselves. They seem to be neon glow lamps along the lines of a Nixie tubes. It sounds like they just need mains power (based on the image annotations for the relay board). The high voltage is switched by that collection of solid state relays. The controller board includes a DCF radio whose antennae is seen just below the controller. This picks up an atomic clock signal from Frankfurt, Germany. We think it’s a nice touch that he included a mechanical relay to simulate a ticking sound. That and the bulbs themselves can be turned off using the two switches in the base of the clock.

This seems like a good time to direct your attention to an artistic take on a Nixie clock.


Steampunk Theremin Goggles

wearable-theremin-goggles

Lots of people build custom steampunk goggles, but most don’t implement any interactivity – they’re just an aesthetic accessory. [Sarah] recently decided to built a pair that, besides looking cool, would engage the wearer in creating sound. She accomplished this by integrating an optical theremin into their design.

To keep the build both affordable and wearable she researched simplified theremins, and eventually settled on creating a basic model that uses only a handful of components and two 555 timers. The main body of the goggles was constructed using mostly random mismatched pieces of metal and leather.  Mounted on the outer edge of each lens, there is a photo sensor and a corresponding slider control. Adjusting the slider alters the level of resistance, therein changing the pitch of the sound. The theremin will produce different pitches and octaves depending on how much light the sensors receive. So, the wearer, or a nearby friend, waves their hands around the wearers head to control it.

The speaker and volume knob are cleverly disguised as the two ‘lenses’. Rotating the volume knob lens adjusts an internal potentiometer that’s held in place by a custom laser etched piece of acrylic. To top it all off, she even designed her own PCB using Eagle.

Check out a video demonstration after the break.

Continue reading “Steampunk Theremin Goggles”