Solder stencil vacuu assist jig

Stencil Vacuum-Assist Helps Avoid The Heartbreak Of Smeared Solder Paste

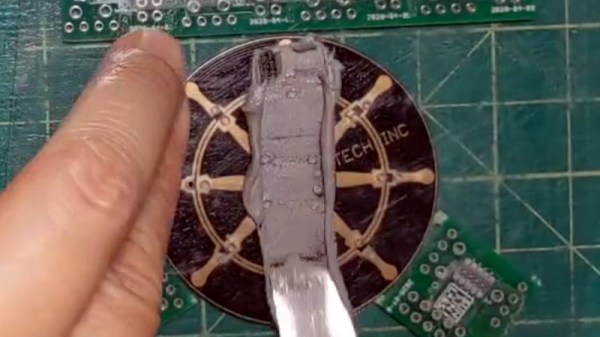
While using a stencil should make solder paste application onto PCBs a simple affair, there are a number of “gotchas” that make it more art than science. Luckily, there are tools you can build, like this 3D-printed vacuum-assist stencil jig, that take a little of the finesse out of the process.

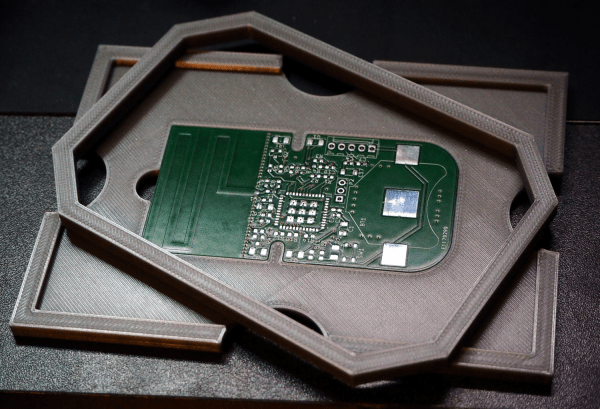
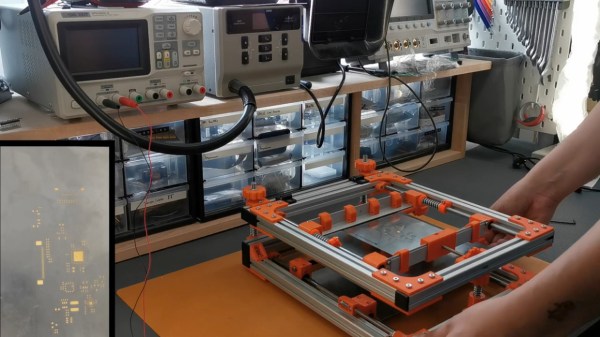
For those who haven’t had the pleasure, solder paste stencils are often used to make the job of applying just the right amount of solder paste onto the pads of a PCB, and only on the pads. The problem is that once the solder paste has been squeegeed through the holes in the stencil, it’s not easy to remove the stencil without smearing. [Marius Heier]’s stencil box is essentially a chamber that attaches to a shop vac, along with a two-piece perforated work surface. The center part of the top platform is fixed, while the outer section moves up and down on 3D-printed springs.

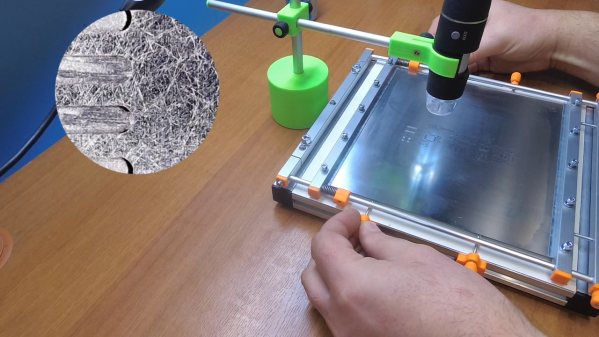
In use, the PCB is placed on the center fixed platform, while the stencil sits atop it. Suction pulls the stencil firmly down onto the PCB and holds it there while the solder paste is applied. Releasing the suction causes the outer section of the platform to spring up vertically, resulting in nice, neat solder-covered pads. [Marius] demonstrates the box in the video below, and shows a number of adapters that would make it work with different sized PCBs.

If you think you’ve seen a manual vacuum stencil box around here recently, you’re right — we featured one by [UnexpectedMaker] not too long ago.

Continue reading “Stencil Vacuum-Assist Helps Avoid The Heartbreak Of Smeared Solder Paste”

Streamline Your SMD Assembly Process With 3D-Printed Jigs

Your brand-new PCBs just showed up, and this time you even remembered to order a stencil. You lay the stencil on one of the boards, hold it down with one hand, and use the other to wipe some solder paste across…. and the stencil shifts, making a mess and smearing paste across the board. Wash, rinse (with some IPA, of course), repeat, and hope it’ll work better on the next try.

openscad window
A PCB jig generated by OpenSCAD

Maybe it’s time to try Stencilframer, a 3D-printable jig generator created by [Igor]. This incredibly useful tool takes either a set of gerbers or a KiCad PCB file and generates 3D models of a jig and a frame to securely hold the board and associated stencil. The tool itself is a Python script that uses OpenSCAD for all 3D geometry generation. From there, it’s a simple matter to throw the jig and frame models on a 3D printer and voilà!– perfectly-aligned stencils, every time.

This is a seriously brilliant script. Anyone whose gone through the frustration of trying to align a stencil by hand should be jumping at the opportunity to try this out on their next build. It could even be paired with an Open Reflow hot plate for a fully open-source PCB assembly workflow.

Continue reading “Streamline Your SMD Assembly Process With 3D-Printed Jigs”

Who Says Solder Paste Stencils Have To Be CNC Cut?

Imagine having a surface mount kit that you’d like to stencil with solder paste and reflow solder, but which doesn’t come with a solder stencil. That was what faced [Honghong Lu], and she rose to the challenge by taking a piece of PET sheet cut from discarded packaging and hand-cutting her own stencil. It’s not a huge kit, the Technologia Incognita 2020 kit, but her home-made stencil still does an effective job.

So how does one create a solder stencil from household waste? In the video we’ve put below the break, she starts with her packaging, and cuts from it a square of PET sheet. It’s 0.24mm thick, which is ideal for the purpose. She then lays it over the PCB and marks all the pads with a marker pen, before cutting or drilling the holes for the pads. The underside is then sanded to remove protruding swarf, and the stencil can then be used in the normal way. She proves it by stenciling the solder paste, hand placing the parts, and reflowing the solder on a hotplate.

It’s clear that this is best suited to smaller numbers of larger components, and we’ll never use it to replace a laser-cut stencil for a thousand tiny 0201 discretes. But that’s not the point here, it’s an interesting technique for those less complex boards, and it’s something that can be tried by anyone who is curious to give stenciling and reflowing a go and who doesn’t have a project with a ready-cut stencil. And for that we like it.

Making your own stencils doesn’t have to include this rather basic method. They can be etched, or even 3D printed.

Continue reading “Who Says Solder Paste Stencils Have To Be CNC Cut?”

A Linear Stencil Clock Built For Quiet Operation

We around the Hackaday shop never get tired of seeing new ways to mark the passage of time. Hackers come up with all manner of interesting timekeeping modalities using every imaginable material and method of moving the mechanism once per whatever minimum time unit the hacker chooses to mark.

But honestly, there are only so many ways to make a clock, and while we’re bound to see some repeats, it’s still nice to go over old ground with a fresh approach. Take this linear sliding stencil clock for instance. [Luuk Esselbrugge] has included some cool design elements that bear a closer look. The video below shows that the display is made up of four separate stepper motors, each driving a vertical stencil via a rack-and-pinion mechanism. There a simple microswitch for homing the display, and a Neopixel for lighting things up.

The video below shows that the stencils move very, very slowly; [Luuk] says that this is to keep the steppers as quiet as possible. Still, this means that some time changes take more than a minute to accomplish, which is a minor problem. The Neopixel also doesn’t quite light up just one digit, which should be a pretty easy fix for version 2. Still, even with these issues, we like the stately movements of this clock, and appreciate [Luuk]’s attempts to make it easier to live with.

Don’t let the number of clocks you see on these pages dissuade you from trying something new, or from putting your twist on an old design. Start with fridge magnets, an old oscilloscope, or even a bevy of steel balls, and let your imagination run wild. Just make sure to tell us all about it when you’re done.

Continue reading “A Linear Stencil Clock Built For Quiet Operation”

This Four-Axis Stencil Printer Is The Ultimate In SMD Alignment Tools

Here at Hackaday we love all kinds of builds, and we celebrate anytime anyone puts parts together into something else. And while we love the quick and dirty builds, there’s just something about the fit and finish of this four-axis SMD stencil printer that really pushes our buttons.

This build comes to us from [Phillip], who like many surface-mount users was sick of the various tape-and-PCB methods that are commonly used to align the solder stencil with the PCB traces. His solution is this fully adjustable stencil holder made from aluminum extrusions joined by 3D-printed parts. The flip-up frame of the device has a pair of clamps for securely holding the stainless steel stencil. Springs on the clamp guide rods provide some preload to keep the stencil taut as well as protection from overtensioning.

The stencil can move in the X-, Y-, and Z-axes to line up with a PCB held with 3D-printed standoffs on a bed below the top frame. The bed itself rotates slightly to overcome any skew in alignment of the PCB. [Phillip] was aghast at the price of an off-the-shelf slew-ring bearing for that axis, but luckily was able to print up some parts and just use simple roller bearing to do the same thing for a fraction of the cost. The frame is shown in use below; the moment when the pads line up perfectly through the stencil holds is oddly satisfying.

This puts us in mind of a recent, similar stencil printer we covered. That one was far simpler, but either one of these beats the expedient alignment methods hands down.

Continue reading “This Four-Axis Stencil Printer Is The Ultimate In SMD Alignment Tools”

Adjustable Jig Eases PCB Stencil Alignment Process

PCB stencils make application of solder paste a snap, but there’s a long, fussy way to go before the paste goes on. You’ve got to come up with some way to accurately align the stencil over the board, which more often than not involves a jury-rigged setup using tape and old PCBs, along with a fair amount of finesse and a dollop of luck.

Luckily, [Valera Perinski] has come up with a better way to deal with stencils. The Stencil Printer is a flexible, adjustable alignment jig that reduces the amount of tedious adjustment needed to get things just so. The jig is built mostly from aluminum extrusions and 3D-printed parts, along with a bunch of off-the-shelf hardware. The mechanism has a hinged frame that holds the stencil in a fixed position above a platen, upon which rests the target PCB. The board is held in place by clamps that ride on threaded rods; with the stencil flipped down over the board, the user can finely adjust the relative positions of the board and the stencil, resulting in perfect alignment. The video below is mainly a construction montage, but if you skip to about the 29:00 mark, you’ll see the jig put through its paces.

Granted, such a tool is a lot more work than tape and spare PCBs, but if you do a lot of SMD work, it may be worth the effort. It’s certainly less effort than a solder-paste dispensing robot.

Continue reading “Adjustable Jig Eases PCB Stencil Alignment Process”

Hackaday Links Column Banner

Hackaday Links: July 22, 2018

KiCad Version 5 has been released! Footprints are going to be installed locally, and the Github plugin for library management is no longer the default. You now have the ability to import Eagle projects directly, Eeschema has a better configuration dialog, better wire dragging, and Pcbnew now has complex pad shapes. The changelog also says they’ve gone from pronouncing it as ‘Kai-CAD’ to ‘Qai-CAD’.

Kids can’t use computers because of those darn smartphones. Finally, the world is ending not because of Millennials, but because of whatever generation we’re calling 12-year-olds. (I’m partial to Generation Next, but that’s only because my mind is polluted with Pepsi commercials from the mid-90s.)

Need a NAS? The Helios4 is built around the Marvell Armada 388 SoC and has four SATA ports, making it a great way to connect a bunch of hard drives to a network. This is the second run from the team behind the Helios, and now they’re looking to take it into production.

A while ago, [Dan Macnish] built Draw This, a camera that takes an image, sends it through artificial intelligence, and outputs a cartoon on a receipt printer. It’s a camera that prints pictures of cartoons. Of course, some people would want to play with this tech without having to build a camera from scratch, so [Eric Lu] built Cartoonify, a web-based service that turns pictures into cartoons.

Grafitti is fun to spell and fun to do, and for all the proto-Banskys out there, it’s all about stencils. [Jeremy Cook] did a quick experiment with a 3D-printed spray paint stencil. It works surprisingly well, and this is due to leveraging the bridging capability of his printer. He’s putting supports for loose parts of the stencil above where they would normally be. The test sprays came out great, and this is a viable technique if you’re looking for a high-quality spray paint stencil relatively easily.