Amateur radio is the only hobby that offers its licensed operators the chance to legally design, build, and operate high power radio transceivers connected to unlimited antenna arrays for the purpose of communicating anywhere in the world. The most complicated part of this communication system is the single-sideband (SSB) high frequency (HF) transceiver. In reality, due to the proliferation of low-cost amateur equipment, there only exists a very small group of die-hards who actually design, build from scratch, and operate their own SSB transceivers. I am one of those die-hards, and in this post I will show you how to get started.
transmitter80 Articles
Using RC Transmitters With Flight Simulators
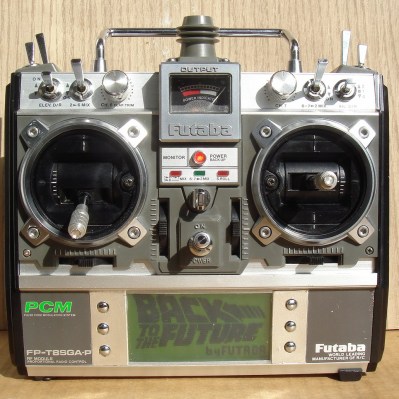
It’s winter, and that means terrible weather and very few days where flying RC planes and helicopters is tolerable. [sjtrny] has been spending the season with RC flight simulators for some practice time. He had been using an old Xbox 360 controller, but that was really unsuitable for proper RC simulation – a much better solution would be to use his normal RC transmitter as a computer peripheral.
The usual way of using an RC transmitter with a computer is to buy a USB simulator adapter that emulates a USB game pad through a port on the transmitter. Buying one of these adapters would mean a week of waiting for shipping, so [sjtrny] did the logical thing and made his own.
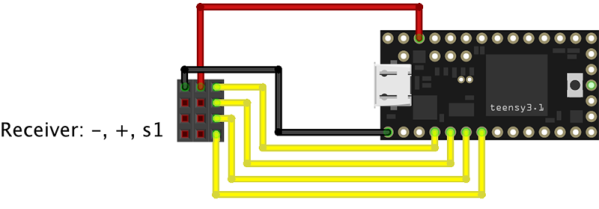
Normally, a USB simulator adapter plugs in to a 3.5mm jack on the transmitter used for a ‘buddy box’, but [sjtrny] had an extra receiver sitting around. Since a receiver simply outputs signals to servos, this provides a vastly simpler interface for an Arduino to listen in on. After connecting the rudder, elevator, aileron, and throttle signals on the receiver to an Arduino, a simple bit of code and the UnoJoy library allows any Arduino and RC receiver to become a USB joystick.
[sjtrny] went through a second iteration of hardware for this project with a Teensy 3.1. This version has higher resolution on the joystick axes, and the layout of the code isn’t slightly terrible. It’s a great project for all the RC pilots out there that can’t get a break in the weather, and is also a great use for a spare receiver you might have sitting around.
Complete FPV Setup For Your Drone
[Ioannis] is like anyone else who has a quadcopter or other drone. Eventually you want to sit in the cockpit instead of flying from the ground. This just isn’t going to happen at the hobby level anytime soon. But the next best option is well within your grasp. Why not decouple your eyes from your body by adding a first-person video to your quad?
There are really only four main components: camera, screen, and a transceiver/receiver pair to link the two. [Ioannis] has chosen the Sony Super HAD CCTV camera which provides excellent quality at the bargain basement price of just $25 dollars. A bit of patient shopping delivered a small LCD screen for just $15. The insides have plenty of room as you can see. [Ioannis] connected the screen’s native driver board up to the $55 video receiver board. To boost performance he swapped out the less-than-ideal antenna for a circular polarized antenna designed to work well with the 5.8 GHz radio equipment.
It seems that everything works like a dream. This all came in under $100 which is half of what some other systems cost without a display. Has anyone figured out a way to connect a transmitter like this to your phone for use with Google Cardboard?
$2 FM Transmitter For Raspberry Pi
We love re-purposed consumer gear. This project uses a cheap, discontinued cellphone gadget to create a Raspberry Pi controlled FM radio transmitter.
The Sony-Ericsson MMR-70 radio transmitter apparently used to connect to a cell phone and broadcast music. But the Walkman cellphones in question are a little bit old in the tooth, so one can buy the transmitter units for cheap on the resale market. What makes the transmitters even more interesting is that you can activate and deactivate the radio, change frequency or output power, and even send RDS station and song information.
It turns out (link in German) that the radios have an AVR ATMega32 microcontroller and a NS73 radio transmitter module, which can be entirely controlled over I2C. (Schematic here as PDF.) The units also have handy test points strewn all around. Once the test points were mapped out, one could completely ignore the on-board AVR microcontroller and control the FM transmitter module directly using the Raspberry Pi’s I2C outputs.
And that’s where [Manawyrm] stepped in. She wrote an I2C daemon for the Raspberry Pi that lets you control the FM transmitter via simple commands. All you have to do is solder up a bunch of test points, install [Manawyrm]’s software, write a batch script, and you’re on the air. For instance, this makes building a FM radio retransmitter for online streamed audio a one-day project. You can see his working example on youtube. Of course, you’ll want a web-based remote control interface to go with that.
If you’re interested in hacking along, and don’t have a Raspberry Pi application in mind, Sparkfun used to sell the NS73 radio transmitter so you can find lots of good information about the chip. We’d love to see a stand-alone broadcasting gizmo that actually utilizes the onboard AVR chip, but our hats are off to [Manawyrm] for making the Raspberry Pi version so accessible.
A Dead Simple, Well Constructed FM Transmitter
[Angelo] is only 15, but that doesn’t mean his fabrication skills are limited to Lego and K’Nex. He’s built himself an amazingly well constructed FM transmitter that’s powerful enough to be received a quarter mile away.
The FM transmitter circuit itself is based off one of [Art Swan]’s builds, but instead of the solderless breadboard construction you would expect to find in a small demo circuit, [Angelo] went all the way, etching his own PCB and winding his own coil.
Using photosensitized copper clad board, [Angelo] laid out the circuit with Fritzing, etched a board, and went at it with a drill. The components found in the transmitter are pretty standard and with the exception of the trimmer cap and electret mic, can be picked up in the parts drawers of any Radio Shack. He gets bonus points for using a 1/4 – 20 bolt for winding the coil, too.
The power supply for the transmitter is a single 9V battery, the battery connector being salvaged from a dead 9V. Awesome work, and for someone so young, [Angelo] already seems to have a grasp of all the random, seemingly useless information that makes prototyping so much easier. Video below.
Continue reading “A Dead Simple, Well Constructed FM Transmitter”
THP Entry: The Everything RC Transmitter
With few exceptions, most of The Hackaday Prize are things we really haven’t seen much of before: base-3 computers that have been relegated to the history books, extremely odd 3D printers, and fancy, new IoT devices are the norm. The OSRC is not a new project to us. (UPDATE: Looks like they deleted their project page. Here is a snapshot of it from the Internet Archive) We saw it once in 2011 and again a year later. What makes the OSRC an interesting project for The Hackaday Prize isn’t the fact that it’s the most advanced RC transmitter ever created. Creating that was evidently the easy part. The OSRC could use a big financial kick in the pants, and if [Demetris] wins, we’d guess he wouldn’t be taking that ride to space. Rather, he’d be taking the cash prize to get his ultimate transmitter into large-scale manufacturing and out into the wild.
While at first glance the base model OSRC seems expensive at about $6-700 USD, consider this: a six-channel transmitter from an excellent brand costs about $120 USD. Nine channels will run you about $400. The OSRC is a forty channel radio. The sticks are capable of force feedback, and of course the ‘pro’ model of the OSRC has that wonderful screen, capable of displaying video from an FPV camera, a GPS/map overlay, or an incredibly extensive telemetry display. There are multi-thousand dollar avionics for real airplanes out there that have a smaller feature set, and that’s not hyperbole.
A few months ago, [Demetris] was interviewed by the awesome people at Flite Test. That (highly suggested) video is embedded below.
The project featured in this post is an entry in The Hackaday Prize. Build something awesome and win a trip to space or hundreds of other prizes.
Easily Turn Your Raspberry Pi Into An FM Transmitter
Have you ever wanted to be your own radio DJ? [Kevin] has made it easier than ever with his Raspberry Pi FM Transmitter program. The program is written in C. [Kevin] has made source code is available along with a compiled binary.
PIFM allows you to load up any audio file and specify a frequency to transmit. The program will then use PWM to modulate the audio sample through the Pi’s GPIO4 pin. [Kevin] claims that the RasPi alone will only transmit around a 10 cm distance. He says that making a simple antenna out of a jumper wire can increase the distance to around 100 meters. All you have to do is hook up the wire to the GPIO4 pin to drastically increase the range.
The legality of such a transmitter will vary from place to place, so be sure to check out your local regulations before you go transmitting audio on regulated frequencies. If this kind of thing is interesting to you, you may want to investigate ham radio. It’s not all Morse code and old fogies. Some people claim it’s a hacker’s paradise.
[via Reddit]