Junkyard Crossbow Aims To Be A Car Killer

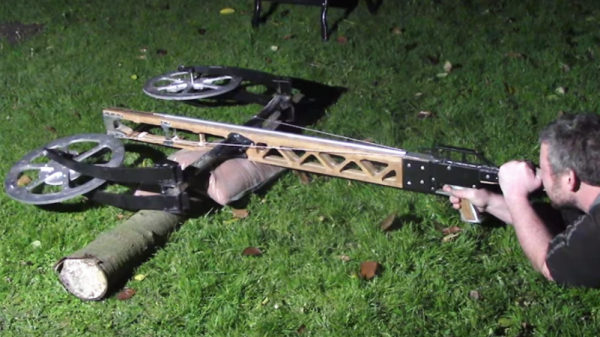
[James], aka [Turbo Conquering Mega Eagle], is not your typical Hackaday poster boy. Most of his builds have a  “Junkyard Wars” vibe, and he’d clearly be a good man to have around in a zombie apocalypse. Especially if the undead start driving tanks around, for which purpose his current anti-tank compound crossbow is apparently being developed.

At its present prototype phase, [James]’ weapon o’ doom looks more fearsome than it actually is. But that’s OK — we’re all about iterative development here. Using leaf springs from a Toyota Hi-Lux truck, this crossbow can store a lot of energy, which is amplified by ludicrously large aluminum cams. [James] put a lot of effort into designing a stock that can deal with these forces, ending up with a composite design of laminated wood and metal. He put a lot of care into the trigger mechanism too, and the receiver sports not only a custom pistol grip cast from aluminum from his fire extinguisher foundry, but a hand-made Picatinny rail for mounting optics. Test shots near the end of the video below give a hint at the power this fully armed and operational crossbow will eventually have. The goal is to disable a running car by penetrating the engine block, and we’re looking forward to that snuff film.

If rubber band-powered crossbows are more your speed, take you pick — fully automatic, 3D-printed, or human-launching.

Continue reading “Junkyard Crossbow Aims To Be A Car Killer”

Powerful Crossbow Is Almost Entirely 3D Printed

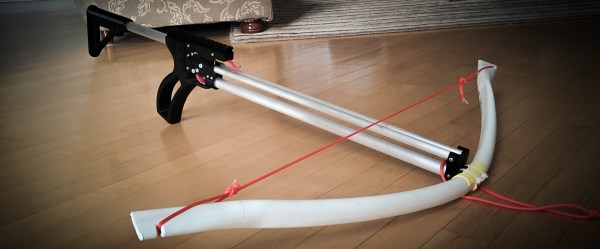
As it turns out, it’s not feasible to print an entire crossbow yet. But [Dan]’s crossbow build does a good job of leveraging what a 3D printer is good at. Most of the printed parts reside in the crossbow’s trigger group, and the diagrams in the write-up clearly show how the trigger, sear and safety all interact. Particularly nice is the automatic nature of the safety, which is engaged by drawing back the string. We also like the printed spring that keeps the quarrel in place on the bridle, and the Picatinny rail for mounting a scope. Non-printed parts include the aluminum tubes used in the stocks, and the bow itself, a composite design with fiberglass rods inside PVC pipe. The video below shows the crossbow in action, and it looks pretty powerful.

Actually, we’ll partially retract our earlier dismissal of entirely 3D-printed crossbows, but [Dan]’s version is a lot more practical and useful than this model. And for a more traditional crossbow design, check out this entirely hand-made crossbow.

Continue reading “Powerful Crossbow Is Almost Entirely 3D Printed”

Simple Photo Flash Trigger For Water Balloon Photography

Water Balloon Photography

There have been countless projects to make custom photo flash trigger circuits. Usually the circuits react to sound, triggering the camera flash at the moment a certain sound is triggered. That type of trigger can be used to detect the popping of a balloon or shattering of glass. Other triggers detect motion, like a projectile crossing a laser beam for example. [Udo’s] friend had a fun idea to take photos of water balloons popping. Unfortunately neither of those trigger methods would be well suited for this situation. That’s when [Udo] had to get creative.

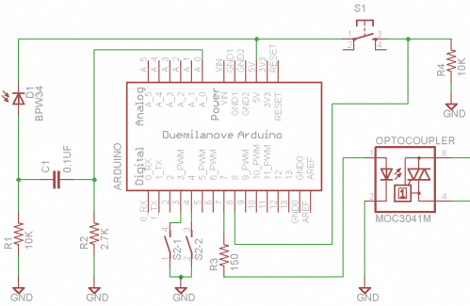
[Udo] built a unique trigger circuit that uses the water inside the balloon as the trigger. The core component of the circuit is an Arduino. One of the Arduino’s analog pins is configured to enable the internal pull-up resistor. If nothing else is connected to the pin, the Arduino will read 5 volts there. The pin is connected to a needle on the end of a stick. There is a second needle on the same stick, just a short distance away from the first. When these needles pierce the balloon’s skin, the water inside allows for a brief moment of conductivity between the two pins. The voltage on the analog pin then drops slightly, and the Arduino can detect that the balloon has popped.

[Udo] already had a flash controller circuit. He was able to trigger it with the Arduino by simply trying the flash controller’s trigger pin to one of the Arduino’s pins. If the Arduino pulls the pin to ground, it closes the switch on the flash controller and the flash is triggered. Both circuits must share a common ground in order for this to work.

All of the code for [Udo’s] project is freely available. With such spectacular photographs, it’s only a matter of time before we see more of these floating around.

Dual PIR Photo Trigger By Crossing The Streams

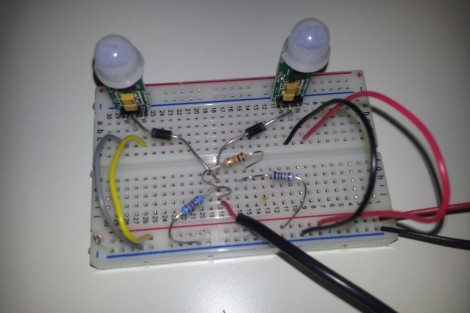
Motion sensing can be quite effective when taking photographs of wildlife. But how can one be sure that the motion was at the center of the frame? A PIR sensor picks up motion in its entire viewing range. It’s not really something that can be aimed. But if you use two PIR sensors you can monitor a focused area for motion.

The trick is to use a logic circuit. By building an AND gate you can trigger based on motion in the area which is overlapped by both of the sensors. In this case the AND gate is built from a voltage divider. The outputs of the PIR sensors are connected above and below the divider’s connection to the photo trigger. Both have a protection diode, and the divider is tuned so that both PIR outputs must come one in order to raise the trigger input above the voltage threshold. So much for never crossing the streams.

[via TriggerTrap]

High Speed Photography Controller Built To Catch Water Droplets

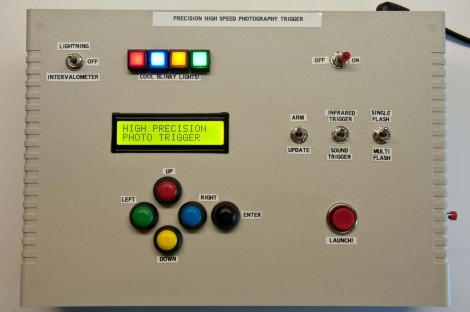
One high-speed photography controller to rule them all. If you’re looking to photograph droplets of water splashing on a still reservoir this is the ticket. But if you’re not, it still offers an incredible amount of flexibility for other high-speed needs. Inside you’ll find an Arduino Mega, which has plenty of room to bend to your will.

[Michael Ross] is the man behind this box. He wanted a system that did it all; timings, droplet control, camera shutter, etc. What you can’t see in the image above is the interface panel on the back of this enclosure (this shot shows the top of the box). The video after the break will give you a look at the overall setup. It has ports to control two different light sources, detectors to snap the images using an infrared sensor or via sound (we’re thinking bullet photography), and four ports to control solenoid valves.

He produced a mammoth PDF tutorial which will guide even the biggest noob through the entire build process. Find it at his site linked above.

Continue reading “High Speed Photography Controller Built To Catch Water Droplets”

Smart Flash Synchronization

[Max] designed this circuit to add smart flash synchronization to his photography arsenal. He did this because ‘dumb’ TTL based flashes won’t play nicely with more sophisticated systems like the Nikon Advanced Wireless Lighting. By building a microcontroller into the mechanism, he’s added functionality for several different scenarios, ensuring that he’ll never again have problems with early flash triggering. Now that the kinks have been ironed out in the prototype, the code and hardware can be migrated over to whatever microcontroller suits you.

Axe Your Camera (again!)

[Maurice] let us know that his latest photography tool for hackers, the Camera Axe 3.0, is now available. The original allowed you to trigger a high-speed flash and camera from a multitude of sensors, including light and sound. The new one does all that, but also: allows multiple cameras or multiple flashes, clean up of software to make it more user adaptable, and the best (arguably the most important) part – cheaper components! All that and more under the Creative Commons that we do love so much. Keep up the amazingly detailed and just pure awesome work [Maurice].