Junkyard Crossbow Aims To Be A Car Killer

[James], aka [Turbo Conquering Mega Eagle], is not your typical Hackaday poster boy. Most of his builds have a  “Junkyard Wars” vibe, and he’d clearly be a good man to have around in a zombie apocalypse. Especially if the undead start driving tanks around, for which purpose his current anti-tank compound crossbow is apparently being developed.

At its present prototype phase, [James]’ weapon o’ doom looks more fearsome than it actually is. But that’s OK — we’re all about iterative development here. Using leaf springs from a Toyota Hi-Lux truck, this crossbow can store a lot of energy, which is amplified by ludicrously large aluminum cams. [James] put a lot of effort into designing a stock that can deal with these forces, ending up with a composite design of laminated wood and metal. He put a lot of care into the trigger mechanism too, and the receiver sports not only a custom pistol grip cast from aluminum from his fire extinguisher foundry, but a hand-made Picatinny rail for mounting optics. Test shots near the end of the video below give a hint at the power this fully armed and operational crossbow will eventually have. The goal is to disable a running car by penetrating the engine block, and we’re looking forward to that snuff film.

If rubber band-powered crossbows are more your speed, take you pick — fully automatic, 3D-printed, or human-launching.

Continue reading “Junkyard Crossbow Aims To Be A Car Killer”

Students Build Electromagnetic Egg Drop Stand

The Egg Drop is a classic way to get students into engineering, fabrication, and experimentation. It’s a challenge to build a container to protect a raw egg from cracking when dropped from various heights.

Here’s a way to add some extra hardware to use when testing each entry. It’s an  electromagnetic drop stand built by several students along with [Tom Jenkins]. The stand doesn’t require anything too exotic, and it allows students to drop their eggs in a controlled manner for a fair competition. Along the way, they learn about circuits, electromagnets, and some other electronic concepts.

If this sounds familiar, it is because it builds on the egg drop project from the Teaching Channel we talked about before. The materials for that lesson have the basic outline of the drop stand, but the video really helps kids visualize it and build it.

Continue reading “Students Build Electromagnetic Egg Drop Stand”

This DIY Turntable Just Got Freaky Fresh

Photography turntables are made for both the precise and lazy. Whether you are concerned about the precision of consistent angles during a photo shoot or you simply do not want to stand there rotating a plate after every picture — yes, it does get old — a lazy susan style automatic photography turntable is the ticket. This automatic 360° design made over at circuito.io satisfies both of these needs in an understated package

The parts required to make this DIY weekend project are about as minimal as they get. An Arduino Uno controls it all with a rotary encoder for input and a character LCD to display settings. The turntable moves using a stepper motor and an EasyDriver. It even takes care of controlling the camera using an IR LED.

The biggest obstruction most likely to arise is creating the actual laser cut casing itself. The circuito team avoided this difficulty by using Pololu‘s online custom laser cutting service for the 4 necessary laser cut parts. After all of the components have been brought together, all that is left to do is Avengers assemble. They provide step by step instructions for this process in such a straightforward way that you could probably put this sucker together blindfolded.

We have seen some other inspired photography turntables on Hackaday before. [NotionSunday] created a true turntable hack based off of the eject mechanism of an old DVD-ROM drive. With the whole thing spinning on the head assembly of a VCR, this is the epitome of letting nothing go to waste. We also displayed another very similar Arduino Uno controlled turntable created 2 years ago by [Tiffany Tseng]. There is even a non-electronic version out there of a DIY 360° photography turntable that only uses a lazy susan and tape measure. All of these photography turntable hacks do the job wonderfully, but there was something that we liked about the clean feel of this one. All of the necessary code for this project has been provided over at GitHub. What is your favorite photography turntable?

A Few Caps For A Faster Multimeter

We just love it when someone takes apart a bench instrument. There is something about voiding a warranty and then making modifications that hits the spot and in a series of simple modifications, [Jack Zimmermann] dives into the guts if an Aneng AN8008.

The multimeter in question, the AN8008, is a low-cost true-RMS instrument that takes a bit longer to settle on the correct voltage reading than [Jack] would have liked. While poking around, he found that the DC rail inside the meter was host to noise spikes. He theorized that these were being coupled back from an element and proceeded to verify the decoupling arrangement.

The first step was to replace a Rubycon 100 uF capacitor with a Panasonic FM 100 µF which has an ESR of 0.4 Ohms, an improvement on the 1.4 Ohms of stock capacitor. Next came the addition of 0.1 µF, 1 µF and a 10 µF 0805 capacitors and finally a huge 1000 uF 10 V capacity which helped cut down the noise from 30 mV p-p to 3.6 mV p-p. And finally he added decoupling capacitors to the voltage reference chip in accordance with the manufacturer’s datasheet.

These small modifications improved the settling time as well as the stability of the measurements. [Jack] verifies the accuracy against a voltage reference and a bench meter which is good news considering the calibration certificate went out the door anyway.

This is one of the many DMM hacks we have covered in the past such as the Fluke 12E+ hack that enables hidden features though there may be other models out there with possible upgrades.

Modder Puts Computer Inside A Power Supply

When building a custom computer rig, most people put the SMPS power supply inside the computer case. [James] a.k.a [Aibohphobia] a.k.a [fearofpalindromes] turned it inside out, and built the STX160.0 – a full-fledged gaming computer stuffed inside a ATX power supply enclosure. While Small Form Factor (SFF) computers are nothing new, his build packs a powerful punch in a small enclosure and is a great example of computer modding, hacker ingenuity and engineering. The finished computer uses a Mini-ITX form factor motherboard with Intel i5 6500T quad-core 2.2GHz processor, EVGA GTX 1060 SC graphics card, 16GB DDR4 RAM, 250GB SSD, WiFi card and two USB ports — all powered from a 160 W AC-DC converter. Its external dimensions are the same as an ATX-EPS power supply at 150 L x 86 H x 230 D mm. The STX160.0 is mains utility powered and not from an external brick, which [James] feels would have been cheating.

For those who would like a quick, TL;DR pictorial review, head over to his photo album on Imgur first, to feast on pictures of the completed computer and its innards. But the Devil is in the details, so check out the forum thread for a ton of interesting build information, component sources, tricks and trivia. For example, to connect the graphics card to the motherboard, he used a “M.2 to powered PCIe x4 adapter” coupled with a flexible cable extender from a quaint company called Adex Electronics who still prefer to do business the old-fashioned way and whose website might remind you of the days when Netscape Navigator was the dominant browser.

As a benchmark, [James] posts that “with the cover panel on, at full load (Prime95 Blend @ 2 threads and FurMark 1080p 4x AA) the CPU is around 65°C with the CPU fan going at 1700RPM, and the GPU is at 64°C at 48% fan speed.” Fairly impressive for what could be passed off at first glance as a power supply.

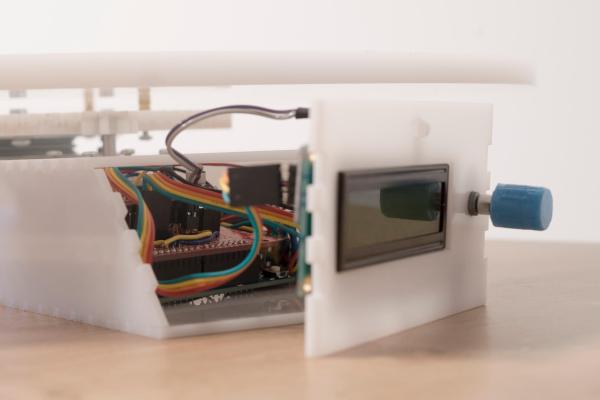
The two really interesting take away’s for us in this project are his meticulous research to find specific parts that met his requirements from among the vast number of available choices. The second is his extremely detailed notes on designing the custom enclosure for this project and make it DFM (design for manufacturing) friendly so it could be mass-produced – just take a look at his “Table of Contents” for a taste of the amount of ground he is covering. If you are interested in custom builds and computer modding, there is a huge amount of useful information embedded in there for you.

Thanks to [Arsenio Dev‏] who posted a link to this hilarious thread on Reddit discussing the STX160.0. Check out a full teardown and review of the STX160.0 by [Not for Concentrate] in the video after the break.

Continue reading “Modder Puts Computer Inside A Power Supply”

Retrotechtacular: How To Repair A Steam Locomotive

Steam locomotives, as a technological product of the 19th century, are not what you would imagine as fragile machines. The engineering involved is not inconsequential, there is little about them that is in any way flimsy. They need to be made in this way, because the huge energy transfer required to move a typical train would destroy lesser construction. It would however be foolish to imagine a locomotive as indestructible, placing that kind of constant strain on even the heaviest of engineering is likely to cause wear, or component failure.

A typical railway company in the steam age would therefore maintain a repair facility in which locomotives would be overhauled on a regular basis, and we are lucky enough to have a 1930s film of one for you today courtesy of the British London Midland and Scottish railway. In it we follow one locomotive from first inspection through complete dismantling, lifting of the frame from the wheels, detaching of the boiler, inspection of parts, replacement, and repair, to final reassembly.

We see steps in detail such as the set-up of a steam engine’s valve gear, and it is impressed upon us how much the factory runs on a tight time schedule. Each activity fits within its own time window, and like a modern car factory all the parts are brought to the locomotive at their allotted times. When the completed locomotive is ready to leave the factory it is taken to the paint shop to emerge almost as a new machine, ready for what seems like a short service life for a locomotive, a mere 130 thousand miles.

The video, which we’ve placed below the break, is a fascinating glimpse into the world of a steam locomotive servicing facility. Most Hackaday readers will never strip down a locomotive, but that does not stop many of them from having some interest in the process. Indeed, keen viewers may wish to compare this film with “A Study in Steel“, another film from the LMS railway showing the construction of a locomotive.

LMS Jubilee class number 5605, “Cyprus”, the featured locomotive in this film, was built in 1935, and eventually scrapped in 1964 as part of the phasing out of steam traction on British railways.

Continue reading “Retrotechtacular: How To Repair A Steam Locomotive”

A Giant Magellan Telescope Needs Giant Mirrors

The Giant Magellan Telescope doesn’t seem so giant in the renderings, until you see how the mirrors are made.

The telescope will require seven total mirrors each 27 feet (8.4 meters) in diameter for a total combined diameter of 24.5 meters. Half of an Olympic size pool’s length. A little over four times the diameter of the James Webb Space Telescope.

According to the website, the mirrors are cast at the University of Arizona mirror lab and take four years each to make. They’re made from blocks of Japanese glass laid out in a giant oven. The whole process of casting the glass takes a year, from laying it out to the months of cooling, it’s a painstaking process.

Once the cooling is done there’s another three years of polishing to get the mirror just right. If you’ve ever had to set up a metal block for precision machining on a mill, you might have an idea of why this takes so long. Especially if you make that block a few tons of glass and the surface has to be ground to micron tolerances. A lot of clever engineering went into this, including, no joke, a custom grinding tool full of silly putty. Though, at its core it’s not much different from smaller lens making processes.

The telescope is expected to be finished in 2024, for more information on the mirror process there’s a nice article here.