The Greengate DS:3 Part 2: Putting A Retro Sampler To Use

The Greengate DS:3 had been re-created in the form of the Goodgreat. Now [Bea Thurman] had to put it to useIf the Greengate DS:3 card was rare,  the keyboard was nearly impossible to find. After a long search, [Bea] bought one all the way from Iceland.  The card of course came courtesy of [Eric]. 

It was time to connect the two together.  But there was a problem — a big problem. The GreenGate has a DB-25 connected via a ribbon cable to the board’s 2×10 connector. The keyboard that shipped with those cards would plug right in.  Unfortunately, [Bea’s] keyboard had a DIP-40 IDC connector crimped on its ribbon cable.  What’s more the connectors for the sustain and volume pedals were marked, but never drilled out. The GreenGate silk screen was still there though. 

Maybe it was a prototype or some sort of modified hardware. Either way, the 40-pin DIP connector had to go if the keyboard ever were to work with the card. What followed were a few hours of careful wire tracing 

Continue reading “The Greengate DS:3 Part 2: Putting A Retro Sampler To Use”

Hackaday Links Column Banner

Hackaday Links: September 25, 2022

Looks like there’s trouble out at L2, where the James Webb Space Telescope suffered a mechanical anomaly back in August. The issue, which was just announced this week, involves only one of the six imaging instruments at the heart of the space observatory, known as MIRI, the Mid-Infrared Instrument. MIRI is the instrument on Webb that needs the coldest temperatures to work correctly, down to six Kelvins — we’ve talked about the cryocooler needed to do this in some detail. The problem has to do with unexpectedly high friction during the rotation of a wheel holding different diffraction gratings. These gratings are rotated into the optical path for different measurements, but apparently the motor started drawing excessive current during its move, and was shut down. NASA says that this only affects one of the four observation modes of MIRI, and the rest of the instruments are just fine at this time. So they’ve got some troubleshooting to do before Webb returns to a full program of scientific observations.

There’s an old saying that, “To err is human, but to really screw things up takes a computer.” But in Russia, to really screw things up it takes a computer and a human with a really poor grasp on just how delicately balanced most infrastructure systems are. The story comes from Moscow, where someone allegedly spoofed a massive number of fake orders for taxi rides (story in Russian, Google Translate works pretty well) through the aggregator Yandex.Taxi on the morning of September 1. The taxi drivers all dutifully converged on the designated spot, but instead of finding their fares, they just found a bunch of other taxis milling about and mucking up traffic. Yandex reports it has already added protection against such attacks to its algorithm, so there’s that at least. It’s all fun and games until someone causes a traffic jam.

Continue reading “Hackaday Links: September 25, 2022”

How The Dis-integrated 6502 Came To Be

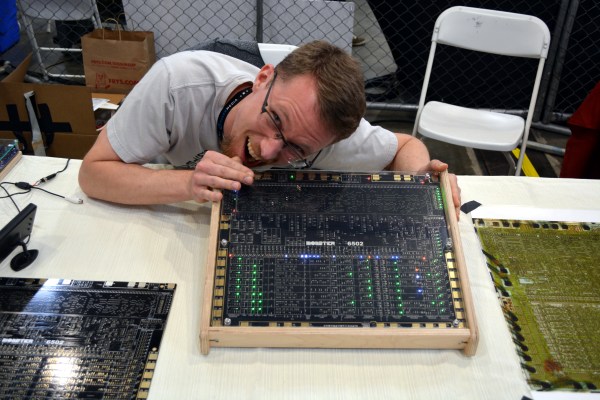
I made a bee line for one booth in particular at this year’s Bay Area Maker Faire; our friend [Eric Schlaepfer] had his MOnSter 6502 on display. If you missed it last week, the unveiling of a 6502 built from discrete transistors lit the Internet afire. At that point, the board was not fully operational but [Eric’s] perseverance paid off because it had no problem whatsoever blinking out verification code at his booth.

I interviewed [Eric] in the video below about the design process. It’s not surprising to hear that he was initially trying to prove that this couldn’t be done. Unable to do so, there was nothing left to do but devote almost six-months of his free time to completing the design, layout, and assembly.

What I’m most impressed about (besides just pulling it off in the first place) is the level of perfection [Eric] achieved in his design. He has virtually no errors whatsoever. In the video you’ll hear him discuss an issue with pull-up/pull-down components which did smoke some of the transistors. The solution is an in-line resistor on each of the replacement transistors. This was difficult to photograph but you can make out the soldering trick above where the 3-pin MOSFET is propped up with it’s pair of legs on the board, and the single leg in the air. The added resistor to fix the issue connects that airborne leg to its PCB pad. Other than this, there was no other routing to correct. Incredible.

The huge schematic binder includes a centerfold — literally. One of the most difficult pieces of the puzzle was working out the decode ROM. What folds out of this binder doesn’t even look like a schematic at first glance, but take a closer look (warning, 8 MB image). Every component in that grid was placed manually.

I had been expecting to see some tube-based goodness from [Eric] this year. That’s because I loved his work on Flappy Bird on a green CRT in 2014, and Battlezone on a tube with a hand-wound yoke last year. But I’m glad he stepped away from the tubes and created this marvelous specimen of engineering.

Update: Battlezone On Vector Display Step-by-Step

When we ran the story of Battlezone played on tube displays earlier this week there were immediately questions about recreating the hack. At the time the software wasn’t available, and there is also a bit of hardware hacking necessary to get the audio working. You asked and [Eric] from Tubetime delivered. He’s posted a pair of articles that show how to get an STM32F4 Discovery board to play the classic game, along with instructions to build the firmware.

The hardware hack in this case is untangling the pinout used on the discovery board. It seems that one of the lines needed to get sound working for this hack is tied to one of the two DACs. If you read the original coverage you’ll remember that both of the DACs are used to drive X and Y on the vector display. The image above shows a cut trace on the bottom of the board. You’ll then need to route that signal to an alternate pin by soldering a jumper wire from the chip to a resistor on the board.

This (as well as one other alteration that bridges two of the chip pins) is a great example of work you should be unafraid to do on your own dev boards. We’ve had to do it with the Launchpad boards to get at the functionality we needed. We’d like to hear your own epic stories of abusing dev boards to do your bidding. Let us know in the comments.

Battlezone Played On Vector Display With Hand-Wound Yoke

We’ve been admirers of the work [Eric] and friends have been doing over at TubeTime for years. One of the earliest we can remember is the decatron kitchen timer, and we still tell the story of [Eric] purposely leaving out button debouncing in order to make his vector flappy bird even harder.

TubeTime is back at it this year and we had the opportunity to speak with them at Bay Area Maker Faire. The group specializes in working with old tube displays and this year’s offering was spectacular in many ways. First off, the software side of things is an emulator running on an STM32 F4 Discovery board. The chips on these boards have a pair of 12-bit DACs which are driving the X and Y of the vector displays. Code to run the original ROMs was ported from existing projects, but the audio for the games was kind of a hack to get working.

This particular display is where things get really fascinating. The tube itself was originally manufactured as test equipment for television repairmen. What’s fascinating about this is that [Eric] had to rewind the deflection yokes himself to get it working again. Luckily he documented quite a bit about his initial research into this process and his experiments to remedy some distortion issues he encountered once it was working.

Make sure to head on over to TubeTime and read their overview of the Battlezone machine. After the break we’ve also embedded a few of our own pictures as well as the interview at BAMF.

Continue reading “Battlezone Played On Vector Display With Hand-Wound Yoke”