Breakout Board Becomes Pogo Pin Programmer

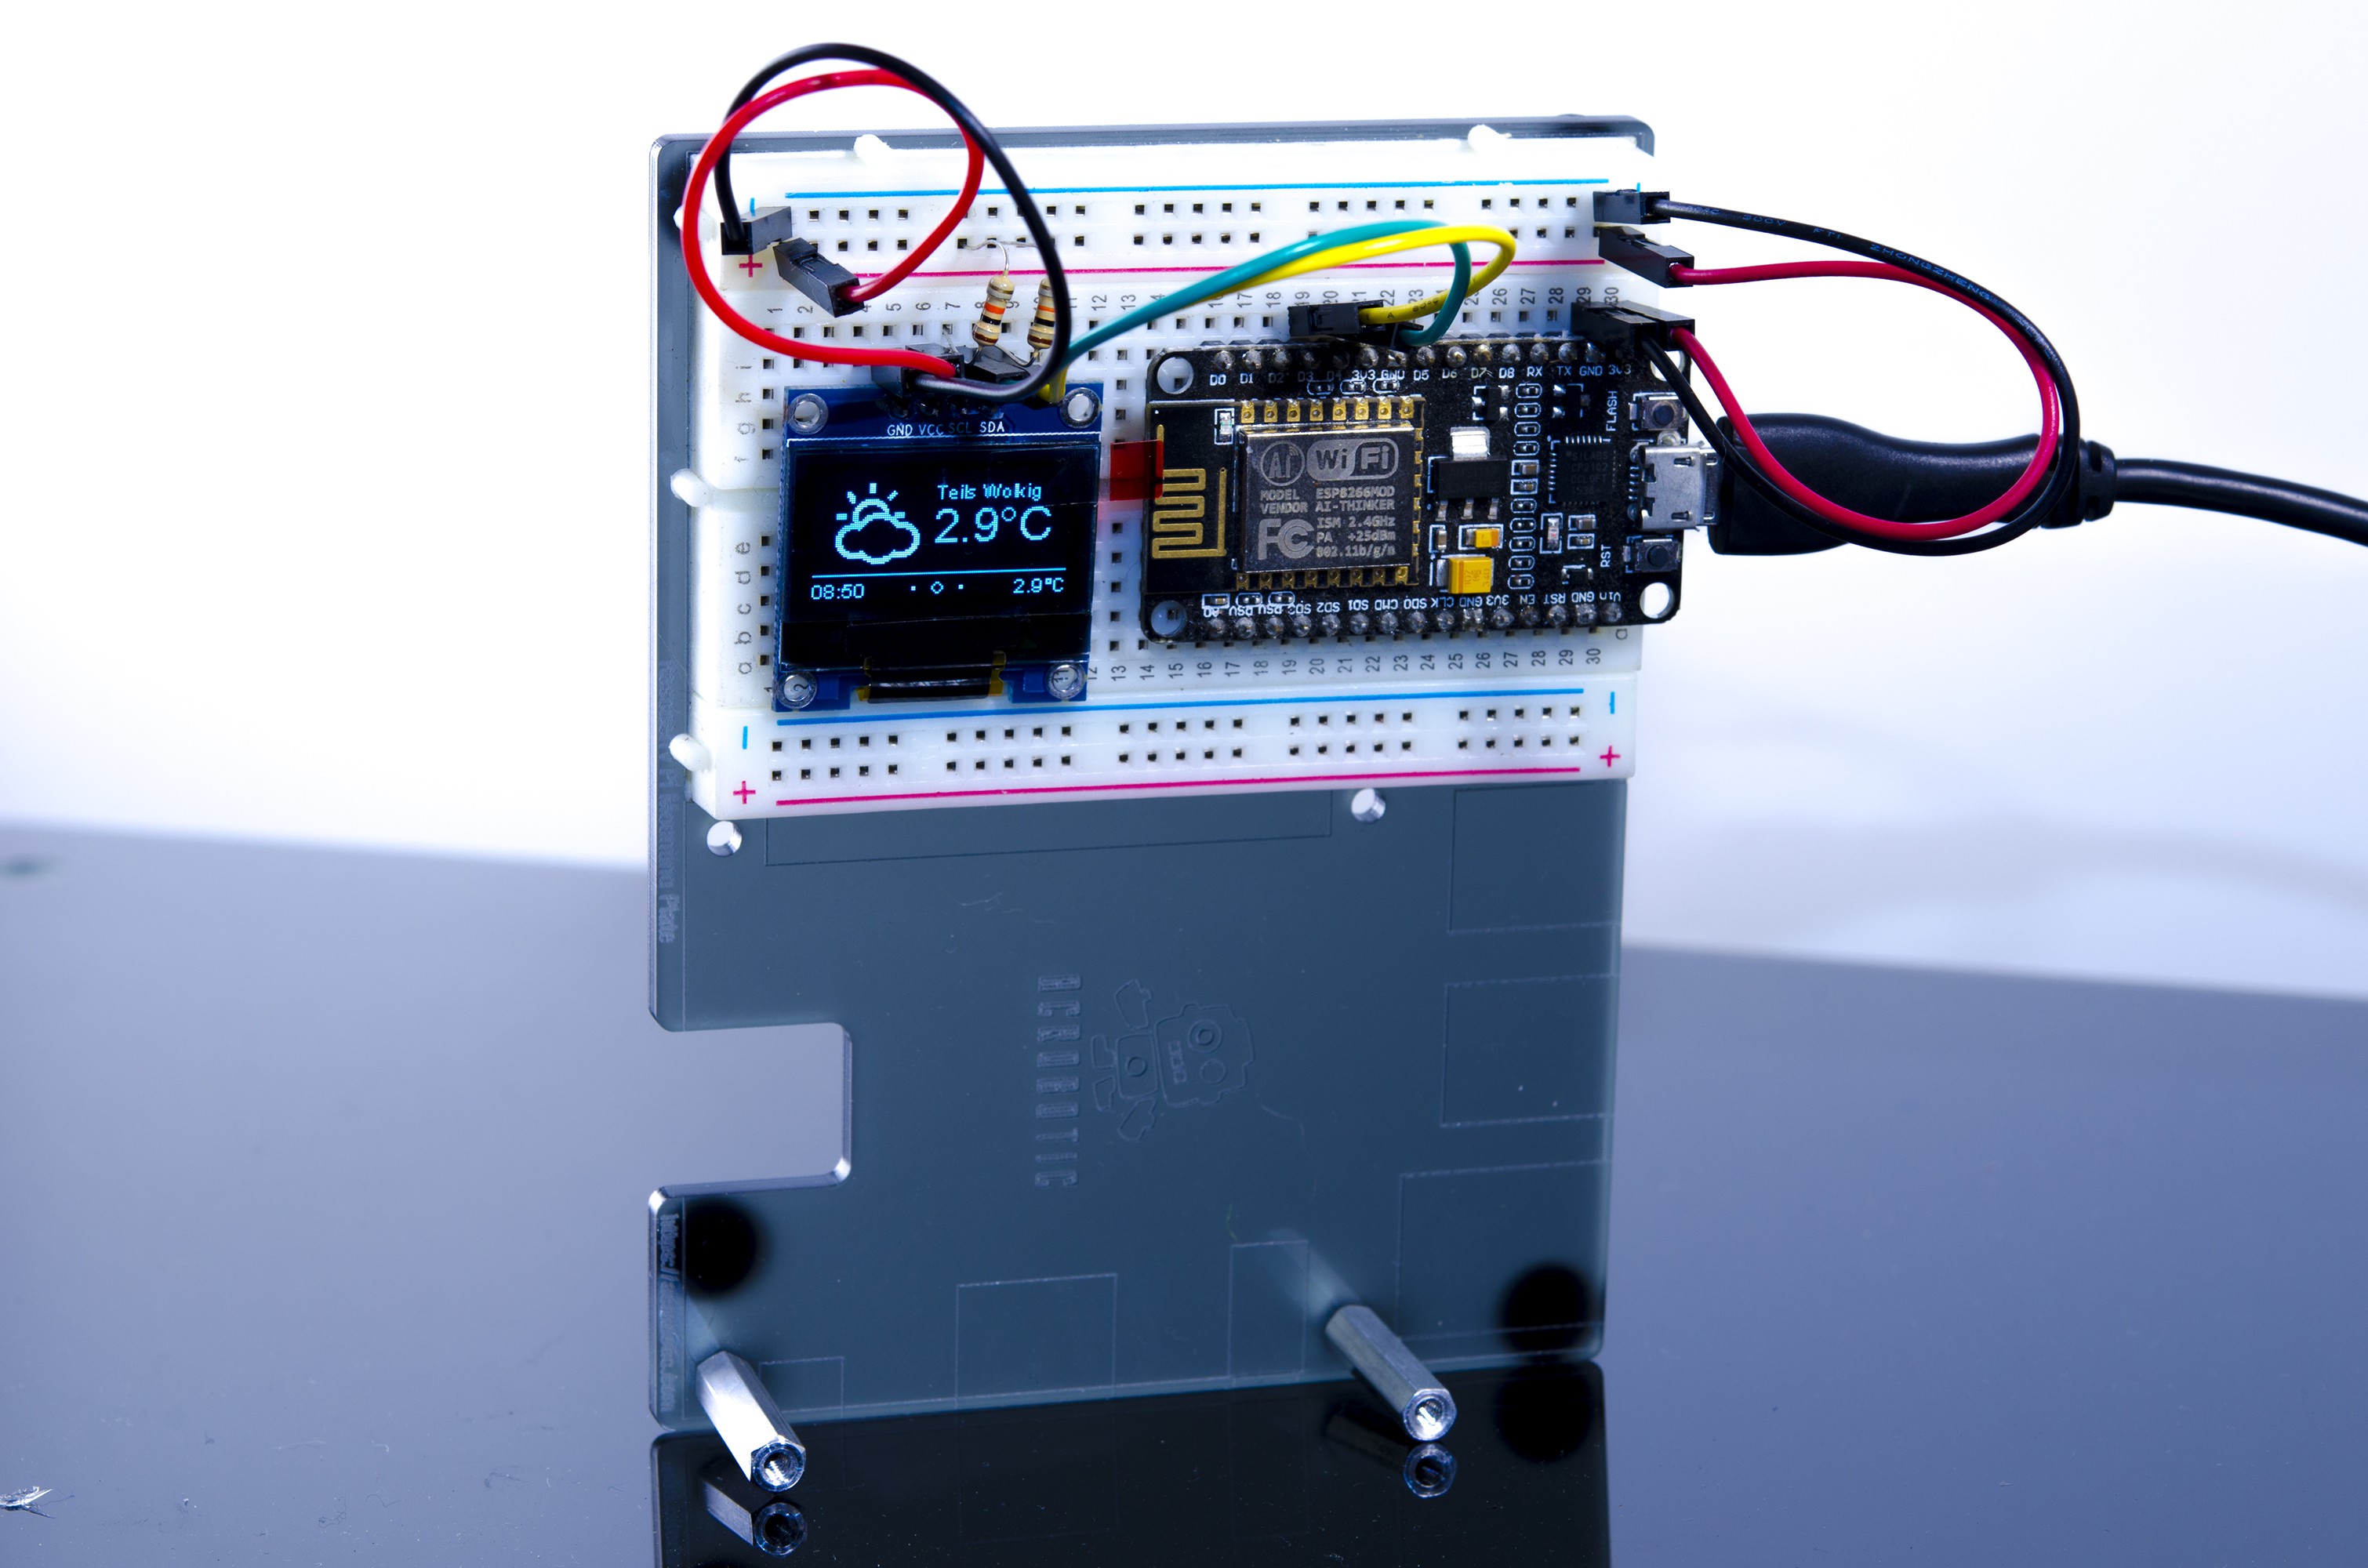
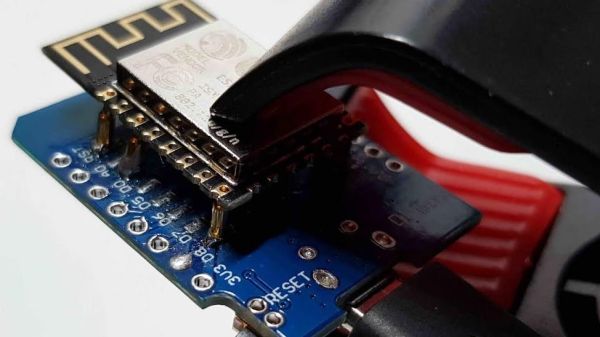
Making a programming jig becomes exponentially more difficult after two pins and who would even consider building one if they were not setting up more than twenty boards? If it were easy for novices to construct jigs, we might all have a quiver of them on the shelf next to our microprocessors. Honestly, a tackle box full of homemade programming fixtures sounds pretty chic. The next advantage to ditching the demo boards is that bare processors take up less room and don’t draw power for unnecessary components like unused voltage regulators and LEDs. [Albert David] improves the return-on-time-investment factor by showing us how to repurpose a WeMos board to program a bare ESP8266 module.

[Albert]’s concept can apply to many other surface-mount chips and modules. The first step is to buy a demo board which hosts a programmable part and remove that part. Since you’ve exposed some solder pads in the process, put pogo pins in their place. Pogo pins are small spring-loaded probes that can be surface mounted or through-hole. We’ve used them for programming gorgeous badges and places where the ESP8266 has already been installed. When you are ready to install your software, clamp your Franken-porcupine to the controller and upload like normal. Rinse, wash, repeat. We even get a view of the clamp [Albert] uses.

Better Debating Through Electronics

Watch any news panel show these days, and you’ll see that things can very quickly become unruly. Guests compete for airtime by shouting over one another and attempting to derail their opponent’s talking points. [cutajar.sacha] had encountered this very problem in the workplace, and set about creating a solution.

The result is the Debatable Deliberator, and it combines the basics of “Talking Stick” practices with behavioural training through humiliation. Two participants each wear a headband, fitted with electronics. The holder of the magic ball may speak for as long as the timer counts down. If their opponent speaks during this time, their headband reprimands them with gentle slapping to the face. If the holder speaks over their assigned time, they are similarly treated to mechanical slapping.

It’s an amusing way to help police a discussion between two parties, and it’s all made possible with a trio of WeMos D1 ESP8266 boards. The headbands act as clients, while the ball acts as a server and keeps track of how many times each speaker has broken the rules.

WiFi projects such as this one have become much easier in the past few years with the wide availability of chips like the ESP8266. Of course, if you need more grunt, you can always upgrade to the ESP32.

Continue reading “Better Debating Through Electronics”

The Internet Of Claw Machines

Remote administration of machines is a very useful tool for all manner of commercial, industrial, and home applications. Now, it’s available for claw machines, too – thanks to [Code Your Venture Free].

The project uses an ESP32 board that includes a battery case on the back for a standard 18650 lithium battery that makes getting small battery powered projects off the ground much easier. You can find them at Banggood and AliExpress, but we’re not 100% sure that they’re kosher because they’re branded WeMos, but don’t show up on WeMos’ website or their official online retail store. Anyway, it’s a cute idea to strap a LiPo cell to the back like that. Let us know in the comments if you know more.

Back to the claw! An off-the-shelf thumbstick is then connected to the ESP32 which is programmed to send packets over the network to control the claw machine, which is wired up with its own network-connected microcontroller. It’s all wrapped up in the usual 3D printed case.

The one problem that the project doesn’t solve is delivery – how does the remote player, whether on the local network or online, collect their prize? We can only assume some cutting-edge form of drone delivery is the solution. It’s not the first remote claw machine we’ve seen, either. Video after the break.

Continue reading “The Internet Of Claw Machines”

Checking The Weather Without A Window

Making a weather display is great because it’s a simple project that shows off some skills and has an obvious daily use. So [ACROBOTIC Industries] decided to make an easy kit for the Hackaday Prize to make weather displays even more accessible.

Calling it the ESPecter, [ACROBOTIC Industries] wanted to make this a simple project for anyone, regardless of skill with a soldering iron or Arduino toolkit. So they decided to base the guts on common components that can be put together easily, specifically a Wemos Mini D1 with an OLED shield as a bright display. They also designed a cool tiltable 3D-printed enclosure for this small device so that you can orient it to your eye level.

ESPecter breadboarded prototype.

While they already have a breadboarded prototype, and a 3D printed case, some software work remains to make the project really shine. They plan to add nice features like a web interface to configure location and network information, alerts, additional locations, and historical weather data. They also want to create a weather library to display well on a low-resolution screen and add battery operation.

We look forward to seeing the final version later in the Hackaday Prize!

This isn’t the first weather project we’ve seen around here. Other variants include mirror weather displays, an ESP8266-based weather monitoring station, a very low-power weather station, and this roundup of weather displays which might give you some inspiration.

ESP8266 Beacon Announces Your Arrival

It used to be people were happy enough to just have to push a button in their car and have the garage door open. But pushing a button means you have to use your hands, like it’s a baby toy or something. We’re living in the 21st century, surely there must be a better way! Well, if you’ve got a home automation system setup and a spare ESP8266 laying around, [aderusha] may have your solution with MQTTCarPresence.

The theory of operation here is very clever. The ESP8266 is powered via the in-dash USB port, which turns on and off with the engine. When the engine is started, the ESP8266 is powered up and immediately connects to the WiFi network and pushes an MQTT message to Home Assistant. When Home Assistant gets the notification that the ESP8266 has connected, it opens the garage door.

When [aderusha] drives out of the garage and away from the house, the ESP8266 loses connection to the network, and Home Assistant closes the door. The same principle works when he comes home: as the car approaches the house it connects to the network and the garage door opens, and when the engine is shut off in the garage, the door closes again.

The hardware side of the setup is really just a WeMos D1 mini Pro board, though he’s added an external antenna to make sure the signal gets picked up when the vehicle is rolling up. He’s also designed a very slick 3D printed case to keep it all together in a neat little package.

We’ve covered automated entry systems based on the ESP8266 before, though usually the ESP stays at home. Be sure to check out the awesome series [Elliot Williams] has on the wonders of MQTT if you’re looking to setup your own automation system.

Solenoids And Servos For Self Actuated Switches

The new hotness in home automation is WiFi controlled light switches. Sure, we’ve had computer-controlled home lighting for literally forty years with X10 modules, but now we have VC money pouring into hardware, and someone needs to make a buck. A few years ago, [Alex] installed WiFi switches in a few devices in his house and discovered the one downside to the Internet of Light Switches — his light switches didn’t have a satisfying manual override. Instead of cursing the darkness for want of an Internet-connected candle, [Alex] did the only sensible thing. He installed electromagnets, solenoids, and servos behind the light switches in his house.

The exact problem [Alex] is trying to solve here is stateful wall switches. With an Internet-connected lamp socket, the wall switch no longer functions. Being able to turn on a light when your phone is out of charge is something we all take for granted, and the solution is, of course, to have Internet-connected switches.

Being able to read the state of a switch and send some data off to a server is easy. For this, [Alex] used a WeMos D1 mini, a simple ESP8266-based board. The trick here, though, is stateful switches that can toggle themselves on and off. This is a mechanical build, and although self-actuated switches that can flip up and down by computer command exist, they’re horrifically expensive. Instead, [Alex] went the DIY route, first installing electromagnets behind the switches, then moving to solenoids, and finally designing a solution around four cheap hobby servos. The entire confabulation stuffed into a 2-wide electrical box consists of two switches, four hobby servos, the D1 mini, and an Adafruit servo driver board.

The software stack for this entire setup includes a NodeJS server connected to Orvibo Smart Sockets over UDP. Also on this server is a WebSocket server for browser-based clients that want to turn the lights on and off, a FauXMo server to turn the lights on and off via an Amazon Echo via WeMo emulation, and an HTTP server for other clients like [Alex]’ Pebble Watch.

This is, without question, the most baroque method of turning a lamp on and off that we’ve ever seen. Despite this astonishing complexity, [Alex] has something that is also intuitive to use and, to borrow an applhorism, ‘Just Works’. With a setup like this, anyone can flick a switch and turn a lamp on or off over the Internet, or vice-versa. This is the best Home Automation build we’ve ever seen.

You can check out [Alex]’ video demo of his build below, or his GitHub for the entire project here.

Continue reading “Solenoids And Servos For Self Actuated Switches”

Hackers Vs. Mold: Building A Humidistat Fan

Having a mold problem in your home is terrible, especially if you have an allergy to it. It can be toxic, aggravate asthma, and damage your possessions. But let’s be honest, before you even get to those listed issues, having mold where you live feels disgusting.

You can clean it with the regular use of unpleasant chemicals like bleach, although only with limited effectiveness. So I was not particularly happy to discover mold growing on the kitchen wall, and decided to do science at it. Happily, I managed to fix my mold problems with a little bit of hacker ingenuity.

Continue reading “Hackers Vs. Mold: Building A Humidistat Fan”