Skateboarding is a sport that was born of hacking. The identity of the person who first nailed roller skate wheels to a board with a milk crate box is lost to history. Those crate scooters were a staple of the 1940’s and 1950’s neighborhoods. Everyone built their own scooter, so the designs evolved. Eventually the milk crates disappeared. At some point, surfers realized that they could use these wheeled boards to surf the concrete jungle. Things just took off from there. Skateboarding is now a multi-billion dollar industry, but at its heart there are still hackers trying out new designs. This week’s Hacklet is all about skateboarding projects.
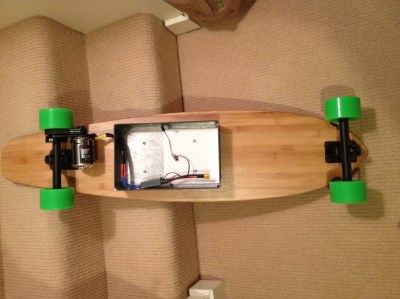 We start with [brian.rundle] and Electric Longboard. [Brian] built his board using trucks and mechanical parts from a DIY skateboard online shop. The motor is a brushless outrunner R/C plane motor from HobbyKing. Batteries are of the LiPo variety. An Arduino Nano provides the PWM signal which drives the Electronic Speed Control (ESC). Throttle control is via RF link using the popular Nordic Semi NRF2401. [Brian] is focusing on building a safe skateboard. He designed it to carry two batteries, though only one is in use at a time. Rather than use a switch, he’s created a fool-proof system with arming plugs and jumpers. Each battery has its own arming plug. There is one jumper, so only one battery can be connected to the board at a time.
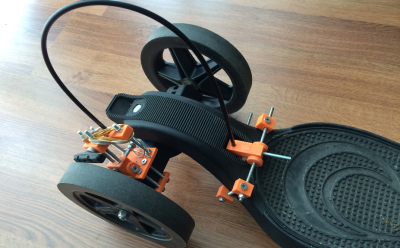 Next up is [suiram21] with Longboard Brake. Downhill longboarding can be a dangerous sport. Running downhill at 40MPH or more with no brakes makes for quite an adrenaline rush. [suiram21] loves longboarding but wanted the safety of having a brake if and when he needed it. He started with a Onda board, which is a longboard with large diameter wheels. He 3D printed brackets for a cable actuated braking system. The brake is activated by stepping on a lever at the rear of the board. A lever presses a bicycle brake pad into the inside edge of the tire. This brings the board to a gentle stop. [suiram21] is thinking of adding a second brake to the other wheel to increase braking authority.
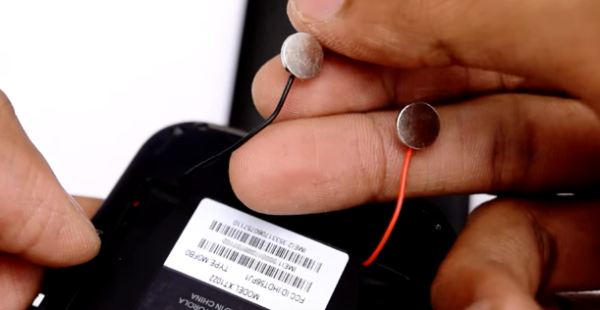
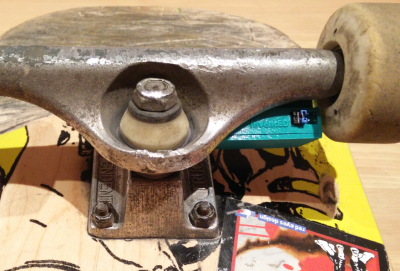 Next we have [edbraun] with Skateboard Speedometer by inventED. [edbraun] wanted to know how fast he was going. A GPS would work, but GPS signals are often blocked in cities. A more accurate way to gather speed data is directly from the wheels. Two tiny magnet plugs are placed in holes drilled in the wheel. A hall effect sensor detects the magnets and passes this data on to an Arduino Pro Mini. Once the speed is calculated, it’s sent to a Bluetooth radio. [edbraun’s] Android phone receives the data and displays current speed and total distance traveled. The speedometer and its slick 3D printed case almost hide between the trucks and the board itself. Nice work [edbraun]!
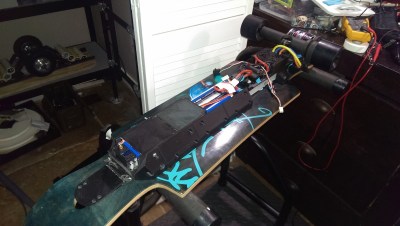 Finally we have Hackaday alum [Josh Marsh] and EV Commuter Longboard. [Josh] uses an electric longboard for his daily commute. His project is an excellent overview and tutorial on building an electric skateboard from scratch. Like many others, [Josh] utilizes R/C Airplane brushless motors and speed controllers. An Arduino or similar microcontroller is all you need to drive these devices. For batteries, [Josh] loves LiPo packs. Long form six cell affairs provide 22.2 Volts with a capacity of 5000 mAh or more. Plenty of power for carving your way to work!
If you want to see more skateboard projects, check out our new skateboard projects list! If I missed your project, don’t be shy, just drop me a message on Hackaday.io. That’s it for this week’s Hacklet. As always, see you next week. Same hack time, same hack channel, bringing you the best of Hackaday.io!