Hackaday Prize Entry: Bypassing TV Broadcasting Restrictions

It’s a common problem faced by TV viewers, the programming they want to watch is being broadcast, but not to their location. TV content has traditionally been licensed for transmission by geography, and this has sometimes put viewers at odds with broadcasters.

The viewing public have not always taken this restriction of their programming choice lying down, and have adopted a variety of inventive solutions with varying degrees of legality and success. Many years ago you might have seen extreme-length UHF antennas to catch faraway transmitters, more recently these efforts have been in the digital domain. It was said in the 1990s that Sky’s Videocrypt satellite TV smart cards were cracked because German Star Trek Next Generation fans were unable to buy subscriptions for non-UK addresses, for example. You can argue in the comments over whether [Patrick Stewart] et al being indirectly responsible for a decryption coup is an urban legend, but it is undeniable that serial smart card emulators and dodgy DOS software for Sky decryption were sold all over Europe at the time.

Modern-day efforts to break the geographic wall on TV broadcasting have turned to the Internet. Services such as the ill-fated Aereo and the Slingbox set-top streaming products have taken the TV broadcast in a particular area and transported it to other locations for viewing online. But they are not the only Internet self-streaming option, if the idea of paying a subscription or tying yourself to a commercial service does not appeal then you can build an off-air streamer for yourself.

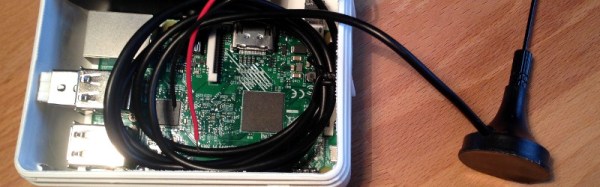
[Solenoid]’s project is an off-air streamer using a Raspberry Pi 3 with a USB DVB-T tuner. It uses Tvheadend to power the streaming, and OpenVPN to provide security. His build logs detail his efforts to ensure that power consumption is not too high and that the Pi is not running too hot, and provides instructions on how to set up and use the software. It’s not an overly complex piece of hardware, but it could provide a useful service for any of you who wish to keep up-to-date with your home TV when you are off on your travels.

Listen To The Sun, Saturn, And The Milky Way With Your Own Radio Telescope

Students from the Indian Institute of Science Education and Research combined a commercial satellite dish, a satellite finder and an Arduino, and produced a workable radio telescope. The satellite dish provides the LNB (low noise block) and the associated set-top box is used only for power.  Their LNB employs an aluminum foil shield to block extraneous signals.

In addition to the hardware, the team built Python software to analyze the data and show several practical applications. They used known geostationary satellites to calibrate the signal from the finder (digitized by the Arduino) to determine power per unit voltage. They also calculated the beam width (about 3.4 degrees) and used the sun for other calibration steps.

Continue reading “Listen To The Sun, Saturn, And The Milky Way With Your Own Radio Telescope”

808 Drum Machine In An ATTiny 14-Pin Chip

You may not know the 808 drum machine, but you have definitely heard it: the original Roland TR-808 was the first programmable drum machine and has been a mainstay of electronic music ever since. Hackers have been building their own versions of this vintage device for years, but this version from do-it-yourself synth builder [Jan Ostman] is quite remarkable.

He’s packed the entire device (called the Drum8 Vintage) into a single ATtiny84 14-pin DIP package, including the samples and eight polyphonic voices, plus old-school analog CV triggers, a global tune and an analog global accent input. That won’t mean a lot to non-musicians, but suffice to say that these are the same inputs that the original TR-808 had that allowed you to do all sorts of interesting stuff to trigger and modify the drum sounds. Plus some extras.

[Jan] is offering the chip itself for $20, and has made a limited edition version that is built into a patch bay panel for that genuine hard-wired look for $99. If you want to go the home-made route and make your own, he’s released the source code and schematics for making your own. You can check out more of [Jan’s] work in this post on making your own open-source instruments from Elliot. Thanks, Jan!

SIM Card Connectors And White PCBs Make Huge LED Snowflakes Happen

[Mike Harrison] talked about designing and building a huge scale LED lighting installation in which PCBs were used as both electrical and mechanical elements, and presented at Electromagnetic Field 2016. The project involved 84,000 RGBW LEDs, 14,000 microcontrollers and 25,000 PCBs. It had some different problems to solve compared to small jobs, but [Mike] shared techniques that could be equally applied to smaller scale projects or applications. He goes into detail on designing for manufacture and assembly, sourcing the parts, and building the units on-site.

The installation itself was a snowflake display for a high-end shopping mall in Hong Kong in the 2015 Christmas season. [Mike] wanted a small number of modular boards that could be connected together on-site to make up the right shapes. In an effort to minimize the kinds of manufacturing and parts needed, he ended up using modular white PCBs as structural elements as well as electrical. With the exception of some minor hardware like steel wire supports, no part of the huge snowflakes required anything outside of usual PCB manufacturing processes to make. The fewer suppliers, the fewer potential problems. [Mike] goes into design detail at 6:28 in the video.

For the connections between the boards, he ended up using SIM card connectors intended for cell phones. Some testing led to choosing a connector that matched up well with the thickness of a 1.6mm PCB used as a spacer. About 28,000 of them were used, and for a while in 2015 it was very hard to get a hold of that particular part, because they had cleaned everyone out! Continue reading “SIM Card Connectors And White PCBs Make Huge LED Snowflakes Happen”

Prusa Releases 4-Extruder Upgrade

Let’s talk multi-material printing on desktop 3D printers. There are a lot of problems when printing in more than one color. The easiest way to do this is simply to add another extruder and hotend to a printer, but this reduces the build volume, adds more mass to the part of the printer that doesn’t need any more mass, and making sure each nozzle is at the correct Z-height is difficult. The best solution for multi-material printing is some sort of mixing hotend that only squirts plastic from one nozzle, fed by a Bowden system.

[Prusa], the man, not the printer, has just released a multi-material upgrade for the Prusa i3 mk2. This upgrade allows the i3 mk2 to print in four colors using only one hotend, and does it in a way that allows anyone to turn their printer into a multi-material powerhouse.

The basic idea behind this multi-material upgrade is a four-way Y-shaped filament path. Each color of filament is loaded into a separate extruder, and when the material is changed the currently ‘active’ filament is retracted out of the heater block to just before where the filament paths cross. After the filament is swapped in the hotend, the remainder of the previous color of filament is squirted out onto a small (3x5cm) tower.

Because this is an upgrade to the i3 mk2, Prusa needed a way to add three additional stepper motors to the build without having to replace the printer’s electronics board. He’s doing this with an SSR-based multiplexer that allows one stepper motor output and a few GPIOs to control four motors.

If you have an i3 mk2, a four- material upgrade for your printer will be available for $249 USD in a few months. That means a full color, four-extruder i3 mk 2 costs less than $1000 USD, a price no other multi-material printer can touch.

You can check out [Prusa’s] video of the multi-material upgrade below. The printer and the man will be touring the US for Maker Faire and Open Hardware Summit, and you can bet we’re going to get some video of this multi-material printer in action.

Continue reading “Prusa Releases 4-Extruder Upgrade”

Ask Hackaday: How Do You Make A Hotplate?

Greetings fellow nerds. The Internet’s favorite artificial baritone chemist has a problem. His hotplates burn up too fast. He needs your help to fix this problem.

[NurdRage] is famous around these parts for his very in-depth explorations of chemistry including the best ways to etch a PCB, building a thermometer probe with no instructions, and chemical synthesis that shouldn’t be performed by anyone without years of experience in a lab. Over the past few years, he’s had a problem: hotplates suck. The heating element is usually poorly constructed, and right now he has two broken hotplates on his bench. These things aren’t cheap, either: a bare-bones hotplate with a magnetic stirrer runs about $600.

Now, [NurdRage] is asking for help. He’s contacted a few manufacturers in China to get a hundred or so of these hotplate heating elements made. Right now, the cost for a mica and metal foil hotplate is about $30 / piece, with a minimum order quantity of 100. That’s $3,000 that could be better spent on something a bit more interesting than a heating element, and this is where you come in: how do you build the heating element for a hotplate, and do it cheaply?

If you buy a hotplate from the usual lab equipment supplier, you’ll get a few pieces of mica and a thin trace of metal foil. Eventually, the metal foil will oxidize, and the entire hotplate will stop working. Repairs can be done with copper tape, but by the time that repair is needed, the heating element is already on its way out.

The requirements for this heating element include a maximum temperature of around 350 ºC. That’s a fair bit hotter than any PCB-based heat bed from a 3D printer gets, so consider that line of reasoning a dead end. This temperature is also above what most resins, thermoplastics, and composites can handle, which is why these hotplates use mica as an insulator.

Right now, [NurdRage] will probably end up spending $3,000 for a group buy of these heating elements. That’s really not that bad – for the price of five hotplates, he’ll have enough heating elements to last through the rest of his YouTube career. There must be a better way, though, so if you have an idea of how to make a high-temperature heating element the DIY way, leave a note in the comments.

New SuperCon Badge Is 40% Lighter And A Work Of Art

The 2016 Hackaday SuperConference is just around the corner and today we get a good look at the hardware badge. It was designed by [Voja Antonic] — a legend of hardware creation who will be at the conference. I like to think of him as the Woz of the Eastern Bloc, having designed the Galaksija computer. This badge is a beautiful example of embedded design. We’ll dive into all of the details after the break.

Get your ticket now for 48-hours of talks, workshops, the Hackaday Prize party, badge hacking,  and so much more.

Continue reading “New SuperCon Badge Is 40% Lighter And A Work Of Art”