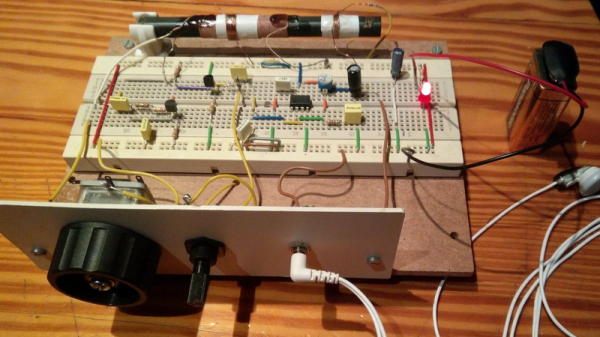
Crystal radios used to be the “gateway drug” into hobby electronics. Trouble was, there’s only so much one can hope to accomplish with a wire-wrapped oatmeal carton, a safety-pin, and a razor blade. Adding a few components and exploring the regenerative circuit can prove to be a little more engaging, and that’s where this simple breadboard regen radio comes in.
Sometimes it’s the simple concepts that can capture the imagination, and revisiting the classics is a great way to do it. Basically a reiteration of [Armstrong]’s original 1912 regenerative design, [VonAcht] uses silicon where glass was used, but the principle is the same. A little of the amplified RF signal is fed back into the tuned circuit through an additional coil on the ferrite rod that acts as the receiver’s antenna. Positive feedback amplifies the RF even more, a germanium diode envelope detector demodulates the signal, and the audio is passed to a simple op amp stage for driving a headphone.
Amenable to solderless breadboarding, or even literal breadboard construction using dead bug or Manhattan wiring, the circuit invites experimentation and looks like fun to fiddle with. And getting a handle on analog and RF concepts is always a treat.
It’s interesting, to consider what constitutes a power user of an operating system. For most people in the wider world a power user is someone who knows their way around Windows and Microsoft Office a lot, and can help them get their print jobs to come out right. For those of us in our community, and in particular Linux users though it’s a more difficult thing to nail down. If you’re a LibreOffice power user like your Windows counterpart, you’ve only really scratched the surface. Even if you’ve made your Raspberry Pi do all sorts of tricks in Python from the command line, or spent a career shepherding websites onto virtual Linux machines loaded with Apache and MySQL, are you then a power user compared to the person who knows their way around the system at the lower level and has an understanding of the kernel? Probably not. It’s like climbing a mountain with false summits, there are so many layers to power usership.
So while some of you readers will be au fait with your OS at its very lowest level, most of us will be somewhere intermediate. We’ll know our way around our OS in terms of the things we do with it, and while those things might be quite advanced we’ll rely on our distribution packager to take care of the vast majority of the hard work.
Linux distributions, at least the general purpose ones, have to be all things to all people. Which means that the way they work has to deliver acceptable performance to multiple use cases, from servers through desktops, portable, and even mobile devices. Those low-level power users we mentioned earlier can tweak their systems to release any extra performance, but the rest of us? We just have to put up with it.
To help us, [Fabio Akita] has written an excellent piece on optimizing Linux for slow computers. By which he means optimising Linux for desktop use on yesterday’s laptop that came with Windows XP or Vista, rather than on that ancient 486 in the cupboard. To a Hackaday scribe using a Core 2 Duo, and no doubt to many of you too, it’s an interesting read.
In it he explains the problem as more one of responsiveness than of hardware performance, and investigates the ways in which a typical distro can take away your resources without your realising it. He looks at RAM versus swap memory, schedulers, and tackles the thorny question of window managers head-on. Some of the tweaks that deliver the most are the easiest, for example the Great Suspender plugin for Chrome, or making Dropbox less of a hog. It’s not a hardware hack by any means, but we suspect that many readers will come away from it with a faster machine.
If you’re a power user whose skills are so advanced you have no need for such things as [Fabio]’s piece, share your wisdom on sharpening up a Linux distro for the rest of us in the comments.
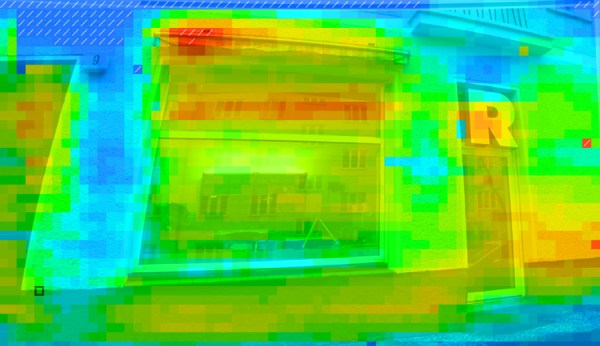
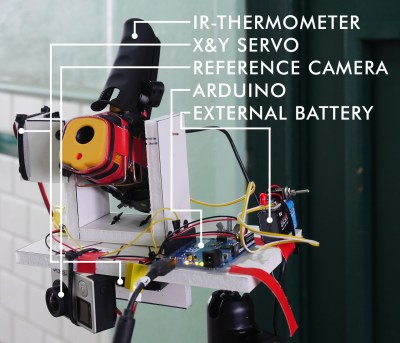
[Niklas Roy] has always wanted to try out thermal imaging and saw his opportunity when he received one of those handheld IR thermometers as a gift. But not content with just pointing it at different spots and looking at the temperatures on the LCD display, he decided to use it as the basis for a scanning, thermal imaging system that would display a heat map of a chosen location on his laptop.
DIY thermal imaging system
He still wanted to to be able to use the IR thermometer as normal at a later date so cutting it open was not an option. Instead he firmly mounted a webcam to it pointing at the LCD display. He then wrote software on his laptop to process the resulting image and figure out what temperature was being displayed.
Once he got that working, he next put the thermometer on a platform with servos connected to an Arduino for slowly rotating it in the horizontal and vertical directions, also under control of the software on his laptop. Each time the thermometer measures the temperature of a spot, the software decodes the temperature on the LCD display and then tells the Arduino to use the servos to point the thermometer at the next spot to be measured. Each measurement takes a little time, so scanning an entire location as 70×44 spots takes around a half hour. But the end result is a heat map drawn on the laptop, done by a device that is low-tech. [Editor’s Snark: Because attaching a webcam and processing the images is “low-tech” these days.] He can overlay the heat map on a normal photo to see at a glance where the hot spots are.
The software he wrote is available on GitHub and the video below shows it in action. We’ve got to admit, it’s pretty awesome to watch. You can even see the heat map being filled in one measurement at a time.
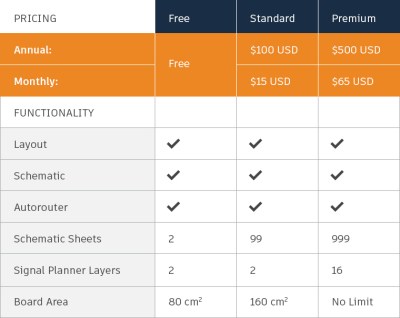
Autodesk has announced that EAGLE is now only available for purchase as a subscription. Previous, users purchased EAGLE once, and used the software indefinitely (often for years) before deciding to move to a new version with another one-time purchase. Now, they’ll be paying Autodesk on a monthly or yearly basis.
Lets break down the costs. Before Autodesk purchased EAGLE from CadSoft, a Standard license would run you $69, paid once. The next level up was Premium, at $820, paid once. The new pricing tiers from Autodesk are a bit different. Standard will cost $15/month or $100/year, and gives similar functionality to the old Premium level, but with only 2 signal layers. If you need more layers, or more than 160 cm^2 of board space, you’ll need the new Premium level, at $65/month or $500/year.
New Pricing Table for EAGLE
This is a bad deal for the pocket book of many users. If you could have made do with the old Standard option, you’re now paying $100/year instead of the one-time $69 payment. If you need more space or layers, you’ll likely be up to $500/year. Autodesk also killed the lower cost options for non-commercial use, what used to be a $169 version that was positioned for hobbyists.
The free version still exists, but for anyone using Eagle for commercial purposes (from Tindie sellers to engineering firms) this is a big change. Even if you agree with the new pricing, a subscription model means you never actually own the software. This model will require licensing software that needs to phone home periodically and can be killed remotely. If you need to look back at a design a few years from now, you better hope that your subscription is valid, that Autodesk is still running the license server, and that you have an active internet connection.
On the flip side of the coin, we can assume that Eagle was sold partly because the existing pricing model wasn’t doing all it should. Autodesk is justifying these changes with a promise of more frequent updates and features which will be included in all subscriptions. But sadly, Autodesk couldn’t admit that the new pricing has downsides for users:
“We know it’s not easy paying a lump sum for software updates every few years. It can be hard on your budget, and you never know when you need to have funds ready for the next upgrade.”
In their press release, they claim the move is only good for customers. Their marketing speak even makes the cliche comparison to the price of a coffee every day. Seriously.
[Garrett Mace] summarized his view on this nicely on Twitter: “previously paid $1591.21 for 88 months == $18.08/mo. Moving to $65/mo? KICAD looks better.”
We agree [Garrett]. KiCad has been improving steadily in the past years, and now is definitely a good time for EAGLE users to consider it before signing on to the Autodesk Subscription Plan™.
[Steve Collins] is a regular around Hackaday. He’s brought homebrew LIDARs to our regular meetups, he’s given a talk on a lifetime’s worth of hacking, and he is the owner of the most immaculate Hackaday t-shirt we’ve ever seen.
For the 2016 Hackaday SuperConference, [Steve] took a break from his day job of driving spacecraft around the Solar System. As you can imagine, NASA plans on things going wrong. How do you plan for that? [Steve] answers all your questions by telling you what happens when things go wrong in space.
Recently, [Manuel] did a post on making logic gates out of anything. He mentioned a site about relay logic. While it is true that you can build logic gates using switch logic (that is, two switches in series are an AND gate and two in parallel are an OR gate), it isn’t the only way. If you are wiring a large circuit, there’s some benefit to having regular modules. A lot of computers based on discrete switching elements worked this way: you had a PCB that contained some number of a basic gate (say, a two input NAND gate) and then the logic was all in how you wired them together. And in this context, the SPDT relay was used as a two input multiplexer (or mux).
In case you think the relay should be relegated to the historical curiosity bin, you should know there are still applications where they are the best tool for the job. If you’re not convinced by normal macroscopic relays, there is some work going on to make microscopic relays in ICs. And even if they don’t use relays to do it, some FPGAs use mux-based logic inside. So it’s worth your time to dig into the past and see how simply switching between two connections can make a computer.
Mux Mania
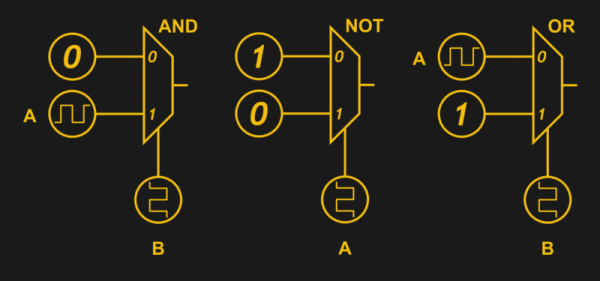
How do you go from a two input mux to an arbitrary logic gate? Simple, if you paid attention to the banner image. (Or try it interactive). The mux symbols show the inputs to the left, the output to the right and the select input at the bottom. If the select is zero, the “0” input becomes the output. If the select is one, the “1” input routes to the output.
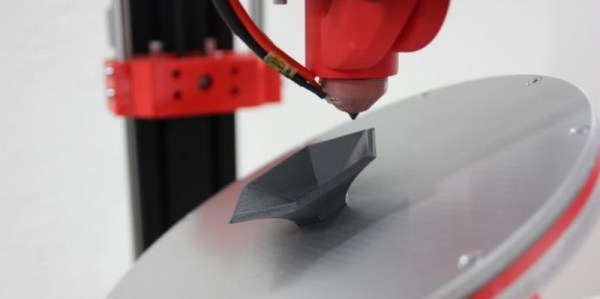
[Oliver Tolar] and [Denis Herrmann], two students from the Zurich University of Applied Sciences (ZHAW), designed and produced a 3D printer prototype that has a movable printing bed that can tilt. By tilting, objects with critical overhangs can be printed without the additional support material. The printer has six axes, three axes control the print head as usual and three other axes control the printing bed, allowing a wider range of movements.
The students claim that besides saving on the support material this printer can actually save time while printing objects that need a lot of support since, we assume, it’s faster to tilt the bed than to print the support itself. In normal 3D printers the plate is always horizontal and the print object is built up in horizontal layers. In this printer, for large overhangs, the printing bed is held in such a way that the print object is pivoted until perpendicular to the print head. Of course, for round shapes it will probably be different but we only saw it in action in one demonstration video. There is also the plus side that, when a print finishes, it’s finished. No x-acto knife to remove support, no sand paper, no time wasted.
Having the software controlling the bed properly was more difficult than the assembly of the printer, they said. It is still under development as it cannot, for example, simultaneously move the print head and printing bed to produce a continuous print.