Having the right tool for the right job is not always possible, but it’s an ideal that’s nice to try to live up to. The problem is that a lot of the time, the right tool is often very expensive. We have found lots of ways around this, though, from building our own CNC machines to finding new ways to electroplate metal. Sometimes, though, the right tool for the job doesn’t have to be improvised or built from scratch, it just falls in your lap.
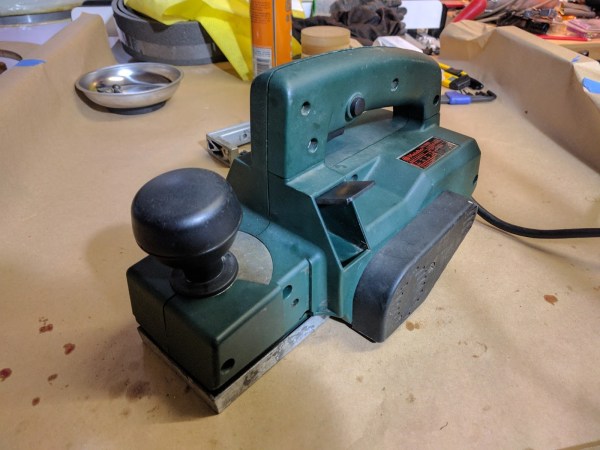
Admittedly, [Sam]’s power planer didn’t literally fall into her lap, but she did pull this neglected tool from the garbage. With no idea what was wrong with it, [Sam] let it sit on the shelf for years until she finally needed it. Assuming there was a major problem with the tool, she set about replacing the blades and bearings only to find that the likely culprit behind why the planer was thrown away in the first place was a faulty switch. This was likely a deal and circuit-breaker for someone who would use it all day, but not so for someone who only needs it for occasional use.
While some might not consider this a “hack”, it is at least a reminder that one man’s trash is another man’s treasure, especially if that trash only needs new bearings and a switch. There are two lessons here: first, that tools aren’t usually beyond repair, and that it’s possible to find all kindsof tools in the dumpster from people who don’t heed this advice.
[Daqq] is back at it again with the linear algebra, and he’s now come up with a method for determining the resistance of lots of resistors using little of wires and loads of math.
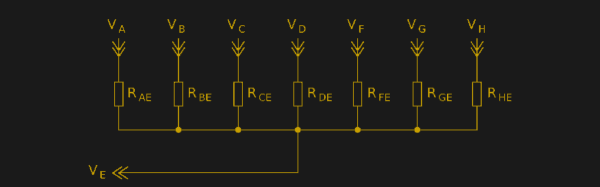
Like any reasonable person, [daqq] decided it would be fun to “solve one of those nasty [electrical engineering] puzzles/exercises where you start out with a horrible mess of wires and resistors and you are supposed to calculate the resistance between two nodes.” You know, just an average Saturday night. At the time, he was also fascinated by Charlieplexing – an awesome technique that either allows one to control multiple polarized components, such as LEDs, simply by connecting them in a specific way. After toying with the idea for a while, [daqq] found that using just Charlieplexing would be“a horrible mess” but he didn’t stop there. Drawing inspiration from Charlieplexing, he came up with the idea to connect things in such a way that every node is connected by one connection to every other node – a complete graph from a topological view point (this makes so much more sense visually). From here, he was able to set pins to HIGH, LOW, or INPUT and gather all the data needed to solve his linear system of equations.
Now, there is a balance to everything, and while this system can determine the resistance of .5*N(N-1) resistors using just N wires, it also a memory and computation hungry method. Oh well, can’t have it all. But, while it’s computationally hungry, [daqq] got it working on an ATMega32, so it’s not an unmanageable feat. And, let’s not forget to mention [daqq’s] wonderful writing. Even if you don’t know linear algebra (or would rather forget), it’s a good read from a theory perspective. So good, in fact, that [daqq] is getting published in Circuit Cellar!
If you are an American, you’ll probably now find yourself in one of three camps. People who are going to see the upcoming solar eclipse that will traverse your continent, people who aren’t going to see the eclipse, and people who wish everyone would just stop going on incessantly about the damn eclipse.
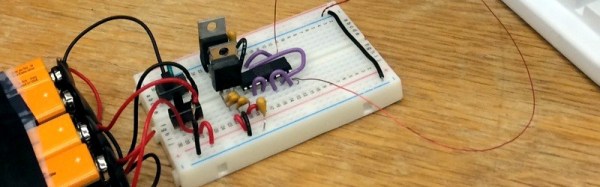
Whichever of those groups you are in though, there is an interesting project that you can be a part of, an effort from the University of Massachusetts Boston to crowdsource scientific observation of the effect a solar eclipse will have on the upper atmosphere, and in particular upon the propagation of low-frequency radio waves. To do this they have been encouraging participants to build their own simple receiver and antenna, and make a series of recordings of the WWVB time signal station before, during, and after the eclipse traverse.
This is an interesting and unusual take upon participation in the eclipse, and has the potential to advance the understanding of atmospheric science. It would be fascinating to also look at the effect of the eclipse on WSPR contacts, though obviously those occur in amateur bands at higher frequencies.
If you are an EclipseMob participant, we’d love to hear from you in the comments. Does your receiver perform well?
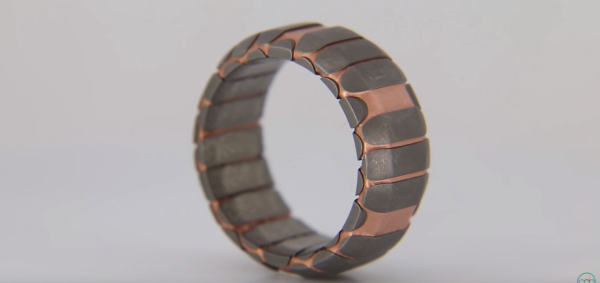
Superconducting wire has been around for decades now. Typically it is a thick wire made up of strands of titanium and niobium encased in copper. Used sections of this wire show up on the open market from time to time. [Patrick] got ahold of some, and with his buddies at the waterjet channel, they cut it into slices. It was then over to the lathe to shape the ring.
Once the basic shape was created, [Patrick] placed the ring in ferric chloride solution — yes the same stuff we use to etch PC boards. The ferric chloride etched away just a bit of the copper, making the titanium niobium sections stand out. A trip through the rock tumbler put the final finish on the ring. [Patrick] left the ring in bare metal, though we would probably add an epoxy or similar coating to keep the copper from oxidizing.
[Patrick] is selling these rings on his website, though at $700 each, they’re not cheap. Time to hit up the auction sites and find some superconducting wire sections of our own!
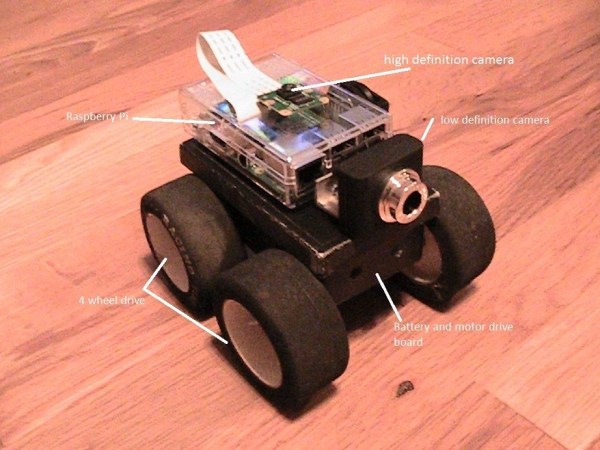
Why bother crawling into that tiny sewer tunnel and getting coated in Cthulhu knows what — not to mention possibly getting stuck — when you can roll a robot in there instead? That’s what InspectorBot does. It’s [Dennis]’ entry for The Hackaday Prize and a finalist for our Best Product competition.
InspectorBot is a low-profile rover designed to check out the dark recesses of sewers, crawlspaces, and other icky places where humans either won’t fit or don’t want to go. Armed with a Raspberry Pi computer, it sports a high-definition camera pointed up and a regular webcam pointing forward for navigation. It uses point-to-point WiFi for communication and rocks all-wheel drive controlled by a pair of L293D motor drivers.
This seems like fertile ground for us. Pipe-crawlers, chimney-climbers, crawlspace-slitherers all sound like they’d be helpful, particularly in conjunction with some kind of computer vision that allowed the robot to notice problems even when the operator does not. Right now, [Dennis] has the chassis rolling and most of the current work is focused on software. Both cameras are now working, allowing the InspectorBot to send forward-looking and upward-looking video back to the operator at the same time. This, alone, is a great advancement of the current crop of Raspberry Pi rovers and adds a lot of functionality to an easy-to-build platform.
So I made an awful, kludgey, “there I fixed it” level repair, and I need to come clean. This is really a case of an ill-advised ground.
My thirteen-year-old daughter asked for help repairing her Macbook charging cable. Macbook chargers really aren’t meant to flex around a lot, and if you’re the kind of person who uses the laptop on, well, the lap, with the charger in, it’s gonna flex. Sooner or later the insulation around the plug housing, where it plugs into the laptop, cracks and the strands of wire can be seen. This type of cable consists of an insulated lead wire surrounded by a stranded ground wire. The problem with this configuration is that the stranded ground also gets flexed until it breaks, one strand at a time, until the cable stops working.
So it was with my daughter’s Macbook cable. I didn’t have the money to buy her a new one, and I figured we could repair the break. We busted out her WLC100 and sat down to get our solder on. She started off working while I supervised, then I took over later on.
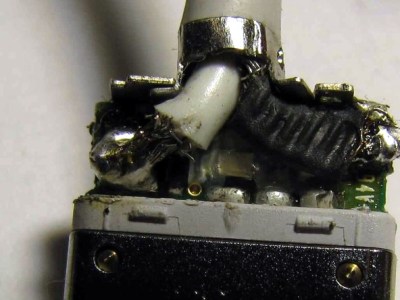
We began by using an Xacto to cut away enough insulation to expose about half an inch of the stranded wire. We pulled the wire away from the insulated lead wire and twisted it into a single stranded wire parallel to the lead wire. Grabbing for the iron, we tinned the ground and soldered a length of 22-gauge solid wire to it. The way the ground connects to the plug is by passing through a conductive ring. My idea was to solder the other end of the 22-gauge wire to the metal ring. Here’s where things started to go wrong. This is, by the way, the part where I took over so you can blame me and not my kid.
My daughter was using the WLC100’s default tip. I should have grabbed my own iron, a WES51, or at least swapped in its ninja-sharp tip. The WLC100’s default tip is a big fat wedge and it was too big to put next to the plug, and the conductive ring quickly got covered in melted plastic and I couldn’t solder anything to it. Worse, I had accidentally burned through the insulation protecting the lead wire, and had to cover it in electrical tape.
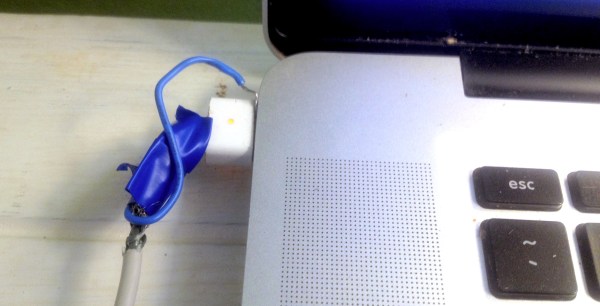
What now? We were left with not being able to use the cable at all. One option was to wait until the goop had cooled and burnish it clean with a Dremel, then attempt to re-solder using an appropriate tip. However, that sounded like a lot of work. The solid wire was still securely soldered to the ground, so instead of trying to attach it to the cable side of the plug, I could connect it to the computer side, by shoving it into the socket alongside the plug. The business end of the plug has a big silver ground surrounding small gold positive leads, and touching the ground with the wire should work just fine, right?
It did. The computer charged up as happy as you’d like. And yet, I was left with the distinct feeling the solution could have been, I don’t know, cleaner. Certainly, the iFixit route shown here comes out much cleaner by sliding off the housing, clipping the damaged wire, and beginning anew. Clean as this is, it’s just waiting to happen the same way again.
So, brethren and sistren, lay on with brickbats and tell what I did wrong. What approaches have you used to fix cables broken where they meet the plug housing, and how do you improve the situation for the future?
If you use the Arduino IDE to program the ESP32, you might be interested in [Andreas Spiess’] latest video (see below). In it, he shows an example of using all three ESP32 UARTs from an Arduino program. He calls the third port “secret” although that’s really a misnomer. However, it does require a quick patch to the Arduino library to make it work.
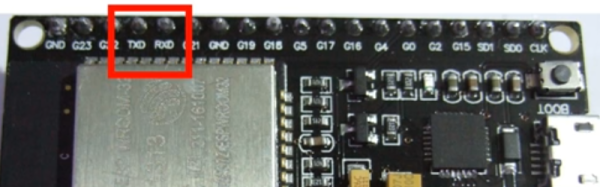
Just gaining access to the additional UARTs isn’t hard. You simply use one of the additional serial port objects available. However, enabling UART 1 causes the ESP32 to crash! The reason is that by default, UART 1 uses the same pins as the ESP32 flash memory.
Luckily, the chip has a matrix switch that can put nearly any logical I/O pin on any physical I/O pin. [Andreas] shows how to modify the code, so that UART 1 maps to unused pins, which makes everything work. it is a simple change, replacing two parameters to a call that — among other things — maps the I/O pins. You could use the technique to relocate the UARTs to other places if you choose.
If you want to learn more about the ESP32, we covered a good set of tutorials for you to check out. Or if you just want a quick overview, you can start here.