Thumbs Up To This Pico MIDI Kalimba

The kalimba, or thumb piano, is an easy way to make some music even if you have next to no idea what you’re doing. The only real downside is that they are limited to the twinkly sounds of metal tines being plucked by thumbs.

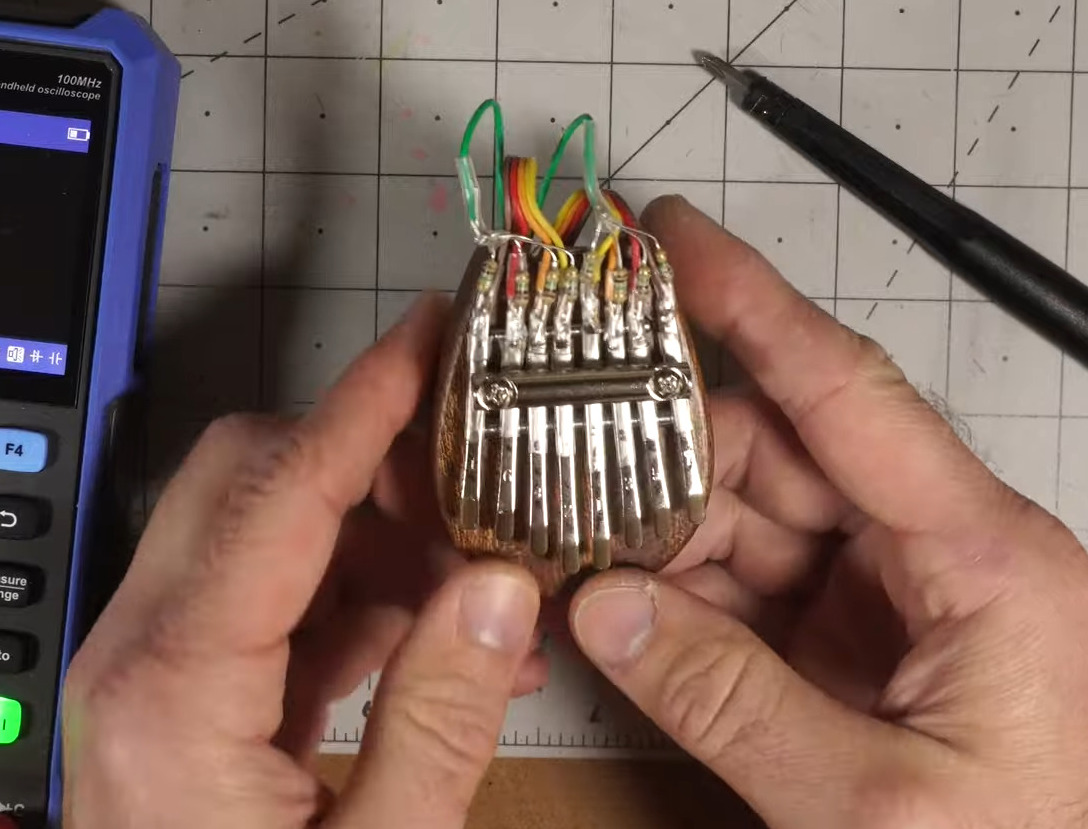
[Jeremy Cook] broke the sonic possibilities wide open by converting a couple of kalimbas into capacitive-touch MIDI instruments using the Raspberry Pi Pico. He started with a small one that is curiously made of solid wood. Usually these instruments are at least partially hollow to allow air to resonate inside the body.

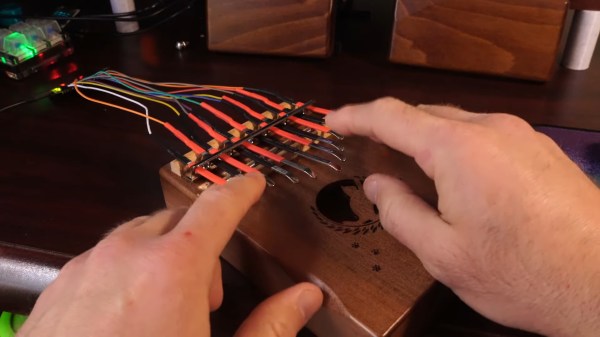
After soldering up all the 1 MΩ resistors necessary to utilize the capacitive touch capabilities of the Pico, [Jeremy] found it a bit difficult to play individual notes on such a small instrument, so he made version two out of a much larger specimen.

This time, [Jeremy] cooked up a custom PCB which he is calling the Pico Touch 2, which adds the necessary resistors at the SMD level for capacitive touch sensing and in turn cleans up the wiring a bit. Be sure to check it out in action after the break.

Okay, so you don’t have an iota of musical talent. You could always build a kalimba that plays itself.

Continue reading “Thumbs Up To This Pico MIDI Kalimba”

On The Merits Of A Solid-State Dehumidifier Filament Dry Box

How good are ion membrane dehumidifiers for keeping FDM filament dry and ready for printing? This is the question which [Stefan] at CNC Kitchen sought to answer in a recent video. Like many of us, he was inspired by a video which [Big Clive] made a while ago in which said dehumidifiers were demonstrated for keeping an enclosure free from moisture. Yet would they be able to tackle the much bigger drying job of one or more spools of filament? Thanks to some free samples sent by Rosahl, [Stefan] was able to start answering this question.

Performance of desiccants and dehumidifier element. (Credit CNC Kitchen)

In the experiments, he used the smaller RS1 (€36.25 a piece) for a single spool container, and the larger MDL-3 (€169) with a Bambu Lab AMS multi-spool unit. Normally such an AMS has three big containers with silica desiccant in it that have to be regularly swapped out, but he modified one AMS to only have the big MDL-3 membrane to dehumidify. A second AMS was left with older silica in its containers, and a third got fresh silica, allowing for some benchmarking between the three units.

The results say a lot, with the initial empty AMS test showing the older silica desiccants topping out quickly and leaving the fresh silica and the membrane dehumidifier to go neck to neck. This is not the usual scenario in which you’d use these dehumidification methods of course, and the small-scale test with the RS1 showed that with a full filament spool in the box, humidity inside the container would only drop very gradually as more and more moisture replaced what was removed from the air. In particular the cardboard element of the spool being used was suspected of being one of the biggest sources of moisture.

Continue reading “On The Merits Of A Solid-State Dehumidifier Filament Dry Box”

TuneShroom Is An Artistic Mushroom-Themed MIDI Controller

Most MIDI controllers are modelled after traditional instruments, like pianos, flutes, or guitars. [Oliver Child] went in a different direction for the TuneShroom, instead modelling his DIY controller after the terrifying, unclassifiable living organism we call the mushroom.

The project was a fun way for [Oliver] to try creating a project with an artistic PCB design, and it worked out well in that regard. He penned a circuit board in the shape of a toadstool, with conductive pads serving as capacitive touch points to activate various notes.

The design is based around the Sparkfun Pro Micro, but it’s not programmed in Arduino. [Oliver] wanted to make full use of the ATmega32U4 microcontroller and have freedom to use the pins at will, so instead the project was programmed with a patched version of LUFA to handle the USB side of things. MIDI data is naturally piped out over this interface to an attached computer.

Files are on Github for the curious. Alternatively, contemplate turning an entire saxophone into a MIDI controller in your spare time. Video after the break.

Continue reading “TuneShroom Is An Artistic Mushroom-Themed MIDI Controller”

Blastoise Humidifier Shows Us You Don’t Need A 3D Printer If You’re This Good With A 3D Pen

[3D SANAGO] is a bit of a master when it comes to using a 3D-printing pen. Their latest work involved fixing a broken humidifier and giving it a Pokemon-themed makeover. It’s an education in just what can be achieved with a tool many of us write off as a simple novelty.

The basic idea of the build was to create a Blastoise figurine that serves as a humidifier. Work starts with marking out a basic outline on a round stone. The 3D pen is then used to create a tortoise shell with the appropriate concave shape, directly on the rock. [3D SANAGO] also demonstrates how a simple plastic framework can be heated with a blowtorch and shaped around the rock as needed to generate gentle curves. Meanwhile, a simple marker pen serves as a form for creating the gun barrels on Blastoise’s back. The legs are built with a similar technique, but with expert manipulation with a blowtorch to turn them into stubby muscular forms.

The full figurine is built up in stages, with individual wireframe components assembled into a complete body. The gaps in the frame are then filled in by hand, which takes a long time; [3D SANAGO] calls it “the most boring for sure.” Plenty of post-processing is then done with various sanding tools and a bladed tip on a soldering iron. The latter is used as the melting action allows the creation of a smooth final surface. In contrast, subtractive methods like sanding would leave holes and divots that need to be filled in before painting. There’s plenty of sealing to be done before paint, too, to ensure the interior of Blastoise can hold water without leaking. Then, the internal componets are installed and the body finished to its final cartoon form. In case you’re wondering, [3D SANAGO] says that sanding took 2-3 days to get such a great result.

If you really dig it, it’s on display at [3D SANAGO’s] cafe in Daejeon. Overall, it’s amazing to see such craftsmanship with a 3D pen. A resin printer could obviously print a wonderful Blastoise of similar quality, but there’s something about watching the level of human skill in this that’s just compelling. Video after the break.

Continue reading “Blastoise Humidifier Shows Us You Don’t Need A 3D Printer If You’re This Good With A 3D Pen”

High-Resolution MIDI Controller

For an older standard, MIDI has remarkable staying power in the music industry. It remains the de facto digital interface between computers and instruments thanks to its open nature, but its age does show a little bit. Sending control change (CC) messages, for example, was originally designed to fit within seven bits, which doesn’t give particularly fine resolution compared to more capable modern computers. To work around that, a fourteen-bit message is possible, doubling the resolution, and this MIDI interface uses this larger amount of data to send these high-resolution CC messages.

The 14-bit messages are actually fairly well documented but are a bit obscure, with very limited hardware support. To that end, [Gero] set about building this control interface to solve that problem. It’s made up of only eight knobs, each of which is mapped one-to-one to a parameter on the computer, allowing the interface to feel more like an analog device where the knob corresponds directly to a change in an aspect of the sound. The platform is built around a Teensy 4.0 and some multiplexers to handle all of the knobs, with the open source software available for anyone to use to modify their actions. [Gero] was aiming for high fidelity for all aspects of this controller, not just the improved digital resolution, and made a number of other improvements to it as well like re-greasing the potentiometer knobs and a custom 3D printed enclosure.

All of the software is available for use, as well as the files to print the case. [Gero] is also working on a PCB to make the construction of the device a little more streamlined, but for now, it requires a bit of soldering off-the-shelf parts together. The MIDI standard is open as well, which allows for a lot of innovation in the creation of musical instruments from unique hardware. This project builds a MIDI synthesizer with parts from a Sega Genesis.

Raspberry Pi Pico Becomes MIDI-Compatible Synth

ECE 4760 is a microcontroller course that runs at Cornell every year, and it gives students a wide remit to pursue various kinds of microcontroller projects. [Pelham Bergesen] took the class and built himself a MIDI-controllable synthesizer out of a Raspberry Pi Pico.

[Pelham] coded a library to parse MIDI messages on the Pico, with the microcontroller’s UART charged with receiving the input data. MIDI is basically just serial at a baud rate of 31.25k, with a set message structure, after all. From there, the Pico takes the note data and plays the relevant frequencies by synthesizing square waves using a PWM output. A second PWM channel can also be blended with the first to generate more complex tones.  The synthesizer is designed to be used with a source of MIDI note data such as a keyboard controller; [Pelham] demonstrates the project in use with a Roland JD-XI. It’s a fairly basic synthesizer, but [Pelham] does a good job of explaining all the steps required to get this far. If you’ve never done an audio or MIDI project before, you might find his guide very helpful for the way it steps through the basics.

[Pelham] didn’t get to implement fancier features like direct digital synthesis (DDS) or analog audio effects before the class closed out. However, that would be an excellent project for anyone else developing their own Pico synthesizer. If you whip up something that sounds good, or even just interesting, be sure to notify us on the tipsline. Video after the break.

Continue reading “Raspberry Pi Pico Becomes MIDI-Compatible Synth”

Turning A Saxophone Into A MIDI Controller

Most of the time, if you’re looking for a MIDI controller, you’re going to end up with some kind of keyboard or a fancy button pad. The saxophone is an altogether more beguiling instrument that makes for one hell of an interface, but there’s a problem: they’re seldom MIDI-compatible. This build from [AndrewChi] changes all that.

This digitized sax relies on a SparkFun ESP32 Thing as the brains of the operation. It uses Hall effect sensors, the digital switch type, to detect the action of the keys of the sax. Choosing parts that are quick to respond is key for musical use, so [AndrewChi] selected the Texas Instruments DRV5023 for its unipolar operation, short output delay and fast rise time. Beyond setting up the basic keys to send MIDI notes, the instrument also received additional octave controls for greater range. With sensors and magnets attached to the saxophone and keys with Sugru, the instrument is ready to serve as a capable MIDI controller. Thanks to the ESP32, it’s capable of sending MIDI data wirelessly over Bluetooth for the maximum freedom of performance.

It’s a nifty build, and a great way for wind players to get into the world of controlling digital synthesizers in an intuitive fashion. We’ve seen some great MIDI controller builds before, too.

Continue reading “Turning A Saxophone Into A MIDI Controller”