Avoid Awkward Video Conference Situations With PIR And Arduino

Working from home with regular video meetings has its challenges, especially if you add kids to the mix. To help avoid embarrassing situations, [Charitha Jayaweera] created Present!, a USB device to automatically turn of your camera and microphone if you suddenly need to leave your computer to maintain domestic order.

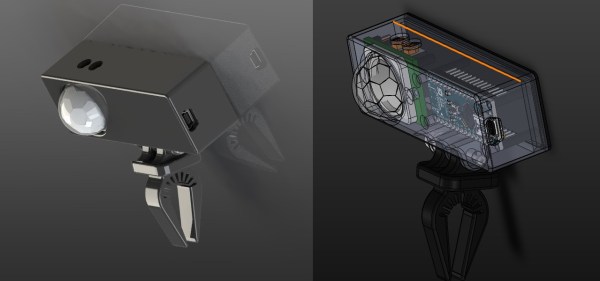
Present consists of just a PIR sensor and Arduino in a 3D printed enclosure to snap onto your monitor. When the PIR sensor no longer detects someone in range, it sends a notification over serial to a python script running on the PC to switch off the camera and microphone on Zoom (or another app). It can optionally turn these back on when you are seated again. The cheap HC-SR501 PIR module’s range can also be adjusted with a trimpot for your specific scenario. It should also be possible to shrink the device to the size of the PIR module, with a small custom PCB or one of the many tiny Arduino compatible dev boards.

For quick manual muting, check out the giant 3D printed mute button. Present was an entry into the Work from Home Challenge, part of the 2021 Hackaday Prize.

Clever PCB Brings Micro USB To The Arduino Uno

Even with more and more devices making the leap to USB-C, the Arduino Uno still proudly sports a comparatively ancient Type-B port. It wouldn’t be a stretch to say that many Hackaday readers only keep one of these cables around because they’ve still got an Uno or two they need to plug in occasionally.

Looking to at least move things in the right direction, [sjm4306] recently set out to create a simple board that would let him mount a micro USB connector in place of the Uno’s original Type-B. Naturally there are no components on the PCB, it simply adapts the original through-hole footprint to the tight grouping of surface mount pads necessary to mount a female micro USB port.

Making castellated holes on the cheap.

The design is straightforward, but as [sjm4306] explains in the video below, there’s actually more going on here than you might think. Looking to avoid the premium he’d pay to have the board house do castellated holes, he cheated the system a bit by having the board outline go right through the center of the standard pads.

Under a microscope, you can see the downside of this approach. Some of the holes got pretty tore up as the bit routed out the edges of the board, with a few of them so bad [sjm4306] mentions there might not be enough of the pad left to actually use. But while they may not be terribly attractive, most of them were serviceable. To be safe, he says anyone looking to use his trick with their own designs should order more boards than they think they’ll actually need.

Of course you could go all the way and retrofit the Uno with a USB-C port, as we’ve seen done with devices in the past. But the latest-and-greatest USB interface can be a bit fiddly, especially with DIY gadgets, so we can’t blame him for going with the more reliable approach.

Continue reading “Clever PCB Brings Micro USB To The Arduino Uno”

Arduino Cable Tracer Helps Diagnose Broken USB Cables

We’ve all found ourselves swimming amongst too many similar-looking USB cables over the years. Some have all the conductors and functionality, some are weird power-only oddballs, and some charge our phones quickly while others don’t. It’s a huge headache and one that [TechKiwiGadgets] hopes to solve with the Arduino Cable Tracer.

The tracer works with USB-A, Mini-USB, Micro-USB, and USB-C cables to determine whether connections are broken or not and also to identify wiring configurations. It’s built around the Arduino Mega 2560, which is ideal for providing a huge amount of GPIO pins that are perfect for such a purpose. Probing results are displayed upon the 2.8″ TFT LCD display that makes it easy to figure out which cables do what.

It’s a tidy build, and one that we could imagine would be very useful for getting a quick go/no-go status on any cables dug out of a junk box somewhere. Just remember to WIDLARIZE any bad cables you find so they never trouble you again. Video after the break.

Continue reading “Arduino Cable Tracer Helps Diagnose Broken USB Cables”

Analog Style VU Meter With Arduino And OLED Display

Looking for a digital recreation of the classic analog volume unit (VU) meter? If you’ve got an Arduino, a few passive components, and a SSD1306 OLED, then [mircemk] might have the answer for you. As you can see in the video below, his code turns a handful of cheap parts into an attractive and functional audio display.

The project’s Hackaday.IO page explains that the idea is based on the work of [stevenart], with code adapted for the SSD1306 display and some tweaks made to the circuit. While [mircemk] says the code could be modified for stereo as long as the two displays don’t have conflicting I2C addresses, he decided to simply duplicate the whole setup for each channel to keep things simple. With as cheap as some of these parts are nowadays, it’s hard to blame him.

[mircemk] has provided source code for a couple different styles of VU indicators, the colors of which can easily be inverted depending on your tastes. He also clarifies that the jerky motion of the virtual “needle” seen in the video is due to the camera; in real-life it sweeps smoothly like the genuine article.

Much like the project that aimed to recreate authentic “steam gauges” with e-paper displays, this as an excellent technique to file away for use in the future. Compared to authentic analog gauges, these digital recreations are quicker and faster to implement, plus going this route prevents any antique hardware from going on the chopping block.

Continue reading “Analog Style VU Meter With Arduino And OLED Display”

DIY Forth On Arduino

On a recent rainy afternoon, [Thanassis Tsiodras] decided to build his own Forth for the Arduino to relieve the boredom. One week of intense hacking later, he called it done and released his project as MiniForth on GitHub. [Thanassis] says he was inspired by our series of Forth articles from a few years back, and his goal was to build a Forth interpreter / compiler from scratch, put it into a Blue Pill microcontroller. That accomplished, he naturally decides to squeeze it into an Arduino Uno with only 2K of RAM.

Even if you are ambivalent about the Forth language, [Thanissis]’s project has some great ideas to check out. For example, he’s a big proponent of Makefile automation for repetitive tasks, and the project’s Makefile targets implements almost every task needed for development, building and testing his code.

Some development and testing tasks are easier to perform on the host computer. To that end, [Thanassis] tests his programs locally using the simavr simulator. The code is also portable, and he can compile it locally on the host and debug it using GDB along with Valgrind and AddressSanitizer to check for memory issues. He chose to write the program in C++ using only zero-cost abstractions, but found that compiling with the ArduinoSTL was too slow and used too much memory. No problem, [Thanassis] writes his own minimalist STL and implements several memory-saving hacks. As a final test, the Makefile can also execute a test suite of Forth commands, including a FizzBuzz algorithm, to check the resulting implementation.

Here’s a short video of MiniForth in action, blinking an LED on an UNO, and the video below the break shows each of the various Makefile tasks in operation. If you want to learn more, check out Elliot Williams’s Forth series which inspired [Thanassis] and this 2017 article discussing several different Forth implementations. Have you ever built your own compiler? Let us know in the comments below.

Continue reading “DIY Forth On Arduino”

This Arduino Isn’t Color Blind

You can sense a lot of things with the right sensor, and [Nikhil Nailwal] is here to show us how to sense colors using a TCS230. The project is a simple demo. It displays the color and lights up an LED to correspond to the detected color.

If you haven’t seen the TCS230 before, it is a chip with an array of photosensors, for different light wavelengths. The controlling chip — an Arduino, in this case — can read the intensity of the selected color.

Continue reading “This Arduino Isn’t Color Blind”

Dumping 90’s Honda ECU Programming With Arduino

[P1kachu] owns a pair of early 1990’s Honda’s with custom tuning on their stock ECUs, and after having to get the ECU repaired on his ’93 civic, he found himself going down the rabbit hole of Honda ECU EPROM chips.

During the repair process, the tuning shop owner, or [Tuner-san] as [P1ikachu] refers to him, made a backup of the custom tuning to another EPROM chip.  This was done with an old Advantest R4945A EPROM programmer, which [Tuner-san] supposedly also used to clone Famicom cartridges back in the day. After realizing that [Tuner-san] could only clone the contents, but not view or modify it, he started looking at ways to do that.

EPROMS are programmed using higher voltage (12.5 V – 25 V) but to read them 5 V is used. The memory address is selected by setting each of the 15 address pins high or low, and then reading the status of the 8 data pins to extract one byte of data. Rinse and repeat for each of the 256 memory addresses on the Microchip 27C256 EPROM. One of the previous owners of [Pikachu]’s Civic made some unknown tuning changes, so he is in the process of looking at the dumped data to see what was changed. Once he has completed figuring out the programming table of the EPROM, he plans to do some testing with [Tuner-san] to possible smooth out the rev limited.

An interesting aspect of EPROMs is that they are erased using UV light, which sets all the memory bits to 1. During programming, selected bits can be set to 0, but it’s not possible to set them back to 1 without erasing the entire chip again.

Messing around with the computers in cars is not only for tuning, but can also expose some rather serious security flaws, especially in modern vehicles.