Giant working NERF gun runs on Arduino.

Giant Working NERF Gun Runs On Tiny Arduino

Well, here it is: a shoe-in for the new world’s largest NERF gun. (Video, embedded below.) The Guinness people haven’t shown up yet to award [Michael Pick], but at 12.5 feet, this baby is over twice as long as the current record holder, which belongs to former NASA mechanical engineer Mark Rober and his now-puny six-foot six-shooter.

We have to wonder if it is technically bigger than the six-shooter, because they seem to be roughly the same scale, except that [Michael] chose a much bigger model to start from. The main body is made from wood, and there are a ton of 3D-printed details that make it look fantastically accurate. The whole thing weighs over 200 pounds and takes at least two people to move it around. We especially love the DIY darts that [Michael] came up with, which are made from a PVC tube inside a section of pool noodle, topped off with a 3D printed piece for that distinctive orange cap.

Propelling those darts at around 50 MPH is a 3,000 PSI air tank connected to an Arduino Pro Mini that controls the trigger and the air valves. While [Michael] hasn’t run the thing quite that high, it does plenty of damage in the neighborhood of 40-80 PSI. As you’ll see in the video after the break, this is quite the ranged weapon. Watch it blow a hole clean through a sheet of drywall and much more.

Want to build something with a bit more stealth? Make it death from above with a NERF quadcopter.

Continue reading “Giant Working NERF Gun Runs On Tiny Arduino”

Arduino Orchestra Plays The Planets Suite

We’ve seen a great many Arduino synthesizer projects over the years. We love to see a single Arduino bleeping out some monophonic notes. From there, many hackers catch the bug and the sky is truly the limit. [Kevin] is one such hacker who now has an Arduino orchestra capable of playing all seven movements of Gustav Holst’s Planets Suite.

The performers are not human beings with expensive instruments, but simple microcontrollers running code hewn by [Kevin’s] own fingertips. The full orchestra consists of 11 Arduino Nanos, 6 Arduino Unos, 1 Arduino Pro Mini, 1 Adafruit Feather 32u4, and finally, a Raspberry Pi.

Different synths handle different parts of the performance. There are General MIDI synths on harp and bass, an FM synth handling wind and horn sections, and a bunch of relays and servos serving as the percussive section. The whole orchestra comes together to do a remarkable, yet lo-fi, rendition of the whole orchestral work.

While it’s unlikely to win any classical music awards, it’s a charming recreation of a classical piece and it’s all the more interesting coming from so many disparate parts working together. It’s an entirely different experience than simply listening to a MIDI track playing on a set of headphones.

We’d love to see some kind of hacker convention run a contest for the best hardware orchestra. It could become a kind of demoscene contest all its own. In the meantime, scope one of [Kevin’s] earlier projects on the way to this one – 12 Arduinos singing Star Wars tracks all together. Video after the break.

Continue reading “Arduino Orchestra Plays The Planets Suite”

Modern Tube Tester Uses Arduino

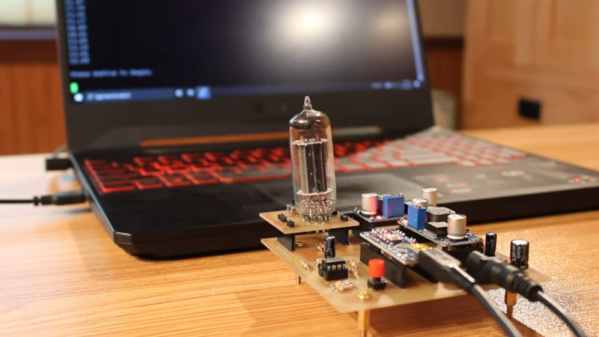
There was a time when people like us might own a tube tester and even if you didn’t, you probably knew which drug store had a tube testing machine you could use for free. We aren’t sure that’s a testament to capitalistic ingenuity or an inditement of tube reliability — maybe both. As [Usagi] has been working on some tube-based projects, he decided he needed a tester so he built one. You can see the results in the video, below.

The tester only uses 24V, but for the projects he’s building, that’s close to the operation in the real circuits. He does have a traditional tube tester, but it uses 100s of volts which is a different operating regime.

Continue reading “Modern Tube Tester Uses Arduino”

Mini Wireless Thermal Printers Get Arduino Library (and MacOS App)

[Larry Bank]’s Arduino library to print text and graphics on BLE (Bluetooth Low Energy) thermal printers has some excellent features, and makes sending wireless print jobs to a number of common models about as easy as can be. These printers are small, inexpensive, and wireless. That’s a great mix that makes them attractive for projects that would benefit from printing out a hardcopy.

It’s not limited to simple default text, either. Fancier output can be done using Adafruit_GFX library-style fonts and options, which sends the formatted text as graphics. You can read all about what the library can do in this succinct list of concise functions.

But [Larry] hasn’t stopped there. While experimenting with microcontrollers and BLE thermal printers, he also wanted to explore talking to these printers from his Mac using BLE directly. Print2BLE is a MacOS application that allows dragging image files into the application’s window, and if the preview looks good, the print button makes it come out of the printer as a 1-bpp dithered image.

Small thermal printers make for neat projects, like this retrofitted Polaroid camera, and now that these little printers are both wireless and economical, things can only get easier with the help of a library like this. Of course, if that’s all starting to look a little too easy, one can always put the thermal back in thermal printing by using plasma, instead.

Arduino Powered Heat Pump Controller Helps Warm Your Toes

Heat pump heating technology is starting to pop up more and more lately, as the technology becomes cheaper and public awareness and acceptance improves. Touted as a greener residential heating system, they are rapidly gaining popularity, at least in part due to various government green policies and tax breaks.

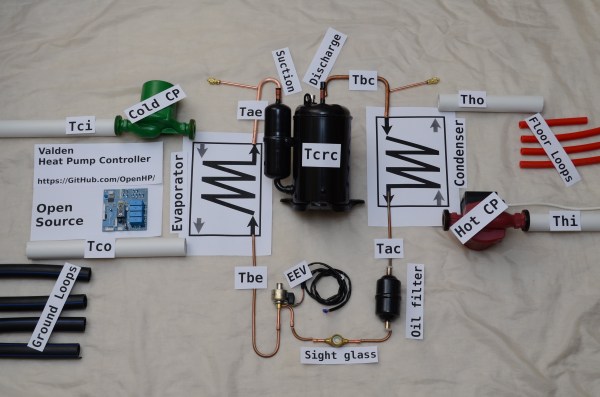
[Gonzho] has been busy the last few years working on his own Arduino Powered Open Source heat pump controller, and the project logs show some nice details of what it takes to start experimenting with heat pumps in general, if that’s your game. Or you could use this to give an old system a new lease of life with an Arduino brain transplant.

In essence they are very simple devices; some kind of refrigerant is passed through a source of heat, absorbing some of it, it then flows elsewhere, and is compressed, which increases its temperature, before that increased heat is lost where the increase in temperature is desired.

This heat source could be a river, a mass of pipes buried in the ground, or simply the air around you. The source and quality of the heat source as well as the desired system operating temperature dictate the overall efficiency, and with ground-source systems it’s even possible to dump excess heat directly into the ground and store it for when required later. This could be the result of a residential cooling system, or even directly sourced from a solar heated setup.

This heat pumping process is reversible, so it is possible to swap the hot and cold ends, just by flipping some valves, and turn your space heater into a space cooler. This whole process can trace its roots back to the super talented Scottish professor, William Cullen who in 1748 was the first person on record to demonstrate artificial refrigeration.

The power needed to run the compressor pump and control gear is usually electrically derived, at least in non-vehicular applications, but the total power required is significantly less than the effective heating (or cooling) power that results.

We’ve covered a few heat pump hacks before, like this guy who’s been heating his house geothermally for years, but not so many platforms designed for experimentation from the ground up.

The associated GitHub project provides the gerber files as well as the Arduino code, so you’ve got a great starting point for your own heat pumping builds.

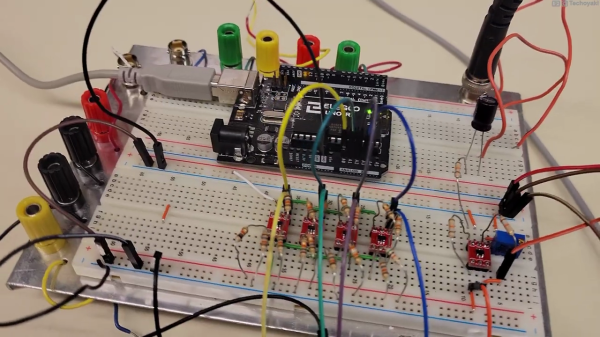
Photo of a prototyping breadboard with an Arduino, whose analog inputs are connected to an array of four small op-amp circuits which perform the voltage slicing function of the Quantizer circuit described in this article.

Arduino Measures 20V Signals Using Quantizer

Canadian electronics geek and nascent YouTuber [Technoyaki] wanted to measure 20 volt signals on his Arduino. One might typically use a voltage divider to knock them down to the 5 volt range of the Arduino’s 10-bit A/Ds. But he isn’t one to take the conventional approach. Instead of using two resistors, [Technoyaki] decides to build an analog circuit out of sixteen resistors, four op amps and a separate 6 VDC supply.

Oscilloscope photo showing the output signals from each of the quantizer's four op amps. They are positioned staggered on the screen so that you can see the original sinusoidal signal clearly.

What is a quantizer? In the usual sense, a quantizer transforms an analog signal (with an infinity of possible values) to a smaller (and finite) set of digital values. An A/D converter is a perfect example of a quantizer. [Technoyaki], stretching the definition slightly, and uses the term to describe his circuit, which is basically a voltage slicer. It breaks up the 20 V signal into four separate 5 V bands. Of course, one could almost  accomplish this by just using an Arduino Due, which has a 12-bit A/D converter (almost, because it has a lower reference voltage of 3.3 V). But that wouldn’t be as much fun.

Why use all these extra components? Clearly, reducing parts count and circuit complexity was not one of [Technoyaki]’s goals. As he describes it, the reason is to avoid the loss of A/D resolution inherent with the traditional voltage divider. As a matter of semantics, we’d like to point out that no bits of resolution are lost when using a divider — it’s more accurate to say that you gain bits of resolution when using a circuit like the quantizer.  And not surprising for precision analog circuitry, [Technoyaki] notes that there are yet a few issues yet to be solved. Even if this circuit ultimately proves impractical, it’s a neat concept to explore. Check out the video below the break, where he does a great job explaining the design and his experiments.

Even though this isn’t quite a cut-and-paste circuit solution at present, it does show another way to handle large signals and pick up some bits of resolution at the same time. We wrote before about similar methods for doubling the A/D resolution of the Arduino. Let us know if you have any techniques for measuring higher voltages and/or increasing the resolution of your A/D converters.

Continue reading “Arduino Measures 20V Signals Using Quantizer”

Detect Lightning Strikes With An Arduino

Lightning is a powerful and seemingly mysterious force of nature, capable of releasing huge amounts of energy over relatively short times and striking almost at random. Lightning obeys the laws of physics just like anything else, though, and with a little bit of technology some of its mysteries can be unraveled. For one, it only takes a small radio receiver to detect lightning strikes, and [mircemk] shows us exactly how to do that.

When lightning flashes, it also lights up an incredibly wide spectrum of radio spectrum as well. This build uses an AM radio built into a small integrated circuit to detect some of those radio waves. An Arduino Nano receives the signal from the TA7642 IC and lights up a series of LEDs as it detects strikes in closer and closer proximity to the detector. A white LED flashes when a strike is detected, and some analog circuitry supports an analog galvanometer which moves during lightning strikes as well.

While this project isn’t the first lightning detector we’ve ever seen, it does have significantly more sensitivity than most other homemade offerings. Something like this would be a helpful tool to have for lifeguards at a pool or for a work crew that is often outside, but we also think it’s pretty cool just to have around for its own sake, and three of them networked together would make triangulation of strikes possible too.

Continue reading “Detect Lightning Strikes With An Arduino”