Laser Z-Axis Table Comes Into Focus

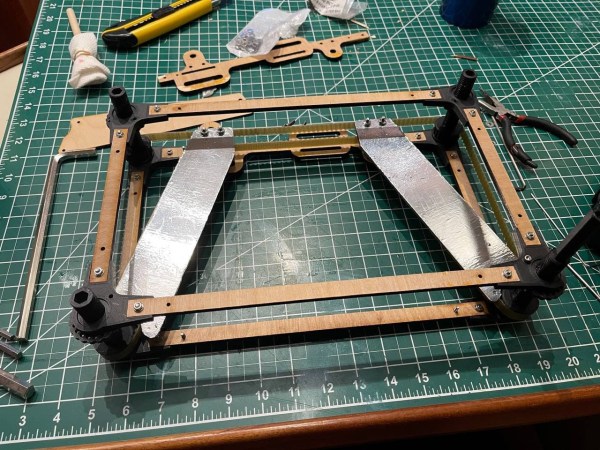
Laser cutters and 3D printers are game-changing tools to have in the workshop. They make rapid prototyping or repairs to existing projects a breeze as they can churn out new parts with high precision in a very short amount of time. The flip side of that, though, is that they can require quite a bit of maintenance. [Timo] has learned this lesson over his years-long saga owning a laser cutter, although he has attempted to remedy most of the problems on his own, this time by building a Z-axis table on his own rather than buying an expensive commercial offering.

The Z-axis table is especially important for lasers because a precise distance from the lens to the workpiece is needed to ensure the beams’s focal point is correctly positioned. Ensuring this distance is uniform over the entire bed can be a project all on its own. For this build, [Timo] started by building a simple table that allowed all four corners to be adjusted, but quickly moved on to a belt-driven solution that uses a stepper motor in order to adjust the entire workspace. The key to the build was learning about his specific laser’s focal distance which he found experimentally by cutting a slot in an angled piece of wood and measuring the height where the cut was the cleanest.

After everything was built, [Timo] ended up with a Z-axis table that is easily adjustable to the specific height required by his laser. Having a laser cutter on hand to bootstrap this project definitely helped, and it also seems to be an improvement on any of the commercial offerings as well. This also illustrates a specific example of how a laser cutter may be among the best tools for prototyping parts and building one-off or custom tools of any sort.

Laser doping silicon wafer

Laser Doping His Way To Homemade Silicon Chips

It’s a pity that more electronics enthusiasts haven’t taken the hobby to its ultimate level: making your own semiconductors. There are plenty of good reasons for that: chief among them is the huge expense involved in obtaining the necessary equipment. But for the sufficiently clever, there are ways around that.

[Zachary Tong] is dipping his toes into the DIY semiconductor world, and further to the goal of keeping costs to a hobbyist scale, is experimenting with laser doping of silicon. Doping is the process of adding impurities to silicon wafers in a controlled manner to alter the electrical properties of the semiconductor. [Zach]’s doping method is a more localized version of the simple thermal diffusion method, which drives a dopant like phosphorus into silicon using high temperatures, but instead of using a tube furnace, he’s using a fiber laser.

The video below shows his two-step process, which first blasts the silicon oxide layer off the wafer before doping with the laser shining through a bath of phosphoric acid. The process is admittedly fussy, and the results were mixed at best. [Zach]’s testing seems to suggest that some doping occurred, and it even looks like he managed to make something reasonably diode-like using the method.

Although the jury is still out on [Zach]’s method, we thought the effort was the important bit here. Granted, not everyone has a fiber laser kicking around to replicate his results, but it’s always good to see progress in the DIY semiconductor field. Here’s hoping [Zach]’s work, along with the stuff that [Sam Zeloof] is doing, kicks off a spate of garage semiconductor fabs.

Continue reading “Laser Doping His Way To Homemade Silicon Chips”

Laser Sees Through Keyhole

Those guys at Stanford must be watching a lot of James Bond movies. Their latest invention is a laser that can image an entire room through a keyhole. We imagine that will show up in a number of spy movies real soon now. You can see the code or watch the video below.

The technique is called NLOS or non-line-of-sight imaging. Previous approaches require scanning a large area to find indirect light from hidden objects. This new approach uses a laser to find objects that are moving. The indirect data changes based on the movement and an algorithm can reverse the measurements to determine the characteristics of the object.

Continue reading “Laser Sees Through Keyhole”

Lasers Make PCBs The Old Fashioned Way

There are many ways to create printed circuit boards, but one of the more traditional ways involves using boards coated with photoresist and exposing the desired artwork on the board, usually with UV light. Then you develop the board like a photograph and etch it in acid. Where the photoresist stays, you’ll wind up with copper traces. Hackers have used lots of methods to get that artwork ranging from pen plotters to laser printers, but commercially a machine called a photoplotter created the artwork using a light and a piece of film. [JGJMatt] sort of rediscovered this idea by realizing that a cheap laser engraver could directly draw on the photoresist.

The laser dot is about 0.2 mm in diameter, so fine resolution boards are possible. If you have a laser cutter or engraver already, you have just about everything you need. If not, the lower-power laser modules are very affordable and you can mount one on a 3D printer. Most people are interested in using these to cut where higher power is a must, but for exposing photosensitive film, you don’t need much power. The 500 mW module used in the project costs about fifty bucks.

Continue reading “Lasers Make PCBs The Old Fashioned Way”

Cardboard Vs. Laser Shootout: A Tale Of Speed And Power Settings

You probably already know that cardboard is versatile, but that goes far beyond the corrugated stuff. There are many types of cardboard out there, some of which you may not even be aware of. In the video after the break, [Eric Strebel] goes through them all and pits each one against his 50 W water-cooled laser with air assist, making a nice reference for himself in the process.

The point of this shootout is to find the optimum speed and power settings for each of these materials using a free power versus speed file. [Eric] almost always runs the thing somewhere between 10% and 50% power, so that’s the range represented here. He’s looking for two things: the settings that leave the least amount of kerf (make the thinnest cut line) and make the cleanest cuts without producing a lot of residue.

[Eric] divided his contestants into three weight classes, the heavyweights being butter board, chip board, mat board, and illustration board All of these are thicker than 1mm. On the middleweight roster, you have railroad board, 4-ply Bristol board, and stencil board, and all of these are under 1mm thickness. Finally, we have the lightweights — yupo paper and 300 series Bristol board, both of which are less than ½ mm thick.

To test their model-making capabilities, [Eric] made a cube out of each material. Once the glue is dry, he peels off the painter’s tape and goes through the various pros and cons of them all. Be sure to check it out after the break.

Of course, you don’t have to hit up the art store to have fun with cardboard — just visit your recycling bin and mix up some cardboard pulp for sculpting and molding.

Continue reading “Cardboard Vs. Laser Shootout: A Tale Of Speed And Power Settings”

Children playing a zombie shooting game on a big screen

Halloween Game Lets You Shoot Zombies With A Laser-Powered Crossbow

Suppose you were looking for all the essential elements to make a great Halloween-themed shooting game. Zombies? Check. Giant “lasers”? Check. Crossbows shooting forks? We’ve got you covered. Check out “Fork The Zombies“, which was set up by [piles.of.spam] to entertain the neighborhood kids this Halloween.

The game is played on a big screen, which shows a horde of angry zombies marching toward the player, who has to shoot as many as possible before they reach the front of the screen. The weapon provided is a crossbow; when the trigger is pulled, a fork is launched and hopefully skewers one of the ghouls. The game was written using an open-source engine called Urho3D, which takes care of all the hard-core 3D and physics work, allowing the user to focus on designing the gameplay and visuals.

A wooden crossbow game controller
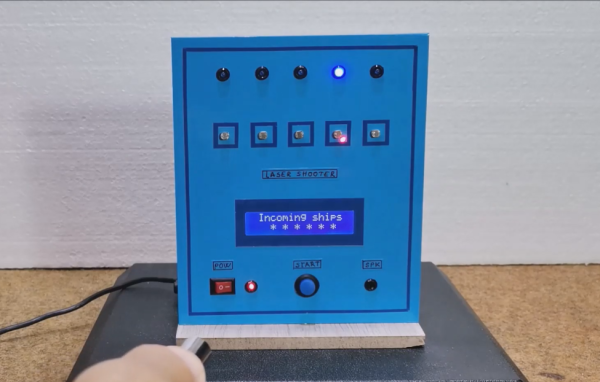
To give the game a bit more of a physical feel, [piles.of.spam] made an actual crossbow for the player to wield. Its handle was cut from a scrap piece of wood, using a band saw for the general shape and a CNC machine for the delicate cut-outs that hold a laser pointer, an ESP32 and a microswitch-based trigger. The laser shines onto the game screen, while the ESP32 sends out a data packet over WiFi when the trigger is pulled.

The location of the shot is tracked using a clever trick: a webcam is pointed at the screen, with a red color filter in front. This way, it only sees the red laser dot moving across the screen. The resulting image is processed using the Python OpenCV library, which provides functions to convert the relative motion of the pointer on the screen to an absolute position along the playing field.

A webcam on top of a Jetson Nano, with a red color filter in frontThe computing hardware consists of a pair of Jetson Nano boards, which sport quad-core ARM A57 CPUs as well as powerful graphics hardware to generate the game’s visuals. The end result is impressive, especially given the fact that all of this was designed and built in just three weeks. It was apparently a great hit with its intended audience, as visitors queued to try their hand at shooting the hungry zombies.

Laser pointers are an obvious tool for creating shooting games: we’ve seen ones with a single round target, a set of shapes set up around you, and even metal cans that fall over and stand up again. But if you need to protect yourself in case of an actual zombie apocalypse, a slingshot that shoots knives might be more useful.

Continue reading “Halloween Game Lets You Shoot Zombies With A Laser-Powered Crossbow”

A game board with five LEDs and a hand shining a laser pointer at it

Laser Pointer And Arduino Make A Minimalistic Shooting Game

Video games are great and all, but sometimes you just want the thrill of manipulating actual objects in addition to watching action on a screen. This must have been the reason why Nintendo’s Duck Hunt became so popular despite the simplicity of its gameplay. Prolific hacker [mircemk] similarly made a computer-plus-physical game called “Laser Shooter“, which somehow reminds us of the good old NES game.

The game is based on an Arduino Nano, to which five LEDs as well as five photoresistors (LDRs) are connected. When the game is started, the LEDs light up at random and the player has a limited time to “shoot” the corresponding LDR with a laser pointer. This time limit is decreased as the game progresses, and the game is over once the player fails to hit the target on time. The “Game Over” message is accompanied by a sad tune, but luckily no giggling dog.

Complete schematics and code are available for anyone willing to try their hand at replicating or improving this game. And no, you can’t simply sweep your laser across the five LDRs all the time, because you lose if you shoot at the wrong target. For more laser pointer-based games, try this Laser Command clone or this laser tag badge system.

Continue reading “Laser Pointer And Arduino Make A Minimalistic Shooting Game”