Hackaday Podcast 101: Lasering And Milling Absolutely Everything

Hackaday editors Mike Szczys and Elliot Williams discuss our favorite hacks of the past week. We accidentally chose a theme, as most of the projects use lasers and are about machining work. We lead off with a really powerful laser that can directly etch circuit boards, only to be later outdone by an even more powerful laser using a chemistry trick to etch glass. We look at how to mix up your own rocket motors, bootstrap your own laser tag, and go down the rabbit hole of building tools for embedded development. The episode wraps up as we discuss what exactly NVMe is and where hardware hacking might take it.

Take a look at the links below if you want to follow along, and as always, tell us what you think about this episode in the comments!

Direct download (~65 MB)

Places to follow Hackaday podcasts:

Continue reading “Hackaday Podcast 101: Lasering And Milling Absolutely Everything”

Beam Dump Makes Sure Your Laser Path Is Safely Terminated

Between hot things, sharp things, and spinny things, there’s more than enough danger in the average hacker’s shop to maim and mutilate anyone who fails to respect their power. But somehow lasers don’t seem to earn the same healthy fear, which is strange considering permanent blindness can await those who make a mistake lasting mere fractions of a second.

To avoid that painful fate, high-power laser fan [Brainiac75] undertook building a beam dump, which is a safe place to aim a laser beam in an experimental setup. His version has but a few simple parts: a section of extruded aluminum tubing, a couple of plastic end caps, and a conical metal plumb bob. The plumb bob gets mounted to one of the end caps so that its tip points directly at a hole drilled in the center of the other end cap. The inside and the outside of the tube and the plumb bob are painted with high-temperature matte black paint before everything is buttoned up.

In use, laser light entering the hole in the beam dump is reflected off the surface of the plumb bob and absorbed by the aluminum walls. [Brainiac75] tested this with lasers of various powers and wavelengths, and the beam dump did a great job of safely catching the beam. His experiments are now much cleaner with all that scattered laser light contained, and the work area is much safer. Goggles still required, of course.

Hats off to [Brainiac75] for an instructive video and a build that’s cheap and easy enough that nobody using lasers has any excuse for not having a beam dump. Such a thing would be a great addition to the safety tips in [Joshua Vasquez]’s guide to designing a safe laser cutter.

Continue reading “Beam Dump Makes Sure Your Laser Path Is Safely Terminated”

Laser Blasts Out High-Quality PCBs

With how cheap and how fast custom PCBs have gotten, it almost doesn’t make sense to roll your own anymore, especially when you factor in the messy etching steps and the less than stellar results. That’s not the only way to create a PCB, of course, and if you happen to have access to a 20-Watt fiber laser, you can get some fantastic homemade PCBs that are hard to tell from commercial boards.

Lucikly, [Saulius Lukse] of Kurokesu fame has just such a laser on hand, and with a well-tuned toolchain and a few compromises, he’s able to turn out 0.1-mm pitch PCBs in 30 minutes. The compromises include single-sided boards and no through-holes, but that should still allow for a lot of different useful designs. The process starts with Gerbers going through FlatCAM and then getting imported into EZCAD for the laser. There’s a fair bit of manual tweaking before the laser starts burning away the copper between the traces, which took about 20 passes for 0.035-mm foil on FR4. We have to admit that watching the cutting proceed in the video below is pretty cool.

Once the traces are cut, UV-curable solder resist is applied to the whole board. After curing, the board goes back to the laser for another pass to expose the pads. A final few passes with the laser turned up to 11 cuts the finished board free. We wonder why the laser isn’t used to drill holes; we understand that vias would be hard to connect to the other side, but it seems like through-hole components could be supported. Maybe that’s where [Saulius] is headed with this eventually, since there are traces that terminate in what appears to be via pads.

Whatever the goal, these boards are really slick. We usually see lasers used to remove resist prior to traditional etching, so this is a nice change.

Continue reading “Laser Blasts Out High-Quality PCBs”

Micromachining Glass With A Laser — Very, Very Slowly

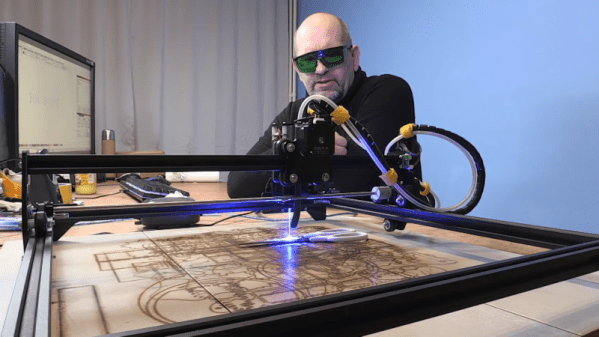
When it comes to machining, the material that springs to mind is likely to be aluminum, steel, or plastic. We don’t necessarily think of glass as a material suitable for machining, at least not in the chuck-it-up-in-the-lathe sense. But glass is a material that needs to be shaped, too, and there are a bunch of different ways to accomplish that. Few, though, are as interesting as micromachining glass with laser-induced plasma bubbles. (Video, embedded below.)

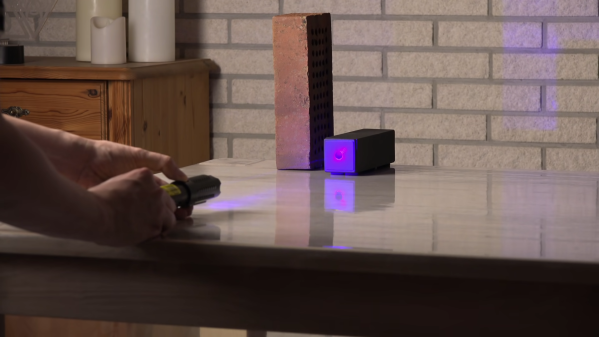
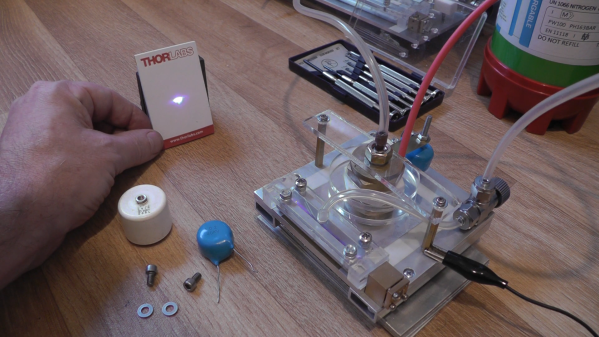
The video below is from [Zachary Tong]. It runs a bit on the longish side, but we found it just chock full of information. The process, formally known as “laser-induced backside wet-etching,” uses a laser to blast away at a tank of copper sulfate. When a piece of glass is suspended on the surface of the solution and the laser is focused through the glass from the top, some interesting things happen.

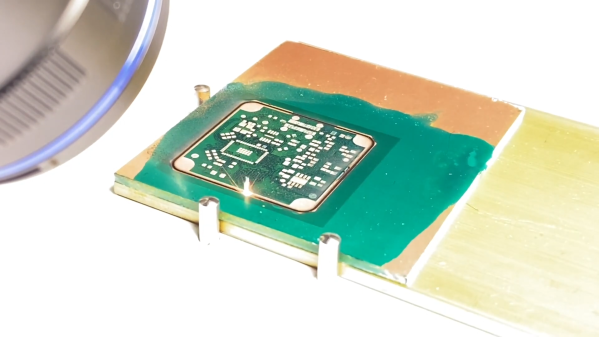
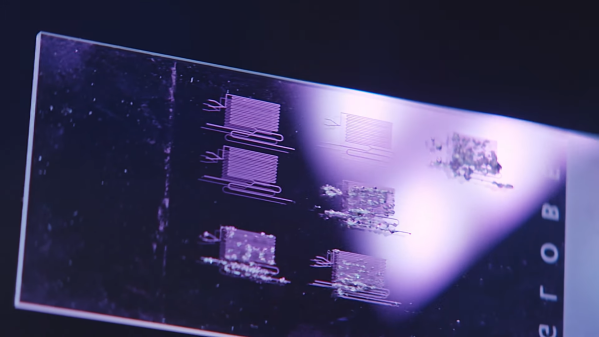
The first pulse of the laser vaporizes the solution and decomposes the copper sulfate. Copper adsorbs onto the glass surface inside the protective vapor bubble, which lasts long enough for a second laser pulse to come along. That pulse heats up the adsorbed copper and the vapor in the original bubble, enough to melt a tiny bit of the glass. As the process is repeated, small features are slowly etched into the underside of the glass. [Zachary] demonstrates all this in the video, as well as what can go wrong when the settings are a bit off. There’s also some great high-speed footage of the process that’s worth the price of admission alone.

We doubt this process will be a mainstream method anytime soon, not least because it requires a 50-Watt Nd:YAG fiber laser. But it’s an interesting process that reminds us of [Zachary]’s other laser explorations, like using a laser and Kapton to make graphene supercapacitors.

Continue reading “Micromachining Glass With A Laser — Very, Very Slowly”

DIY Laser Tag System Comes With All The Bells And Whistles

While VR is becoming really immersive, it still can’t compete with a game of good old laser tag to get the blood pumping and spending quality time with friends. [Xasin] has been working on a DIY laser tag system for a while now, and it has grown to include an impressive array of features and customizability.

Named LZRTag, the project started back in 2018 with simple ATmega328 based prototypes on breadboards. It has since evolved to a fully-featured system with ESP32s in the 3D printed pistol communicating with a Raspberry Pi/Linux game server over MQTT. Each pistol also features an accelerometer, I2S audio amp and speaker for game sounds, and WS2812 RGP LEDs for light effects. IR Lasers are used as emitters to target wearable IR receivers with more RGB LEDs wired to the pistol.

A Ruby server on a Linux machine takes care of all the communications, game management, shot validation, and scoring. It can handle up to 255 players and is designed to be extremely customizable for game modes, weapons classes, or any other feature you would like to have. [Xasin] has also created IR beacons to add even more possibilities, such as capture the flag, safe zones, and revive zones.

We really like the flexibility of the system, and it would make an awesome group project for a hackerspace. You could also add a shock module to motivate players a bit more to avoid getting shot. If you want more gun, take a look at the laser tag rifle with a HUD we featured earlier in the year Continue reading “DIY Laser Tag System Comes With All The Bells And Whistles”

Laser Etching Stainless Steel With Mustard

[Brain] wanted to mark some scissors with his Ortur laser engraver. The problem? The laser won’t cut into the hard metal of the scissors. His solution? Smear the scissors with mustard. No kidding. We’ve heard of this before, and apparently, you can use vinegar, as well, but since the mustard is a paste it is easier to apply. You can see the result in the video, below.

In case you think you don’t need to watch because we’ve already told you the trick, you should know that [Brian] also goes into a lot of detail about preparing single line fonts to get a good result, among a few other tips like improvements to his air assist setup. On a laser cutter, the air assist blows away charred material leaving a clear field of view between the laser and the remaining uncut material. Using a proper air assist can really expand the capabilities of these inexpensive laser cutters — something we recently saw upgraded with a 3D-printed air assist nozzle.

You can buy a commercial marking solution called CerMark Black, but you probably already have mustard. If you are super cheap, you can probably pick up a packet next time you buy a burger somewhere. After all, you don’t need much. Although the video talks about the Ortur, this technique would work with any engraver. We’ve also heard you can do something similar with plaster and alcohol.

Continue reading “Laser Etching Stainless Steel With Mustard”

No Doorknobs Needed For This Nitrogen Laser Build

Sometimes the decision to tackle a project or not can boil down to sourcing parts. Not everything is as close as a Digi-Key or Mouser order, and relying on the availability of surplus parts from eBay or other such markets can be difficult. Knowing if and when a substitute will work for an exotic part can sometimes be a project all on its own.

Building lasers is a great example of this, and [Les Wright] recently looked at substitutes for hard-to-find “doorknob” capacitors for his transversely excited atmospheric lasers. We took at his homebrew TEA lasers recently, which rely on a high voltage supply and very rapid switching to get nitrogen gas to lase. His design uses surplus doorknob caps, big chunky parts rated for very high voltages but also with very low parasitic inductance, which makes them perfect for the triggering circuit.

[Les] tried to substitute cheaper and easier-to-find ceramic power caps with radial wire leads rather than threaded lugs. With a nominal 40-kV rating, one would expect these chunky blue caps to tolerate the 17-kV power supply, but as he suspected, the distance between the leads was short enough to result in flashover arcing. Turning down the pressure in the spark gap chamber helped reduce the flashover and prove that these caps won’t spoil the carefully engineered inductive properties of the trigger. Check out the video below for more details.

Thanks to [Les] for following up on this and making sure everyone can replicate his designs. That’s one of the things we love about this community — true hackers always try to find a way around problems, even when it’s just finding alternates for unobtanium parts.

Continue reading “No Doorknobs Needed For This Nitrogen Laser Build”