ESP-Drone: Building An ESP32-Based Quadcopter For Not Much Cash

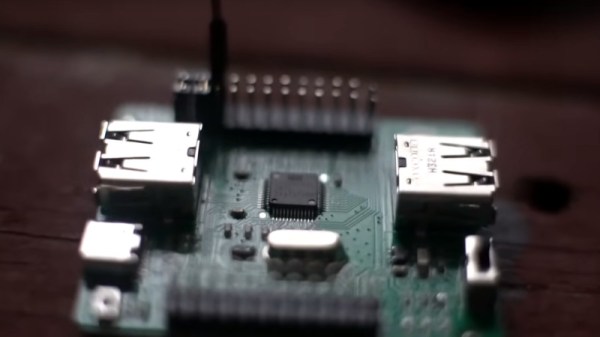
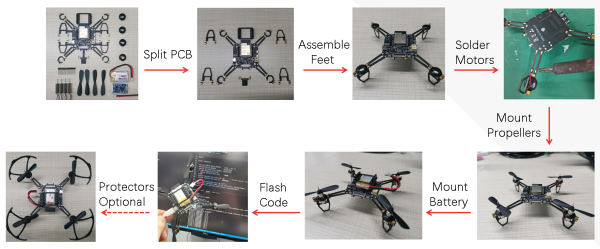
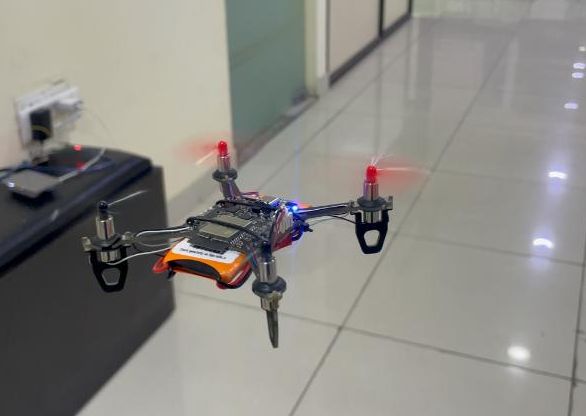
What’s the cheapest quadcopter you can build? As [Circuit Digest] demonstrates with their variant of the ESP-Drone project by Espressif, you only need a minimum of parts: an ESP32 MCU, an inertial measurement unit (IMU) such as the MPU6050, and four MOSFETs to drive the brushless DC motors. As the PCB also forms the structural frame and landing struts for the quadcopter, not even a 3D printer is needed. All told, [Circuit Digest] figures the total BOM comes in at around 1,000 Indian Rupees, or about $12 USD.

The fully assembled ESP-Drone flying around. (Credit: Circuit Digest)

While this [Circuit Digest] project provides basic IMU functionality, the Espressif project also has a few expansion boards detailed on its hardware page, depending on the base model of the mainboard you pick. The [Circuit Digest] project follows the ESPlane-V2-S2 version with no expansion boards, but the ESP32-S2-Drone V1.2 mainboard can be extended with position-hold, pressure and compass modules, as well as custom boards.

As a derivative of the Bitcraze Crazyflie project, the ESP-Drone firmware also supports the rather nifty cfclient software for remote monitoring, logging and control. This may also be in the [Circuit Digest] firmware, but wasn’t listed among the features.

Continue reading “ESP-Drone: Building An ESP32-Based Quadcopter For Not Much Cash”

LoRA, With No Radio

A LoRa project has traditionally required a dedicated radio module, because it’s a commercially licenced protocol. But as the way it works has been progressively reverse engineered, it’s become ever more possible to produce a LoRA radio for yourself. But what about a LoRA radio without a radio at all? [CNLohr] has managed just that, by driving a microcontroller pin and relying on one of its harmonics to provide enough RF to be received by a LoRA gateway.

The video below the break goes into the process in great detail, revealing some of the tricks. Undersampling to create intentional aliasing for example allows subharmonic peaks to be produced in unexpected places. Most of the development is performed on Espressif microcontrollers, but as the code is optimised it becomes possible to use it on much more modest silicon. The dirt cheap CH32V003 RISC-V microcontroller for example can be a LoRA transmitter able to talk to a gateway at a range of hundreds of metres with the CH32 and 2.5km with the ESP32. The code can be found in this GitHub repository.

The CH32 can’t receive of course, and it relies on barfing harmonics all over the spectrum to work. But on the other hand its total RF output is so tiny that we’re guessing a filter for the LoRA band might even make it almost legal. He’s got a little way to go before beating the record though.

Continue reading “LoRA, With No Radio”

2024 Home Sweet Home Automation: [HEX]POD – Climate Tracker And Digital Nose

[eBender] was travelling India with friends, when one got sick. Unable to find a thermometer anywhere during COVID, they finally ended up in a hospital. After being evacuated back home, [eBender] hatched an idea to create a portable gadget featuring a few travel essentials: the ability to measure body temperature and heart rate, a power bank and an illumination source. The scope evolved quite a lot, with the concept being to create a learning platform for environmental multi-sensor fusion. The current cut-down development kit hosts just the air quality measurement components, but expansion from this base shouldn’t be too hard.

ML for Hackers: Fiddle with that Tensor Flow

This project’s execution is excellent, with a hexagon-shaped enclosure and PCBs stacked within. As everyone knows, hexagons are the bestagons. The platform currently hosts SCD41 and SGP41 sensors for air quality, a BME688 for gas detection, LTR-308 for ambient light and motion, and many temperature sensors.

On top sits a 1.69-inch IPS LCD, with an OLED display on the side for always-on visualization. The user interface is completed with a joystick and a couple of buttons. An internal blower fan is ducted around the sensor array to pull not-so-fresh air from outside for evaluation. Control is courtesy of an ESP32 module, with the gory details buried deep in the extensive project logs, which show sensors and other parts being swapped in and out.

On the software side, some preliminary work is being done on training TensorFlow to learn the sensor fusion inputs. This is no simple task. Finally, we would have a complete package if [eBender] could source a hexagonal LCD to showcase that hexagon-orientated GUI. However, we doubt such a thing exists, which is a shame.

There are many air quality sensors on the market now, so we see a few hacks based on them, like this simple AQ sensor hub. Let’s not forget the importance of environmental CO2 detection; here’s something to get you started.

Trick Your (1970) Pickup Truck

[Dave] wanted an old pickup, and he found a GMC Sierra Grande truck vintage 1970. While it had an unusual amount of options, there weren’t that many high-tech options over 50 years ago. The five-year-long restoration work was impressive, as you can see in the video below, but we were really interested in the electronics part. As [Dave] mentions, the truck was made when the Saturn V was taking people to the moon, but after his modifications, the truck has a lot more computing power than the famous rocket.

He was concerned that the taillights were not up to modern standards and that it would be too easy for someone using their cell phone to plow into the rear of the truck. So he broke out an ESP32 and some LEDs and made an attractive brake light that would have been a high-tech marvel in 1970.

Continue reading “Trick Your (1970) Pickup Truck”

Dodge, The Weird Tripod Robot

[hannu_hell] created Dodge as a “novel design of tripod.” It’s a small robotic device quite unlike anything else we’ve seen of late. It’s intended to be a self-mobile camera platform that can move itself around to capture footage as needed.

Dodge is essentially a two-legged robot with a large flat “foot” in the center. When stationary, it rests on this flat foot. When it needs to move, it can raise this center foot and rest on its two outside legs. If Dodge needs to move, it can crab back and forth in a line with these two legs. If it wants to turn, it can return to resting on its center foot, and pivot about its central axis. It can thus rotate itself and use its two outer legs to move further as needed.

Dodge does all this while carrying an ESP32 Cam module. The idea is that it’s a small mobile tripod platform with a live camera feed. It reminds us of various small monitoring robots from cartoons and anime.

Ultimately, it’s an interesting take on robot locomotion. Rather than walking with two legs or four legs and dynamic stability, it takes full advantage of static stability instead.

We’ve seen some wild roboticized camera rigs over the years. Video after the break.

Continue reading “Dodge, The Weird Tripod Robot”

PCB Design Review: ESP32-S3 Round LCD Board

For our next installment, I have a lovely and daring PCB submitted by one of our readers, [Vas]. This is an ESP32-S3 board that also has an onboard round TFT display, very similar to the one we used on the Vectorscope badge. The badge is self-sufficient – it has an ESP32, it has a display, a programming connector, two different QWIIC ports you could surely use as GPIOs – what’s not to love?

This is a two-layer board, and I have to admit that I seriously enjoy such designs. Managing to put a whole lot of things into two layers is quite cool in my book, and I have great fun doing so whenever I get the opportunity. There’s nothing wrong with taking up more layers than needed – in fact, if you’re concerned about emitted/received noise or you have high-speed interfaces, four-layer is the way to go. But making complex boards with two layers is a nice challenge, and, it does tend to make these boards cheaper to manufacture as a very nice bonus.

Let’s improve upon it, and support [Vas]’s design. From what I can see looking at this board, we can help [Vas] a lot with ease of assembly, perhaps even help save a hefty amount of money if they go for third-party PCBA instead of sitting down with a stencil – which you could do with this board pretty easily, since all of the components on it, save for the display, are the ones you’d expect JLCPCB to stock.

Continue reading “PCB Design Review: ESP32-S3 Round LCD Board”

Dev Board Watch Takes Path Of Least Resistance

Building your own watch or clock is kind of a maker’s rite of passage. Once upon a time, if you went with a wrist watch, you’d typically work on producing your own compact PCB with everything crammed into a typical watch form factor, maybe relying on a simple binary output for compactness and simplicity. Times have changed, however, and [Arnov]’s design is altogether different in its construction.

The build relies on a XIAO ESP32-C3 microcontroller board as the brains of the operation. It’s paired with the XIAO expansion board. It’s designed as a carrier for the ESP32-C3, giving it a bunch of IO that’s accessible over readily-accessible connectors. It also features a display, a real-time clock, and a battery — pretty much the three main things you’d need to add to an ESP32 to turn it into a watch.

Thus, with the electronics pretty much done, it was simply up to [Arnov] to turn the device into a watch. He achieved this by screwing the frame and strap of an old Casio watch to a 3D printed carrier for the XIAO expansion board. With that done, it was simply a matter of writing the code to show the time from the RTC on the display. There’s no connectivity features, no smart stuff going on — just the time and date for your perusal.

Some might decry the project for simply slapping a watch band on a devboard. Or, you could look at how this indicates just how fast and easy development can be these days. Once upon a time, you could spend weeks trying to find a cheap display and then further weeks trying to get it working with your microcontroller. Now you can spend $20, get the parts in a few days, and get your project blasting along minutes later.

If you’ve done an altogether more ornate watch build of your own, we’d love to see that, too. Show us on the tipsline!