3D Printed Engine Gets Carburetor

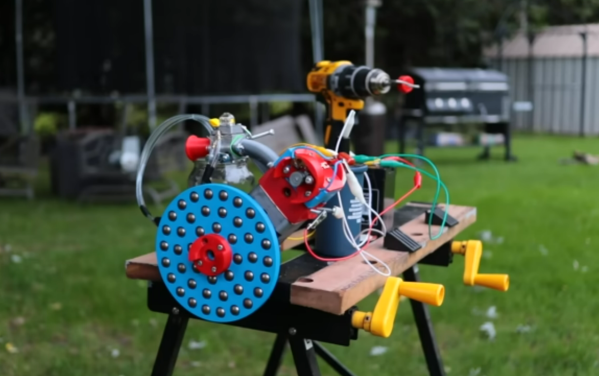
3D printed materials have come a long way in the last decade or so as printers have become more and more mainstream. Printers can use all kinds of different plastics with varying physical characteristics, and there are even printers now for other materials like concrete and metal. But even staying within the realm of the plastic printer can do a lot of jobs you might not expect. [Camden Bowen] recently 3D printed a single-piston engine which nearly worked, and is back with some improvements to it thanks to a small carburetor.

The carburetor itself isn’t 3D printed (although not from lack of trying) — it’s on loan from a weed eater, and is helping to solve a problem with the fuel-air mixture of his original design. Switching from butane to a liquid fuel also solved some problems as well, and using starter fluid also helped to kick off the ignition. Although it ran for a short period of time over several starts, the valve train suffered some damage with the exhaust valves melting in place to the head. This is actually a problem common to any internal combustion engine like this, especially if the fuel-air mixture is too lean, there’s incomplete combustion, the valves aren’t adjusted properly, or any number of other problems. In this case it seems to have been caused by improper engine timing.

It’s actually noteworthy though that the intake valves weren’t burned, meaning that if the engine can be tuned to allow for complete combustion before the exhaust gasses leave the combustion chamber, the plastic 3D printed head and valve train will likely survive much longer operational periods. We’ll certainly look forward to the next iteration of this engine build to see if that’s the case. If 3D printed piston engines aren’t your speed, though, take a look at this jet engine which uses a 3D printed compressor.

Continue reading “3D Printed Engine Gets Carburetor”

Make Your Own Vinegar

Making fermentation work for us is one of the original hacks that allowed humans to make food last longer, and festivities more interesting. [Mike G] has been experimenting with making his own vinegar, and found the end product to be a delicious addition to his cooking.

The first step is similar to making alcoholic beverages. Take something that contains sugar, like fruit, mix it with water and let stand. Wild yeast will feed on the sugar and create alcohol. Once the alcohol content reaches the 6-12% range, the resulting liquid can be separated from the solids and left exposed to the air. This allows Acetobacter bacteria to convert the alcohol into aceticĀ acid, producing vinegar. The entire process takes around 30 days.

[Mike]’s first round of experiments was mainly with fresh fruit, with the addition of raisins. To prevent white mold from forming the mixtures should be stirred daily, but life got in the way and mold got out of control on all the fruits, except for the raisins. This gave [Mike] the to try another round with dried fruit, which was significantly less prone to mold, and produced deliciously flavored vinegar. [Mike] also demonstrated their use in a couple of mouth-watering dishes.

The DIY vinegar production process is just begging for some fermentation monitoring and automation tech. We’ve seen plenty of sourdough and beer production projects, which we suspect could also be applied to vinegar production with some minor changes.

Continue reading “Make Your Own Vinegar”

Will A Kettle Filled With Alcohol Boil Dry?

The average home kettle is set up to switch off automatically when water reaches its boiling point. But would a kettle filled with alcohol, which has a significantly lower boiling point, actually turn off? [Steve Mould] set out to find out.

The prediction was that a kettle full of 40% strength vodka would boil dry, as the vodka would evaporate before it actually got to a hot enough temperature to cause the kettle’s cutout mechanism to kick in. The experiment was done outside to minimise the dangers from the ethanol vapor. As it turns out, the vapor from the boiling vodka is about 80% ethanol and just 20% water, so eventually the mixture left in the kettle is mostly water and it boils hot enough to trigger the cutout mechanism.

However, the experiment doesn’t end there. Trying again with 99% ethanol, when the fluid started boiling, the kettle switched off even more quickly. So what’s going on?

The kettle in question uses a bimetallic strip, which trips the switch off in the base of the kettle when it gets too hot. There’s also a tube inside the kettle that carries vapor from the internal cavity and lets it pass over the bimetallic strip. When the liquid inside the kettle boils, it forces hot vapor through the tube, out of the kettle and over the bimetallic strip.

This strip triggers at a temperature significantly lower than the boiling point of water; indeed, as long as the liquid in the kettle is fairly hot and is boiling enough to force vapor out the tube, the kettle will switch off. [Steve] points out that it’s a good mechanism, as this mechanism allows the kettle to respond to boiling itself, rather than the arbitrary 100 C point which water technically only boils at when one is at sea level.

It’s an interesting look at a safety system baked into something many of us use every day without even thinking. It’s not the first time we’ve seen [Steve] dive deep into the world of tea-making apparatus, either. Video after the break.

Continue reading “Will A Kettle Filled With Alcohol Boil Dry?”

Faster IPA Recycling For Your Resin Print Workflow

If you’ve printed with photopolymer resins, you know that you need alcohol. Lots of alcohol. It makes sense that people would like to reuse the alcohol both to be environmentally responsible and to save a little money. The problem is that the alcohol eventually becomes so dirty that you have to do something. Given time, the polymer residue will settle to the bottom and you can easily pour off most of the clean liquid. You can also use filters with some success. But [Makers Mashup] had a different idea. Borrowing inspiration from water treatment plants, he found a chemical that will hasten the settling process. You can see a video of his process below.

The experimentation started with fish tank clarifier, which is — apparently — mostly alum. Alum’s been used to treat wastewater for a long time. Even the ancient Romans used it for that purpose in the first century. Alum causes coagulation and flocculation so that particles in the water wind up sinking to the bottom.

Continue reading “Faster IPA Recycling For Your Resin Print Workflow”

Art of 3D printer in the middle of printing a Hackaday Jolly Wrencher logo

3D Printering: Wash Parts Better And Make Solvent Last Longer

SLA printing in resin is great, but part washing can be a hassle. The best results come from a two-stage wash, but that also means more material and more processing steps. Fortunately, there are ways to make it easier and more effective. One such way is to use a part washing machine, and I’ll cover a DIY option to make your own, but despite what the advertising implies for the commercial ones, a wash machine isn’t a cure-all.

Let’s go through how to get the best results from part washing, how to make the solvent last as long as possible, and how to dispose of the eventual waste.

Resin-Printed Parts Need Washing

All parts printed in resin emerge from the printer coated in syrupy, uncured goop. This needs to be removed completely, or the print ends up sticky and no amount of drying or additional UV curing will change that. (There is a way to fix sticky prints, but it’s better to avoid the situation in the first place.)

Simple part washing can be done with nothing more than a jar in which to rinse and soak a small part for about ten minutes, but agitation and a secondary wash will go a long way toward better and more consistent results. As mentioned, part washing machines like to present themselves as a one-appliance solution, but best results still come from a two-stage wash, and that means some additional steps.

Continue reading “3D Printering: Wash Parts Better And Make Solvent Last Longer”

Graphene Prints More Smoothly Under The Influence Of Alcohol

If you’ve ever sloshed coffee out of your mug and watched the tiny particles scurry to the edges of the puddle, then you’ve witnessed a genuine mystery of fluid mechanics called the coffee ring effect. The same phenomenon happens with spilled wine, and with functional inks like graphene.

Graphene and other 2D crystals print much better under the influence of alcohol.

The coffee ring effect makes it difficult to print graphene and similar materials onto silicon wafers, plastics, and other hard surfaces because of this drying problem. There are already a few commercial options that can be used to combat the coffee ring effect, but they’re all polymers and surfactants that negatively affect the electronic properties of graphene.

Recently, a group of researchers discovered that alcohol is the ideal solution. In the case of spilled graphene, the particles fleeing for the edges are naturally spherical. By adding a mixture of isopropyl and 2-butanol alcohol, they get flattened into a pancake shape, resulting in smoother deformation during the drying process and an easier printing process with better results.

Graphene is quite interesting by nature, and has many uses. It can shift from an insulator to a superconductor with the right temperature changes, and it can desalinate sea water for drinking.

The Auto-Bartender

It’s the end of the academic semester for many students around the globe, so here comes the flurry of DIY projects. Always a great time to check out all the cool hacks from our readers all over the world. One project that piques our interest comes courtesy of [Jason Ummel] and his Auto-Bartender. (Video, embedded below.)

[Jason] developed this project as a part of his robotics class taught by Professor Martinez, one of our friends at FlexiLab. Powered by one of our favorite microcontrollers, the ATmega328, the Auto-Bartender is driven by a single 12 V motor coupled with 10 individual valves for separate drinks. Drinks are pumped into a cup sitting on top of a scale, allowing the device to know how much of each drink has been dispensed. The entire setup is controlled using a smartphone application developed in MIT App Inventor, a super-easy way to prototype Android applications.

Furthermore, [Jason] incorporated a number of user-centered design considerations into his project. These include an LCD to display updates, a green LED to indicate the device is in progress, and a buzzer to let the user know the drink is complete.

We really like the combination of craftsmanship, electronics hardware design, and software development that [Jason] put into his project. It’s the kind of project we know our readers will enjoy.

It looks like Jason substituted tap water for Whiskey and Dr. Pepper for his demo. Not exactly what we had in mind, but I guess he still has exams to finish.

Cool project [Jason]! We can’t wait to see Auto-Bartender on Hackaday.io.

Bottoms up! Continue reading “The Auto-Bartender”