Custom-Fit Small Shop Crane Lightens The Load

On the shortlist of workshop luxuries, we’d bet a lot of hackers would include an overhead crane. Having the ability to lift heavy loads safely and easily opens up a world of new projects, and puts the shop into an entirely different class of capabilities.

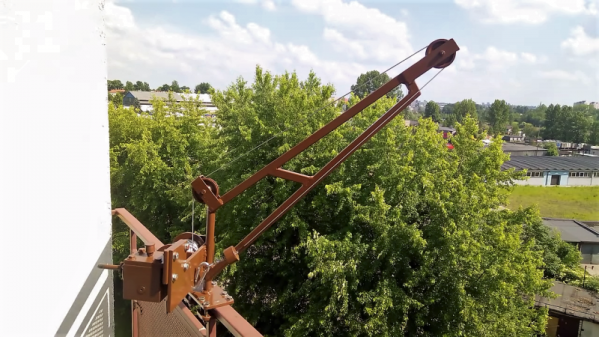
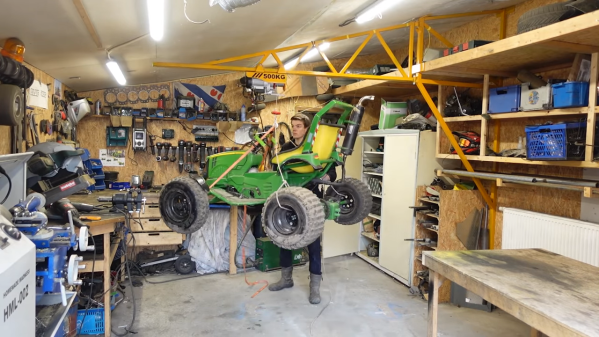
As with many of us, [Jornt] works in a shop with significant space constraints, so the jib crane he built had to be a custom job. Fabricated completely from steel tube, the build started with fabricating a mast to support the crane and squeezing it into a small slot in some existing shelves in the shop, which somehow didn’t catch on fire despite being welded in situ. A lot of custom parts went into the slewing gear that mounts the jib, itself a stick-built space frame that had to accommodate a pitched ceiling. A double row of tubing along the bottom of the jib allows a trolley carrying a 500 kg electric winch to run along it, providing a work envelope that looks like it covers the majority of the shop. And hats off for the safety yellow and black paint job — very industrial.

From the look of the tests in the video below, the crane is more than up to the task of lifting engines and other heavy loads in the shop. That should prove handy if [Jornt] tackles another build like his no-compromises DIY lathe again.

Continue reading “Custom-Fit Small Shop Crane Lightens The Load”

Lowering The Boom On Yagi Element Isolation

Antenna design can be confusing, to say the least. There’s so much black magic that goes into antennas that newbies often look at designs and are left wondering exactly how the thing could ever work. Slight changes in length or the angle between two elements result in a vastly different resonant frequency or a significant change in the antenna’s impedance. It can drive one to distraction.

Particularly concerning are the frequent appearances of what seem to be dead shorts between the two conductors of a feedline, which [andrew mcneil] explored with a pair of WiFi Yagi antennas. These highly directional antennas have a driven element and a number of parasitic elements, specifically a reflector behind the driven element and one or more directors in front of it. Constructive and destructive interference based on the spacing of the elements and capacitive or inductive coupling based on their length determine the characteristics of the antenna. [Andrew]’s test antennas have their twelve directors either isolated from the boom or shorted together to the shield of the feedline. In side-by-side tests with a known signal source, both antennas performed exactly the same, meaning that if you choose to build a Yagi, you’ve got a lot of flexibility in what materials you choose and how you attach elements to the boom.

If you want to dive a little deeper into how the Yagi works, and to learn why it’s more properly known as the Yagi-Uda antenna, check out our story on their history and operational theory. And hats off to [andrew] for reminding us that antenna design is often an exercise in practicality; after all, an umbrella and some tin cans or even a rusty nail will do under the right circumstances.

Continue reading “Lowering The Boom On Yagi Element Isolation”

Hiking Pole Turned Lightweight Yagi Antenna

Among amateur radio enthusiasts, there’s a subset of users who climb mountainous areas to use their gear from elevated positions. Anyone looking to take part in what’s known as Summits on the Air (SOTA) will obviously want to keep their equipment as light and small as possible. For [Stuart Thomas], that meant a collapsible yagi antenna he could easily pack away.

But one day he wondered why he was carrying around a separate antenna boom when his aluminum hiking pole would make a perfectly good substitute. All he had to do was figure out a way to mount the elements to the pole in a way that could be easily assembled in the field. He initially tried to use the sort of insulated electrical clamps used to hold down conduit, but he found they weren’t quite what he was after.

[Stuart] eventually ended up designing and 3D printing his own element mounts that use an M3 bolt to tightly clamp onto the hiking pole, preventing them from twisting while still being very lightweight and easy to adjust. To further reduce the packed size of the antenna, he cut each element in half with a pipe cutter and flared the ends slightly so he could reassemble them on location with inserts.

Even if you aren’t the type of person who owns hiking poles, let alone climbs mountains for fun, there’s still plenty of interesting applications for a lightweight yagi antenna. We’ve seen custom yagis built out of carbon fiber before and of course cobbling one together out of PVC and tape measures is a classic hack, but we think the solution [Stuart] has come up with strikes a nice balance between the extremes.

Continue reading “Hiking Pole Turned Lightweight Yagi Antenna”

High-End Headphones Get Flexible Boom Upgrade

It seems a reasonable assumption that anyone who’d be willing to spend a few hundred dollars on a pair of headphones is probably the type of person who has a passion for high quality audio. That, or they work for the government. We’re fairly sure [Daniel Harari] falls into that former category though, given how much thought he gave to adding a decent microphone to his Sennheiser HD650 headphones.

Not happy with the results he got from microphones clipped to his shirt or mounted on a stand, [Daniel] realized what he really wanted was a sensitive boom microphone. This would be close enough to his mouth that it wouldn’t pick up stray noises, but at the same time not obstruct his field of view or otherwise get in the way.

He found a few options on the market which would allow him to mount a boom microphone to his HD650’s, but he didn’t want to stick anything to them and risk scratching the finish so those weren’t really an option. [Daniel] decided to go the DIY route, and eventually settled on a microphone that would mount to the headphone’s existing connector which plugs in at the bottom of the cup.

To make his mount, he 3D printed a two piece clamp that could be screwed together and securely attach to the connector without making any permanent changes. Once he had that base component printed, he salvaged the flexible metallic neck from a cheap USB light and used that to hold the female 3.5mm connector. Into that he’s plugged in a small commercially available microphone that is usually used on voice recorders, which [Daniel] said sounds much better than even the larger mics he had tested.

Finally, he used Sugru to encapsulate the wires and create a flexible strain relief. The whole assembly is very light, easily movable, and perhaps most importantly, didn’t require any modifications or damage to a pair of headphones which have a retail price that could double as a car payment.

It’s been a few years since we’ve seen anyone brave enough to hack their pricey Sennheiser headphones. But in the past we covered a modification which gave them an infusion of Bluetooth and even one that reversed a sneaky manufacturer hardware limitation.

A DIY Balcony Crane Lifts Groceries For The Lazy But Patient

If necessity is the mother of invention, then laziness is probably its father. Or at least a close uncle. Who hasn’t thought, “There has to be a better way to do this, one that doesn’t involve me burning precious calories”?

Motivational laziness seems to increase with potential energy, as anyone who needs to haul groceries up four flights of stairs will tell you. This appears to be where this balcony-mounted drill-powered crane came from. Starting with a surplus right-angle gearbox and drum, [geniusz K] fabricated the rest of the crane from steel plate and tubing. We like the quality of fabrication and the tip on making slip couplings from bits of square tubing. The finished product got a nice coat of brown paint to match the balcony railing; keeping the neighbors happy is always important. He tested the crane with a 20-kg weight before installing it on the balcony and put it to work hauling groceries up three stories. Check out the build and the test in the video below.

While it won’t set any speed records, at least the drill is doing the work. But what if you’re impatient as well as lazy? Aside from being two-thirds of the way to programming greatness, you may have to up the game. A heavy-lift quadcopter, perhaps?

Continue reading “A DIY Balcony Crane Lifts Groceries For The Lazy But Patient”

Flaming Jack-o’-lanterns Light Up The Night

[misterdob] wanted to spice up his Halloween decor, so he built these flaming concrete jack -o’-lanterns to decorate his walkway. He started with the classic plastic jack-o’-lanterns that trick-or-treaters have been using to collect candy for years. [misterdob] filled the plastic pumpkins halfway with concrete mix, then dropped in metal coffee cans. He then filled the pumpkins up to the top with concrete, shaking them up a bit to avoid air pockets.

Once the concrete had set, [misterdob] cut away the plastic revealing nearly perfect concrete duplicates. He used acid stain to color his creations – though it looks like he missed a spot or two.

We have to disagree with [misterdob’s] choice of fuels. In fact, we think he was out of his gourd when he picked gasoline for his flaming pumpkins. Seriously though, gasoline is a horrible choice for a fire pot like this for a multitude of reasons. Gas has a particularly foul odor and its fumes are explosive. If a Halloween prankster were to try kicking one of the pumpkins over, not only would they have a broken foot, they’d also be covered in burning gas.

Thankfully, the folks on [misterdob’s] Reddit thread had better fuel suggestions – citronella torch cans with lamp oil and wicks, kerosene, or gel fuel would be better suited for these hot pumpkins.

If you still don’t believe how dangerous gas and its fumes can be, check out this video of a bonfire gone wrong (language warning).

Blowing Up Capacitors

[grenadier] wrote in to show us a video of some capacitors being blown up. Yup, that’s it. Just some capacitors being blown up. You might be wondering what there is to learn from this video. The answer is… nothing. It sure is fun to watch though. We’re all busy trying to find some nice hacks to share with you, so we figured you could watch some stuff getting destroyed while you waited.  Here’s someone using explosives to reveal art behind a thin layer of concrete on a wall. Here’s some high voltage destroying multimeters. How about a turkey being cooked with thermite? Thermite works on hard drives too.

Ok, enough of that. This was a gentle reminder to send us tips to your projects.

Continue reading “Blowing Up Capacitors”