Yet Another Restomod Of The Greatest Computer Ever

The best computer ever made is nearly thirty years old. The Macintosh SE/30 was the highest-spec original all-in-one Macs, and it had the power of a workstation. It had expansion slots, and you could hang a color monitor off the back. It ran Unix. As such, it’s become the prize of any vintage computer collector, and [Kris] recently completed a restomod on our beige king. It’s a restored Macintosh SE/30, because yes, we need to see more of these.

The restoration began with the case, which over the last thirty years had turned into an orange bromiated mess. This was fixed with RestOBrite, or Retr0Brite, or whatever we’re calling it now. This was just Oxyclean and an off-the-shelf bottle of 3% hydrogen peroxide, left out in the sun for a little bit.

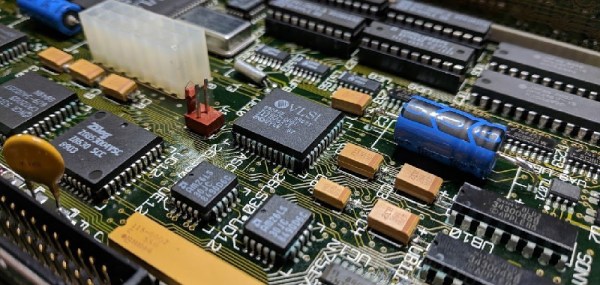
Of course the capacitors had spilled their magic blue smoke over the last three decades, so a few replacements were in order. This is well-trodden territory, but [Kris] also had to replace the SCSI controller chip. Three of the pads for this chip had lifted, but this too is something that can be fixed.

With the restoration work complete, [Kris] turned his attention to doing something with this computer. The spinny hard drive was replaced with a SCSI2SD, currently the best solution to putting SCSI disks into old computers. There are a few more additions, including a Micron Xceed color video adapter, a video card that allows the SE/30 to drive two monitors (internal included) in color.

The current plans are to attach a modem to this SE/30, have it ring into a Raspberry Pi, and surf the web over a very slow connection. There is another option, though: You can get a WiFi adapter for the SE/30, and there’s a System 7 extension to make it work. Yes, we’re living in the future, in the past. It’s awesome.

Replace Legacy CNC PCs With A Gerbil

There are lots of laser cutters and other CNC machines available for a decent price online, but the major hurdle to getting these machines running won’t be the price or the parts. It’s usually the controller PC, which might be running Windows XP or NT if you’re lucky, but some of them are still using IBM XT computers from the ’80s. Even if the hardware in these machines is working, it might be impossible to get the software, and even then it will be dated and lacking features of modern computers. Enter the Super Gerbil.

[Paul] was able to find a laser cutter with one of these obsolete controllers, but figured there was a better way to getting it running again. As the name suggests, it uses GRBL, a G-Code parser and CNC controller software package that was originally made to run on an 8-bit AVR microcontroller, but [Paul] designed the Super Gerbil to run on a 32 bit ARM platform. He also added Z-axis control to it, so it now sports more degrees of freedom than the original software.

By way of a proof of concept, once he was finished building the Super Gerbil he ordered a CNC machine from China with an obsolete controller and was able to get it running within a day. As an added bonus, he made everything open so there are no license fees or cloud storage requirements if you want to use his controller. [Paul] also has a Kickstarter page for this project as well. Hopefully controllers haven’t been the only thing stopping you from getting a CNC machine for your lab, though, but if they have you now have a great solution for a 3040 or 3020 CNC machine’s controller, or any other CNC machine you might want to have. Continue reading “Replace Legacy CNC PCs With A Gerbil”

A Neat Pen POV Build

We’ve seen a lot of persistence of vision (POV) builds on bike wheels, sticks, and many other holders, but this one puts it on something new: a pen. [Befinitiv] was looking for a new way to add some smarts to everyday devices, and the result is a neat POV display that fits over a pen. At 128 by 64 pixels, it is not high definition, but this build uses a number of interesting techniques.

Continue reading “A Neat Pen POV Build”

High-End Headphones Get Flexible Boom Upgrade

It seems a reasonable assumption that anyone who’d be willing to spend a few hundred dollars on a pair of headphones is probably the type of person who has a passion for high quality audio. That, or they work for the government. We’re fairly sure [Daniel Harari] falls into that former category though, given how much thought he gave to adding a decent microphone to his Sennheiser HD650 headphones.

Not happy with the results he got from microphones clipped to his shirt or mounted on a stand, [Daniel] realized what he really wanted was a sensitive boom microphone. This would be close enough to his mouth that it wouldn’t pick up stray noises, but at the same time not obstruct his field of view or otherwise get in the way.

He found a few options on the market which would allow him to mount a boom microphone to his HD650’s, but he didn’t want to stick anything to them and risk scratching the finish so those weren’t really an option. [Daniel] decided to go the DIY route, and eventually settled on a microphone that would mount to the headphone’s existing connector which plugs in at the bottom of the cup.

To make his mount, he 3D printed a two piece clamp that could be screwed together and securely attach to the connector without making any permanent changes. Once he had that base component printed, he salvaged the flexible metallic neck from a cheap USB light and used that to hold the female 3.5mm connector. Into that he’s plugged in a small commercially available microphone that is usually used on voice recorders, which [Daniel] said sounds much better than even the larger mics he had tested.

Finally, he used Sugru to encapsulate the wires and create a flexible strain relief. The whole assembly is very light, easily movable, and perhaps most importantly, didn’t require any modifications or damage to a pair of headphones which have a retail price that could double as a car payment.

It’s been a few years since we’ve seen anyone brave enough to hack their pricey Sennheiser headphones. But in the past we covered a modification which gave them an infusion of Bluetooth and even one that reversed a sneaky manufacturer hardware limitation.

Adorable Desktop Disc Sander Warms Our Hearts And Our Parts

Casually browsing YouTube for “shop improvements” yields a veritable river of project ideas, objects for cat amusement, and 12 INCREDIBLE SHOP HACKS YOU WON’T BELIEVE, though some of these are of predictably dubious value. So you might imagine that when we found [Henrique]’s adorable disc sander we dismissed it out of hand, how useful could such a tiny tool be? But then we remembered the jumbo tub o’ motors on the shelf and reconsidered, maybe a palm sized sander has a place in the tiny shop.

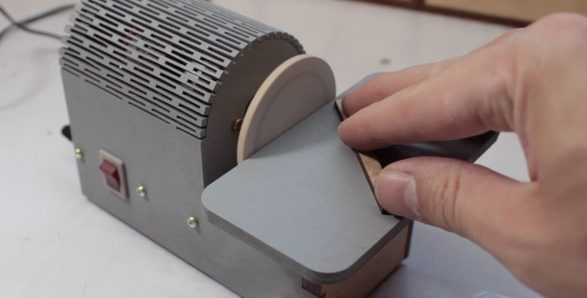
Electrically the build is a simple as can be. It’s just a brushed DC motor plugged into a wall wart with a barrel jack and a toggle switch. But what else does it need? This isn’t a precision machine tool, so applying the “make it out of whatever scrap” mindset seems like a much better fit than figuring out PWM control with a MOSFET and a microcontroller.

There are a couple of neat tricks in the build here. The most obvious is the classic laser-cut living hinge that we love so much. [Henrique] mentions that he buys MDF in 3 mm sheets for easy storage, so each section of the frame is built from layers that he laminates with glue himself. This trades precision and adds steps, but also give him a little flexibility. It’s certainly easier to add layers of thin stock together than it would be to carve out thicker pieces. Using the laser to precisely cut holes which are then match drilled through into the rest of the frame is a nice build acceleration too. The only improvement we can imagine would be using a shaft with a small finger chuck (like a Dremel) so it could use standard rotary tool bits to avoid making sanding disks by hand.

What could a tool like this be used for? There are lots of parts with small enough features to be cleaned up by such a small tool. Perhaps those nasty burrs after cutting off a bolt? Or trimming down mousebites on the edges of PCBs? (Though make sure to use proper respiration for cutting fiberglass!)

If you want to make one of these tools for your own desk, the files are here on Thingiverse. And check out the video overview after the break.

Continue reading “Adorable Desktop Disc Sander Warms Our Hearts And Our Parts”

Daphne Oram And The Birth Of Electronic Music

For most of human history, musical instruments were strictly mechanical devices. The musician either plucked something, blew into or across something, or banged on something to produce the sounds the occasion called for. All musical instruments, the human voice included, worked by vibrating air more or less directly as a result of these mechanical manipulations.

But if one thing can be said of musicians at any point in history, it’s that they’ll use anything and everything to create just the right sound. The dawn of the electronic age presented opportunities galore for musicians by giving them new tools to create sounds that nobody had ever dreamed of before. No longer would musicians be constrained by the limitations of traditional instruments; sounds could now be synthesized, recorded, modified, filtered, and amplified to create something completely new.

Few composers took to the new opportunities offered by electronics like Daphne Oram. From earliest days, Daphne lived at the intersection of music and electronics, and her passion for pursuing “the sound” lead to one of the earliest and hackiest synthesizers, and a totally unique way of making music.

Continue reading “Daphne Oram And The Birth Of Electronic Music”

The Circuit Sculpture Contest

Many artists are inseparably associated with their medium: Vincent Van Gogh had oil paint, Auguste Rodin had bronze, and Banksy has the spraycan and stencil. You have ICs, passives, wire, and solder. So often electronics are hidden away, but not today! We want to see you build electronic circuits that are beautiful in and of themselves.

This is Hackaday’s Circuit Sculpture Contest and we bet you already have everything you need to enter. Leave behind the drab flatland of 2D PCBs and break out into the third dimension! Or break away from the PCB entirely. Our inspiration comes from a few recently featured projects by Mohit Bhoite and by Eirik Brandal that show functional electronic circuits supported by their own wiring:

There’s something beautiful in these works. They take what would be unnoticed traces and bring them to the forefront of the project. The core of the challenge is simple: built a sculpture where an electronic circuit is the main building material (or medium if you prefer the artistic vernacular).

Continue reading “The Circuit Sculpture Contest”