3D Printed Radius Gauge, Just Add Calipers (And A Wee Bit Of Math)

With 3D printed arms of fixed measurements, the depth reading from a set of digital calipers can be used to calculate the radius of a curve.

Specialized tools that focus on one particular job tend to get distilled right down to their essentials and turned in an economical consumer product. One example of this is radius (or fillet) gauges: a set of curves in different sizes that one uses to measure the radius of a curved surface by trial and error. To some, such products represent solved problems. Others see opportunities for a fresh perspective, like this caliper-enabled 3D printed radius gauge by [Arne Bergkvist].

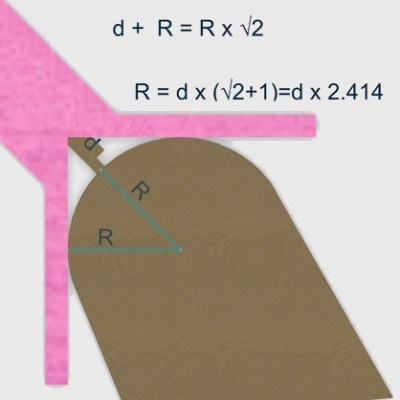
[Arne]’s 3D printed radius gauge is a simple object; a rigid attachment for a nearly ubiquitous model of digital caliper. By placing the curve to be measured between the two arms of the device and using the depth measurement of the caliper to measure distance to the curve’s surface, a simple calculation (helpfully printed on the unit itself) of radius = distance * 2.414 reveals the radius of the curve. However, this shortened calculation makes a number of assumptions and only works for [Arne]’s specific design.

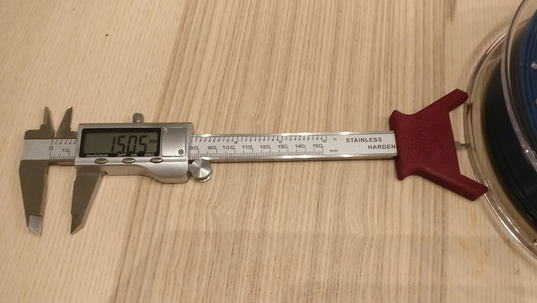
Another version by [Fredrik Welander] represents a more flexible take on the same concept. His RadGauge design (pictured up top) has a few different sizes to accommodate a variety of objects, and his Git repository provides a calculator tool as well as some tips on fine tuning to allow for variations in the dimensions of the printed attachment.

3D printing has opened a lot of doors, and items like this show that the plastic doodads created aren’t always the end result in and of themselves; sometimes they are the glue that enables a tool or part to work in a different way. To help get the most out of 3D printing, check out the in-depth coverage of how to best tap 3D printed parts for fasteners, and [Roger Cheng]’s guide to using 3D printed brackets and aluminum extrusion to make just about anything.

Electromagnetic Field: A Cyberpunk Headdress To Be Noticed In

At the recent Electromagnetic Field hacker camp in the UK, one of the highlights was the Null Sector, a cyberpunk-themed zone best described as something close to the set of Blade Runner made from shipping containers, clever props, and lighting. Our community rose to the occasion with some truly impressive costumes and wearable electronics, lending the venue a real authenticity.

Among the many creations on show there was one that stood quite literally head and shoulders above the rest. [Chebe]’s colour stealing sound reactive LED headdress is a confection of Neopixels, organza, and transparent floor protectors on a wire frame, driven by a Lillypad wearable microcontroller board with a microphone and colour sensor attached. The resulting sound-and-colour-reactive display stood out across a crowded venue full of hackers who’d all made their own efforts to produce similar outfits, which is really saying something!

The Lillypad and LEDs are standard fare, but the wire part of this project isn’t, and that’s what makes it rather interesting from our perspective. Anyone can make something that goes over their head, but to make something that’s comfortable takes a bit of effort and thought. Have you ever tried a set of ill-fitting sunglasses? If you have then you might understand. In this case stiff garden wire is used, bent to shape and joined with rolled-up tape, before being covered with wound-on ribbon for extra comfort. A Hackaday scribe travels the field at a hacker camp, and though [Chebe]’s cranium is a little more petite than the Hackaday bonce it was certainly an enveloping fit when we tried it.

Anyone can attach an LED to an item of clothing and call it a wearable. But to be noticed like this one it has to be done with style. If you’ve not had your fill of this topic, we suggest you continue with the Hackaday Belgrade talk from our friend [Rachel “Konichiwakitty” Wong].

Hackaday Links Column Banner

Hackaday Links: September 9, 2018

Octoprint is one of those must-have apps for 3D printers. All you need is a Raspberry Pi, an SD card, and a USB cable, and you can control your 3D printer from anywhere in the house. Of course, some people take it too far and open up their Octoprint to the greater Internet. Gizmodo reports thousands of people are doing so, with possible dire consequences. Choice quotes: “Imagine waking up in the morning to find that your 3D printer was used to produce a gun” and “Once again, 3D guns come to mind”. Yes, they referenced 3D printed guns twice in a story. Call me when you can 3D print bullets. Or when bioprinters can print airborne HIV, which was also suggested in the story.

ARS Electronica is going on in Linz this weekend, and it’s the largest new media art festival where cyber artists are recognized for their innovations. One of the more interesting exhibits is [Sarah Petkus]’ Noodlefeet. Its [Sarah]’s kid, that’s a robot, that’s made out of pool noodles. She’s talked about it at the Hackaday Superconference, and now there’s an entire exhibit behind it. You can check out her ‘making of’ post right here.

A mirror is a useful survival tool, if only for signalling people. Here’s a video showing long-distance mirror signalling, over a distance of 27.5 miles. The mirror used was 330 x 254mm, but the real challenge here is pointing the mirror in the right direction. For that, [Andy] used a bamboo pole a few meters in front of the mirror. By reflecting sunlight onto the pole, he knew it was going in about the right direction. Accuracy versus precision, or something like that.

Last week, a slow leak was detected aboard the International Space Station. The leak was quickly traced to a 2mm hole in the upper orbital module of a visiting Soyuz spacecraft. prompting call of micrometeoroid damage and plenty of speculation on what would have happened if this hole appeared anywhere else on the station. Now, it looks like this hole was put there by a drill, probably during assembly or testing, and was somehow plugged until the Soyuz was in space for a few weeks. Why this hole just magically appeared one night is anyone’s guess, but there you go.

Now, Finally, We Can Play With Power

In case you’re not a ’90s kid, the Nintendo Power Glove is the greatest device for human-computer interaction ever created. It’s so good, they called it bad, and then they made a movie about it. At its heart, the Power Glove is just some force sensors in the fingers of a glove, but that hasn’t stopped hackers from cracking these gloves open for years. We’ve seen the Power Glove used in Hackaday Prize entries before, we’ve seen it control quadcopters, we’ve seen it used as a Vive controller, and the Ultimate Power Glove comes loaded up with Bluetooth, motion tracking, a 9-axis IMU, and a 20-hour battery life. With all these Power Glove hacks, what more can be done?

Surprisingly, we haven’t seen a Power Glove hack that transmutes this icon of cyberpunk into a usable keyboard and mouse. That’s exactly what [Scott] is doing for his Hackaday Prize entry, and the results are looking good so far.

First up, the mouse. This is actually a joystick-based version of cursor control, capitalizing on the force sensors in the Power Glove to register clicks. Add in a button, some perfboard, and an Arduino, and you have a USB input device that can control a cursor. Without any good solution for a small keyboard, [Scott] turned to a normal ‘ol Bluetooth keyboard mounted to the Power Glove’s wrist.

It might not be as fancy as the great Power Glove hacks out there, but this is certainly the most useful. Who wouldn’t want to wear their keyboard and mouse at all times, all while looking like they stepped out of a time machine controlled by a Commodore 64? This is the heights of early ’90s futurism, and a great entry for the Hackaday Prize.

Cheap RC Boat Turned Weirdly Capable Seaplane

What do you get when you combine a cheap RC boat from Walmart, foam board, a couple powerful motors, and some aluminum cans? Most people would just end up with a pile of garbage, but we’ve already established [Peter Sripol] is fairly far from “most people”. In his hands, this collection of scraps turns into an almost unbelievably nimble seaplane, despite looking like something out of a TailSpin and Mad Max crossover episode.

In his latest YouTube video, [Peter] takes viewers through the process of turning one of these rather lame RC boats into an impressive flying machine. His took inspiration from the Sikorsky S-38, an American amphibious aircraft introduced in 1928. The S-38 looked like a fairly traditional boat bolted to the bottom of a set of huge wings, so it’s little surprise that he patterned this build after it.

The construction of the seaplane is very simple, and boils down to cutting some big wings out of foam board, using some sticks to give it some rigid framing, and putting a tail on it. The biggest problem is that the boat’s hull lacks the “steps” that a seaplane would have, so it’s not an ideal shape to lift out of the water. But with enough thrust and a big enough control surface, it all works out in the end.

Which is in effect the principle by which the whole plane flies. There’s a large elevator cantilevered far astern to help leverage the boat out of the water, but otherwise all other control is provided by differential thrust between the two top mounted motors. The lack of a rudder does make its handling a bit sluggish in the water, but it obviously has no problem once it’s airborne.

If [Peter] and his foam board artistry seem familiar, it’s probably from the not one but two homemade aircraft he built with shockingly similar techniques to this current project.

Continue reading “Cheap RC Boat Turned Weirdly Capable Seaplane”

The Tide Is High, And This Clock Lets You Know

In case you happen to have an ocean nearby, you’re probably familiar with its rising and falling tides. And if mudflat hiking is a thing in your area, you’re also aware of the importance of good timing and knowing when the water will be on its way back. Tide clocks will help you to be prepared, and they are a fun alternative to your usual clock projects. If you’re looking for a starting point, [rabbitcreek] put together an Arduino-based tide clock kit for educational purposes.

If you feel like you’re experiencing some déjà vu here, this indeed isn’t [rabbitcreek]’s first tide clock project. But unlike his prior stationary clock, he has now created a small and portable, coin-cell version to take with you out on the sea. And what shape would better fit than a 3D printed moon — unfortunately the current design doesn’t offer much waterproofing.

For the underlying tide calculation itself, [rabbitcreek] uses just like in his previous project [Luke Miller]’s location-based library for the ubiquitous DS1307 and DS3213 real-time clocks. Of course, if you also want to keep track of other events on your clock, why not set up calendar events for the next rising tide?

A DIY Balcony Crane Lifts Groceries For The Lazy But Patient

If necessity is the mother of invention, then laziness is probably its father. Or at least a close uncle. Who hasn’t thought, “There has to be a better way to do this, one that doesn’t involve me burning precious calories”?

Motivational laziness seems to increase with potential energy, as anyone who needs to haul groceries up four flights of stairs will tell you. This appears to be where this balcony-mounted drill-powered crane came from. Starting with a surplus right-angle gearbox and drum, [geniusz K] fabricated the rest of the crane from steel plate and tubing. We like the quality of fabrication and the tip on making slip couplings from bits of square tubing. The finished product got a nice coat of brown paint to match the balcony railing; keeping the neighbors happy is always important. He tested the crane with a 20-kg weight before installing it on the balcony and put it to work hauling groceries up three stories. Check out the build and the test in the video below.

While it won’t set any speed records, at least the drill is doing the work. But what if you’re impatient as well as lazy? Aside from being two-thirds of the way to programming greatness, you may have to up the game. A heavy-lift quadcopter, perhaps?

Continue reading “A DIY Balcony Crane Lifts Groceries For The Lazy But Patient”