Generator Control Panel Unlocked With Reverse Engineering Heroics

Scoring an interesting bit of old gear on the second-hand market is always a bit of a thrill — right up to the point where you realize the previous owner set some kind of security code on it. Then it becomes a whole big thing to figure out, to the point of blunting the dopamine hit you got from the original purchase.

Fear not, though, because there’s dopamine aplenty if you can copy what [Buy it Fix it] did to decode the PIN on a used generator control panel. The panel appears to be from a marine generator, and while it powered up fine, the menu used to change the generator’s configuration options is locked by a four-digit PIN. The manufacturer will reset it, but that requires sending it back and paying a fee, probably considerable given the industrial nature of the gear.

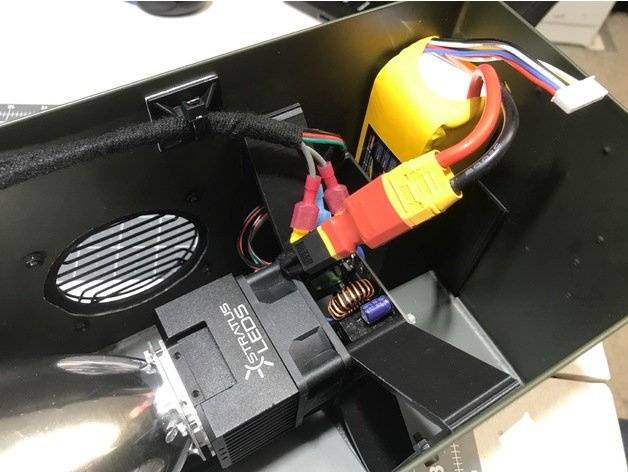
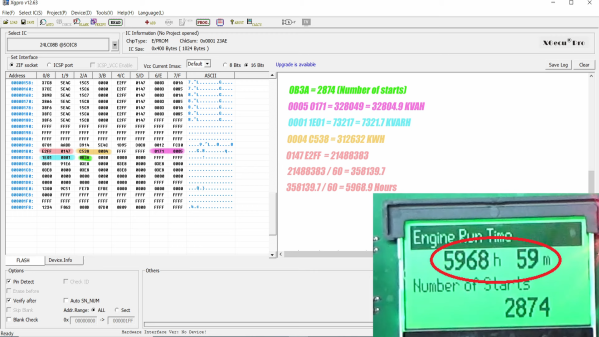
Instead of paying up, [Buy it Fix it] decided to look for a memory chip that might store the PIN. He identified a likely suspect, a 24LC08B 8-Kb serial EEPROM, and popped it off to read its contents. Nothing was immediately obvious, but blanking the chip and reinstalling it cleared the PIN, so he at least knew it was stored on the chip. Many rounds of soldering and desoldering the chip followed, blanking out small sections of memory each time until the PIN was located. The video below edits out a lot of the rework, but gives the overall gist of the hack.

To be honest, we’re not sure if the amount of work [Buy it Fix it] put into this was less than taking a couple of hours to punch in PINs and brute-force it. Then again, if he hadn’t done the reverse engineering he wouldn’t have stumbled upon where the generator parameters like running time and power figures were stored. And it’s not really his style, either; we’ve seen him perform similar heroics on everything from tractors to solar inverters, after all.

Continue reading “Generator Control Panel Unlocked With Reverse Engineering Heroics”

Taking Over The Amazing Control Panel Of A Vintage Video Switcher

Where does he get such wonderful toys? [Glenn] snagged parts of a Grass Valley Kalypso 4-M/E video mixer switcher control surface from eBay and since been reverse engineering the button and display modules to bend them to his will. The hardware dates back to the turn of the century and the two modules would have been laid out with up to a few dozen others to complete a video mixing switcher console.

[Glenn’s] previous adventures delved into a strip of ten backlit buttons and gives us a close look at each of the keyswitches and the technique he used to pull together his own pinout and schematic of that strip. But things get a lot hairier this time around. The long strip seen above is a “machine control plane” module and includes a dozen addressible character displays, driven by a combination of microcontrollers and FPGAs. The square panel is a “Crosspoint Switch Matrix” module include eight individual 32 x 32 LCDs drive by three dedicated ICs that can display in red, green, or amber.

[Glen] used an STM8 Nucleo 64 to interface with the panels and wrote a bit of code to help map out what each pin on each machine control plane connector might do. He was able to stream out some packets from the plane that changed as he pressed buttons, and ended up feeding back a brute-force of that packet format to figure out the LED display protocols.

But the LCDs on the crosspoint switch were a more difficult nut to crack. He ended up going back to the original source of the equipment (eBay) to get a working control unit that he could sniff. He laid out a man-in-the-middle board that has a connector on either side with a pin header in the middle for his logic analyzer. As with most LCDs, the secret sauce was the initialization sequence — an almost impossible thing to brute force, yet exceedingly simple to sniff when you have a working system. So far he has them running under USB control, and if you are lucky enough to have some of this gear in your parts box, [Glen] has painstakingly recorded all of the details you need to get them up and running.

An Old-School Control Panel For Your Computer

For as long as computers have been in the hands of programmers, they have offered frequent mildly tedious tasks that their operators have sought to automate. Who hasn’t written a shell script or a batch file that unites a string of commands into one just to save a bit of typing?

But even that effort can be reduced with a hardware add-on that ties the script to a physical control, and in this endeavor [Tomas] has created a beauty. His control panel project mimics the robust industrial panels of yesteryear with an array of metal buttons and toggle switches in a sturdy metal case sourced from an old KVM switch.

Behind the scenes are a pair of I/O extenders and a NodeMCU board, whose ESP8266 does the talking to the host computer on which a daemon awaits its call. Individual addressable LEDs next to each switch convey the state of operation, and the switches trigger useful operations such as connecting to a VPN. All the code is available in a handy GitHub repository, and you can see it in action in the video we’ve placed below the break.

We rather like the idea of a desktop control panel here at Hackaday, indeed this isn’t the first one we’ve brought you.

Continue reading “An Old-School Control Panel For Your Computer”

Psst – Wanna Buy A Control Panel From A Nuclear Power Station?

Doing the rounds today is an interesting lot in an otherwise unexciting industrial dispersal auction in Lincolnshire, UK. On sale is an “Ex nuclear plant reactor control/monitoring system“, at the time of writing attracting the low low bid of £220 ($270), but we guess it will rise. Everyone who has watched Chernobyl (or maybe The Simpsons) is now gazing awestruck at a crescent of metal consoles covered in screens, buttons, and joysticks just waiting for a staff of white-coated technicians to pore over them.

Chernobyl Unit 3 control room (still active). [Source: IAEA Imagebank on Flickr CC-SA 2.0]
It’s a very cool lot indeed, but it raises more questions than it answers. The auction house has very little information indeed, so we’re left guessing, where did it come from? From this image showing the unit 3 control room at Chernobyl it’s obvious didn’t come from there (/s). Since it is for sale in the UK, and the country has decommissioned the majority of its first-generation reactors by now, so there is no shortage of candidates. But that intriguing possibility raises another question. Is it even a reactor control panel in the first place?

British civilian nuclear plants have tight security but they are hardly a secret, so plenty of photos are online showing their interiors. And in studying those we hit a problem, this panel doesn’t resemble any of the control panel images we can find. The first generation of Magnox (Magnetic Oxide Magnesium Non Oxidising) plants had panels covered in analogue dials and chart recorders so it’s unlikely to be one of those. The second-generation AGR (Advanced Gas-cooled Reactor) stations had similarly complex panels, and it’s evidently not one of them.

Looking closely at the photos it becomes apparent that there are a lot of camera controls and monitors, and even what looks like a uMatic video recorder. It’s definitely nuclear-related and the 1980s look of it suggests maybe it could have come from an Advanced Gas-Cooled Reactor (AGR) station, but could it be a little closer to Sector 7G than the centre of the action? Is it a video monitoring console used to keep a physical eye on its operation?

Be careful if you bid, you could end up with a rather cool but absurdly large 1980s CCTV system. Can any of our readers shed any light on the matter?

Thanks [Gregg “Cabe” Bond] for the tip.

Custom Control Panels With Photogrammetry

One of the best applications for desktop 3D printing is the creation of one-off bespoke components. Most of the time a halfway decent pair of calipers and some patience is all it takes to model up whatever part you’re after, but occasionally things get complex enough that you might need a little help. If you ever find yourself in such a situation, salvation might be just a few marker scribbles away.

As [Mangy_Dog] explains in a recent video, he wanted to model a control panel for a laser cutter he’s been working on, but thought the shapes involved were a bit more than he wanted to figure out manually. So he decided to give photogrammetry a try. For the uninitiated, this process involves taking as many high-resolution images as possible of a given object from multiple angles, and letting the computer stitch that into a three dimensional model. He reasoned that if he had a 3D model of the laser’s existing front panel, it would be easy enough to 3D print some replacement parts for it.

That would be a neat enough trick on its own, but what we especially liked about this video was the tip that [Mangy_Dog] passed along about increasing visual complexity to improve the final results. Basically, the software is looking for identifiable surface details to piece together, so you can make things a bit easier for it by taking a few different colored markers and drawing all over the surface like a toddler. It might look crazy, but all those lines give the software some anchor points that help it sort out the nuances of the shape.

Unfortunately the markers ended up being a little more permanent than [Mangy_Dog] had hoped, and he eventually had to use acetone to get the stains off. Certainly something to keep in mind. But in the end, the 3D model generated was accurate enough that (after a bit of scaling) he was able to design a new panel that pops right on as if it was a factory component.

Hackaday readers may recall that when we last heard from [Mangy_Dog] he was putting the finishing touches on his incredible “Playdog Blackbone” handheld gaming system, which itself is a triumph of mating 3D printed components with existing hardware.

Continue reading “Custom Control Panels With Photogrammetry”

Ammo Can Holds A 14,000 Lumen LED Flashlight

For most people, a flashlight is just something you keep in a drawer in the kitchen in case the power goes out. There’s even a good chance your “flashlight” is just an application on your phone at this point. But as we’ve seen many times before from mechanical keyboards to Power Wheels, hardcore niche communities can develop around the most innocuous pieces of hardware; and the lowly flashlight is no different.

Case in point, this 14,000 lumen LED flashlight built by [Bryson Hicks]. Designed around a 100 watt module from Stratus LED, the flashlight uses a number of 3D printed components to make itself at home in a suitably hardcore enclosure: a metal ammo can. With the addition of some modular electronics and a rather slick little control panel, his light is ready to deliver an unreasonable level of brightness anywhere he wishes.

The Stratus LED module includes its own driver, and just needs to be hooked up to a suitably beefy power source to do its thing. [Bryson] went with a 4500 mAh LiPo battery that he says gets him about a one hour runtime at full brightness. For somewhat less intense operation, he’s added a potentiometer which interfaces with the module’s driver board to control the LED output. Considering how fast the light sucks down the juice, adding a small LCD battery charge indicator to the top of the device seems like it was a prudent decision.

To prevent you from cooking anyone’s eyes at close range, the light requires you to first “arm” it by flipping the military style protected switch. Once the switch is in the on position, an illuminated push button is used to actually turn the LED module on and off. You can also snap the toggle switch back into the closed and covered position if you needed to kill the light in a hurry.

This isn’t the first preposterously bright LED flashlight we’ve seen around these parts. There’s something of an arms-race between hackers and makers to develop increasingly bright lights they can carry around, on the off chance they need to illuminate an entire neighborhood.

Sim Panel Proves You Can Always Use More Buttons

Many people enjoy playing flight simulators or making the occasional orbit in Kerbal Space Program, but most are stuck controlling the onscreen action with nothing more exotic than a keyboard and mouse. A nice compromise for those that don’t have the space (or NASA-sized budget) to build a full simulator cockpit is a USB “button box” that you can plug in whenever you need a couple dozen extra knobs, switches, and lights.

If you’ve been considering building one for yourself, this incredible build by [nexprime] should prove quite inspirational. Now at this point, a box of buttons hooked up to a microcontroller isn’t exactly newsworthy. But there are a few features that [nexprime] packed in which we think make this particular build worth taking a closer look at.

For one, the powder coated 8.5” x 10” enclosure is absolutely gorgeous. The console itself was purchased from a company called Hammond Manufacturing, but of course it still took some work to turn it into the object you’re currently drooling over. A CNC machine was used to accurately cut out all the necessary openings, and the labels were laser etched into the powder coat.

But not all the labels. One of the things we like best about this build is that [nexprime] thought ahead and didn’t just design it for one game. Many of the labels are printed on strips of paper which slide into translucent plastic channels built into the front of the box. Not only does this allow you to change out the overlays for different games, but the paper labels look fantastic when lit with the LED strips placed behind the channels.

Internally, [nexprime] used a SparkFun Pro Micro paired with a SX1509 I/O expander. The electronics are all housed on professionally manufactured PCBs, which gives the final build an incredibly neat look despite packing in 68 separate inputs for your gaming pleasure. On the software side this box appears as a normal USB game controller, albeit one with a crazy number of buttons.

If this build doesn’t have enough switches and buttons for you, don’t worry. This Kerbal Space Program cockpit has banks of switches below and above the player, so one can more realistically scramble for the correct onet to flip when things start going sideways. On the other hand, we’ve seen slightly less intense builds if you’re not quite ready to take out a loan just to get into orbit.