Writing Characters Straight To The Linux Framebuffer

These days, working with a display in software is fairly easy. Thanks to the convenience of the modern OS, we’re blessed with graphical user interfaces, where things such as buttons and windows and text are all taken care of for us. Of course, once you start to wander off the beaten track, particularly in embedded systems with no GUI, things can get a little more difficult. For these situations, [JSBattista] wrote some code to blast text directly to the Linux framebuffer.

It’s a project borne out of necessity. Working with a Raspberry Pi with no X server, it was found that the console text size made it difficult to display data. By writing directly to the framebuffer, it would be possible to display text of a larger size without having to implement a full GUI, and overheads could be kept to a minimum.

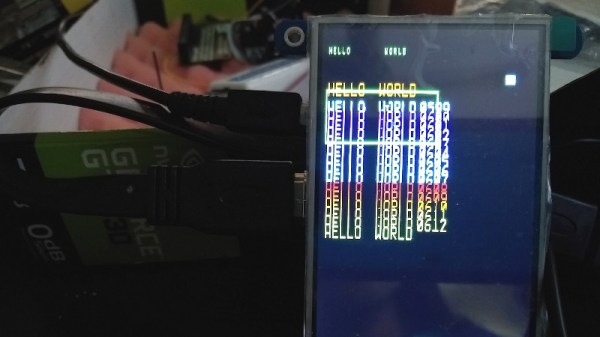
Working in this manner comes with some limitations. Glyphs are taken from an array in bitmap format, rather than font files. In this case, a font akin to that of the Alien sentry gun interface was chosen, for an attractive sci-fi look. Lowercase characters are currently unimplemented. Testing thus far has been on Raspberry Pi and Beaglebone non-GUI systems, with performance varying depending on platform.

It’s a project we suspect might prove useful to the developers of lightweight embedded systems. It’s something that may take some tweaking and experimentation to implement, but the hacker set rarely shy away from a challenge. If you’re eager to get down and dirty with some heavy programming, this tutorial on Linux graphics will help.

Linux Graphics Programming

There was a time when embedded system developers didn’t need to worry about graphics. When you have a PIC processor and two-line LCD, there isn’t much to learn. But if you are deploying Linux-based systems today, graphics are a real possibility. There are many options for doing Linux graphics including Wayland, X11, and frame buffers. Confused? This tutorial can help. The sections on Wayland and Mir are under construction, but that’s probably not what you are going to be using on a typical hacker project for the foreseeable future, anyway.

Of course, even inside those broad categories, you have multiple choices. If you are doing X11, for example, you can go low-level or pick any of a number of high-level libraries.

Continue reading “Linux Graphics Programming”

Mac SE

Viewing A Macintosh SE’s Video On A Modern Computer

[Bbraun] has an old Macintosh SE computer. He was looking for a way to view the video output from the SE on a newer, modern computer. He ended up working out a pretty clever solution using a stm32f4discovery board.

First, the SE’s logic board was removed from its case and placed onto a desk for easier access. The discovery board was then hooked up to the SE’s processor direct slot (PDS) using normal jumper wires. The discovery board acts as a USB COM port on a newer Mac OSX computer. The discovery board watches the SE for writes to video memory. When it sees that the R/W pin goes low, it knows that a write is occurring. It then waits for /AS to go low, which indicates that an address is on the bus. The discovery board reads the address and verifies that it falls within the range of the video frame buffer. If it does, then the discovery board writes a copy of the data to a local buffer.

The OSX computer runs a simple app that can make a request to the discovery board via USB. When the board receives the request, it sends its local frame buffer data over the USB connection and back to the host. The OSX computer then displays that data in a window using CGImage. The demo video below was captured using this technique. Continue reading “Viewing A Macintosh SE’s Video On A Modern Computer”

Tetris

Arduino Tetris On A Multiplexed LED Matrix

[Alex] needed a project for his microcomputer circuits class. He wanted something that would challenge him on both the electronics side of things, as well as the programming side. He ended up designing an 8 by 16 grid of LED’s that was turned into a game of Tetris.

He arranged all 128 LED’s into the grid on a piece of perfboard. All of the anodes were bent over and connected together into rows of 8 LED’s. The cathodes were bent perpendicularly and forms columns of 16 LED’s. This way, if power is applied to one row and a single column is grounded, one LED will light up at the intersection. This method only works reliably to light up a single LED at a time. With that in mind, [Alex] needed to have a very high “refresh rate” for his display. He only ever lights up one LED at a time, but he scans through the 128 LED’s so fast that persistence of vision prevents you from noticing. To the human eye, it looks like multiple LED’s are lit up simultaneously.

[Alex] planned to use an Arduino to control this display, but it doesn’t have enough outputs on its own to control all of those lights. He ended up using multiple 74138 decoder/multiplexer IC’s to control the LED’s. Since the columns have inverted outputs, he couldn’t just hook them straight up to the LED’s. Instead he had to run the signals through a set of PNP transistors to flip the logic. This setup allowed [Alex] to control all 128 LED’s with just seven bits, but it was too slow for him.

His solution was to control the multiplexers with counter IC’s. The Arduino can just increment the counter up to the appropriate LED. The Arduino then controls the state of the LED using the active high enable line from the column multiplexer chip.

[Alex] wanted more than just a static image to show off on his new display, so he programmed in a version of Tetris. The controller is just a piece of perfboard with four push buttons. He had to work out all of the programming to ensure the game ran smoothly while properly updating the screen and simultaneously reading the controller for new input. All of this ran on the Arduino.

Can’t get enough Tetris hacks? Try these on for size.

Learning Python With Tron Radio

[5 Volt Junkie] has built his share of Arduino projects, but never anything with Python, and certainly never anything with a GUI. After listening to Internet radio one day, a new idea for a project was born: a Raspberry Pi with a small touchscreen display for a UI and displaying soma.fm tracks. It’s finally finished, and it’s a great introduction to Python, Pygame, and driving tiny little displays with the Pi.

Playing soma.fm streams was handled by mpd and mpc, while the task of driving a 2.8″ TFT LCD was handled by the fbtft Linux framebuffer driver. This left [5 Volt Junkie] with the task of creating a GUI, some buttons, and working out how to play a few streams. This meant drawing some buttons in Inkscape, but these were admittedly terrible, so [5 Volt Junkie] gave up and turned on the TV. Tron Legacy was playing, giving him the inspiration to complete his Tron-themed music player.

The result of [5 Volt Junkie]’s work is a few hundred lines of Python with Pygame and a few multicolor skins all wrapped up in a Tron theme. It looks great, it works great, and it’s a great introduction to Python and Pygame.

Continue reading “Learning Python With Tron Radio”