Up Your Desk Toy Game With This 3D Printed Escalator

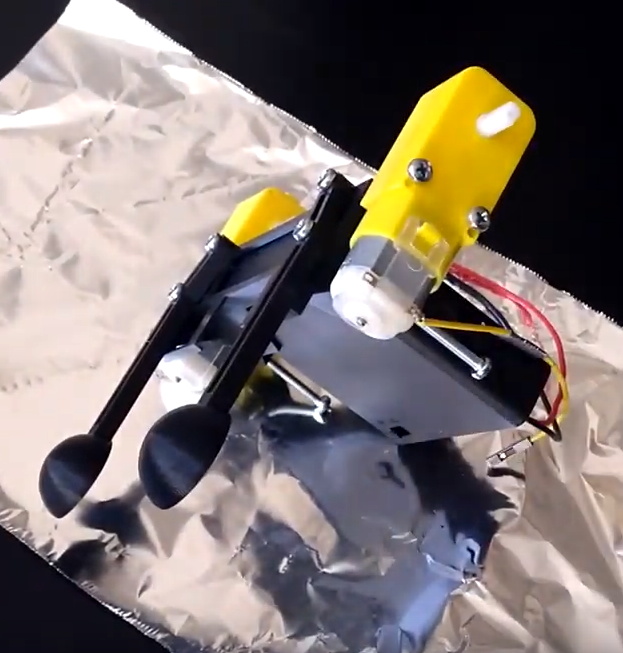
Let’s be real, nobody needs a tiny motorized escalator for their desk. But now that you’ve seen it, can you really say you don’t want one of your own? The design comes our way from [AlexY], and is actually the logical evolution of a manually-operated version released previously. But for our money (and 3D printing time), we’d definitely go with this new motorized variant.

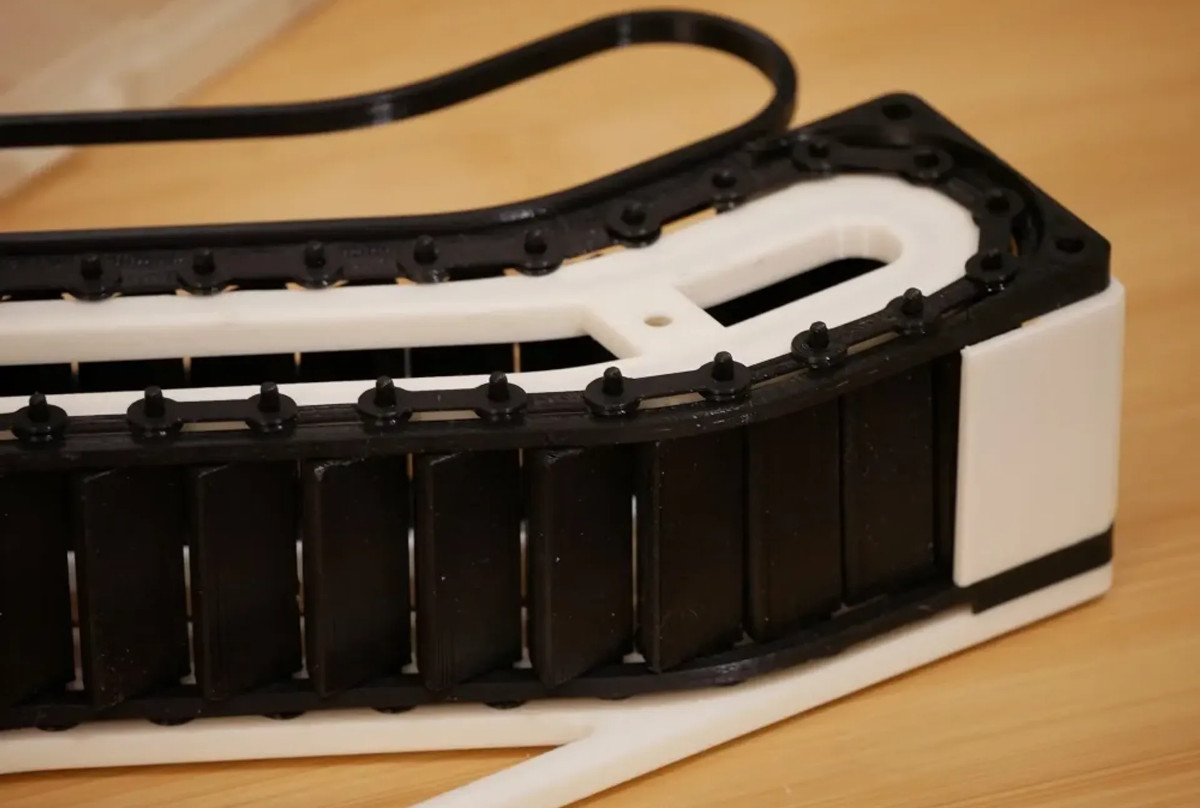
While the core mechanism is largely the same, the powered unit uses a N20 geared motor and an 18650 cell. There’s no fancy motor controller here — just flip the switch and you’ve got 30 RPMs worth of stair-steppin’ action. When you’ve run the cell down, and you will, there’s an onboard TP4056 charging module to keep the good times rolling.

[AlexY] hasn’t had a chance to document the build process for the motorized version of the escalator, but as most of the parts are compatible with the manual version, you should be able to figure it out by referencing the earlier assembly guide.

Hot squirted plastic not your thing? We’ve previously seen a wooden escalator designed to keep a Slinky in motion for as long as it takes for you to realize you could be using your skills for something more constructive.

Continue reading “Up Your Desk Toy Game With This 3D Printed Escalator”

Junkbox Build Keeps Tesla Coils Perfectly Varnished

Admittedly, not a lot of people have a regular need to varnish coils. It’s mainly something that Tesla coil builders and other high-voltage experimenters are concerned with. But since that group probably constitutes a not insignificant fraction of the Hackaday audience, and because there are probably more applications for this homebrew coil varnishing setup, we figured it would be a good idea to share it.

For [Mads Barnkob], coil maintenance isn’t something to take lightly. If you check out his Kaizer Power Electronics channel on YouTube, you’ll see that he has quite a collection of large, powerful Tesla coils, some of which are used for demos and shows, and others that seem to be reserved mainly for blowing stuff up. To prevent one of his coils from joining the latter group, keeping the coat of insulating varnish on the secondary coil windings in tip-top condition is essential.

The setup seen in the video below helps with that tedious chore. Built entirely from scraps and junk bin parts, the low-speed, low-precision lathe can be set up to accommodate coils of all sizes. In use, the lathe turns the coil very slowly, allowing [Mads] to apply an even coat of varnish over the coil surface, and to keep it from sagging while it dries.

[Mads]’ setup is probably not great for coil winding as it is, but for coil maintenance, it’s just the thing. If your needs are more along the lines of a coil winder, we’ve got a fully automated winder that might work for you.

Continue reading “Junkbox Build Keeps Tesla Coils Perfectly Varnished”

Pi Powered 1:35 Scale Panther Tank

Tank aficionado [Daniel Zalega] has enjoyed playing around with armored fighting vehicles in the digital realm for years, but only recently realized he had the technology and skills necessary to take his passion into the physical world. Albeit on a slightly reduced scale. So he bought a 1:35 plastic model kit for the German WWII Panther tank from Tamiya, and started working on a way to make it move.

Luckily for [Daniel], the assembled model is essentially hollow. That gave him plenty of room to install the geared drive motors, batteries, motor controllers, voltage regulators, a servo for the turret, and the Raspberry Pi Zero that controls the whole show. Those with an aversion to hot glue would do well not to look too closely at the construction here, but it gets the job done. Besides, it’s not like this little Panther is going to see any front line combat.

Another element of the model kit that made it well-suited to motorization is the fact that it had real rubber treads. That meant [Daniel] just had to pop some holes in the side of the tank, and figure out how to mount the drive sprockets to his gear motors. Unfortunately it looks like the wheels are static on this model, meaning the tread has to be dragged over them. That’s certainly robbing the tank of some power and speed, but in the video after the break, you can see its movement is still fairly realistic.

To control the tank, he points his phone’s browser to a simple page running on the Raspberry Pi. By simply dragging a finger on the screen, you can operate the tank’s two independent treads and rotate the turret. [Daniel] said his original plan was more elaborate, with the web page displaying a live video feed from an onboard camera as well as the readings from various sensors. But at least for now, things are kept as straightforward as possible.

This certainly isn’t the first souped-up toy tank we’ve seen here at Hackaday. From gorgeous steam powered machines to this Tiger tank with a laser-assisted aiming system, these small tracked platforms have long been a favorite of hardware hackers.
Continue reading “Pi Powered 1:35 Scale Panther Tank”

A 3D Printed Robotic Chariot For Your Phone

As we’ve said many times in the past, the wide availability of low-cost modular components has really lowered the barrier to entry for many complex projects which previously would have been nigh-on impossible for the hobbyist to tackle. The field of robotics has especially exploded over the last few years, as now even $100 can put together a robust robotics experimentation platform which a decade ago might have been the subject of a DARPA grant.

But what if you want to go even lower? What’s the cheapest and easiest way to put together something like a telepresence robot? That’s exactly what [Advance Robotics] set out to determine with their latest project, and the gadget’s final form might be somewhat surprising. Leveraging the fact that nearly everyone has a device capable of video calls in their pocket, the kit uses simple hardware and 3D printed components to produce a vehicle that can carry around a smartphone. With the phone providing the audio and video link, the robot only needs to handle rolling around in accordance with the operators commands.

The robot chassis consists of a few simple 3D printed components, including the base which holds the phone and electronics, the wheels, and the two rear “spoons” which are used to provide a low-friction way of keeping the two-wheeled device vertical. To get it rolling, two standard DC gear motors are bolted to the sides. With the low cost of printer filament and the fact that these motors can be had for as little as $2 online, it’s hard to imagine a cheaper way to get your electronics moving.

As for the electronics, [Advance Robotics] is using the Wemos D1 Mini ESP8266 development board along with L298N motor controller, another very low-cost solution. The provided source code pulls together a few open source libraries and examples to provide a simple web-based user interface which allows the operator to connect to the bot from their browser and move it around with just a few clicks of the mouse.

If you like the idea of printing a rover to explore your living room but want something a bit more advanced, we’ve seen printable robotics platforms that are sure to meet your needs, no matter what your skill level is.

Continue reading “A 3D Printed Robotic Chariot For Your Phone”

Mario Candy Machine Gamifies Halloween

Picture it: Halloween, 2018. You want to go to a party or take the kids out trick-or-treating, but remember what happened last year when you weren’t there to answer the door? A pack of wild children blew their allowances on 48 rolls of the cheapest toilet paper ever printed, and it took you four full hours to get all the sodden, dew-laden wads out of your rose bushes.

Halloween is a time to fear things like hobgoblins and the possibility of The Purge becoming a thing, not sugar-fueled children who are upset that you left out a bowl of Sixlets, wax lips, and alt-flavored Tootsie Rolls. So how do you take back the night? Do what [Randall Hendrix] did: build a Super Mario-themed candy-dispensing machine.

No customer, not one tiny [Thanos] or [Tony Stark] will be able to resist the giant, blinking, green start button. Pushing it cues the music and the spinning drum, which tumbles the candy around like a clothes dryer. Gravity and chance will drop one or three pieces onto a conveyor belt that runs under Mario’s feet, but it’s up to you to press the jump button at the right time.  Otherwise, he knocks your prize back into the barrel.

There’s no micro here, just woodworking, relays, motors, a sound FX board, and the amp from an old pair of PC speakers. Mario’s candy-securing jump was originally pneumatic, but now it’s powered by a 240:1 gear motor that lifts him up with a cam. Grab a fun size Snickers and slap that break button to see this marvelous machine in action.

Concerned that they’ll play until the candy is gone? Add a sinister element like the Candy-or-Death machine we saw a few years ago.

Continue reading “Mario Candy Machine Gamifies Halloween”

Hackaday Links: February 1, 2012

The only thing he needs now is a micro and RTC

For [Dino]’s 44th Hack A Week extravaganza, he made powered window blinds in five minutes. It’s a simple build with a small gear motor and a bit of tubing to adapt the shaft to the control rod of the blinds. Good job [Dino].

BecauseCamelCaseWillKillYourPinkieFinger

The wonderful [Lizzie] over at LUSTlab realized that typing meta keys really slows down the development process. The result? Foot pedals for the Shift and Command keys. No build log for this one, but it’s just a set of old racing pedals and a disused keyboard.

So much cooler than a potato

[mdevaev] out of Russia built a fully articulated GLaDOS replica. Here’s the build album and the relevant MLP forum post. This GLaDOS is tiny – probably less than a foot long, but it moves around and speaks (Russian, which is weird). Somebody get us a couple of motorcycle fenders so we can build the 1:1 scale version.

Visualizing a plane of fog

[greg] was looking for a way to visualize the chaotic turbulence of air. He mounted a laser on a computer fan and held some dry ice above the beam. The result looks like it could make for an interesting photography project, but check out the video if you don’t believe us.

We were asking for it

We asked for battery charging circuits that don’t use specialized parts. [Petr] found this one that only uses few transistors, a MOSFET and a voltage regulator. In one of the Hackaday comments, [atomsoft] had the idea of putting a USB plug on the traces to save a bit in component costs. [mohonri] said he designed one, but we have yet to see it. Perhaps next links post…

Lego Modded Antenna Tuner

legomoddedtunner

This antenna tuner is controlled remotely using geared motors and legos. The tuner needed to be closer to the antenna for performance reasons. This created a problem; most of the radio gear is inside while the tuner is outside. The gear motors and Legos combine to form a closed loop servo, operating two air core caps and an inductor switch. A control box placed near the radio is hard wired to the modded tuner outside. We would like to see something like this under gesture control using the Wii MotionPlus + Arduino.