Hackaday Links Column Banner

Hackaday Links: April 17, 2022

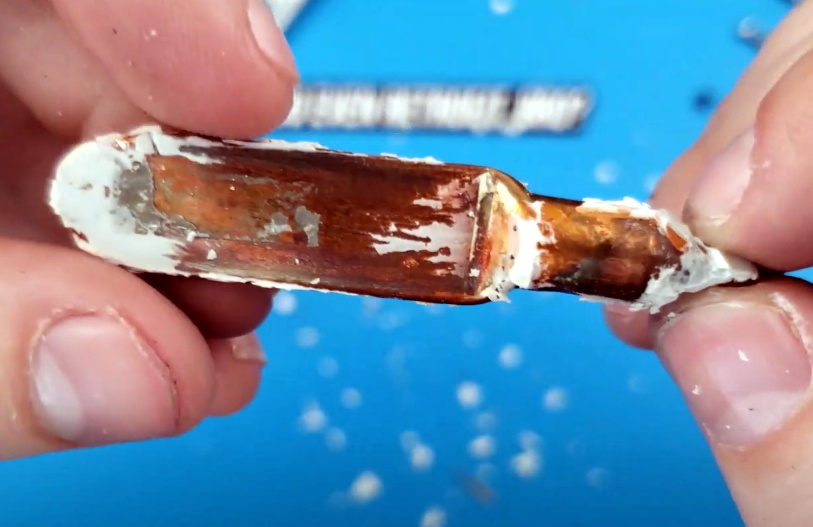
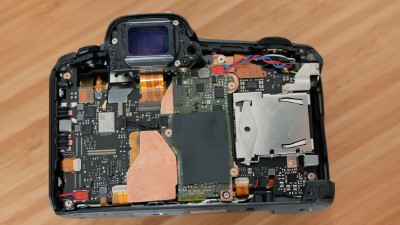
There are plenty of stories floating around about the war in Ukraine, and it can be difficult to sort out which ones are fact-based, and which are fabrications. Stories about the technology of the war seem to be a little easier to judge, and so stories about an inside look at a purported Russian drone reveal a lot of interesting technical details. The fixed-wing UAV, reported to be a Russian-made “Orlan,” looks quite the worse for wear as it’s given a good teardown by someone wearing Ukraine military fatigues. In fact, it looks downright homemade, with a fuel tank made from what looks like an old water bottle, liberal use of duct tape to hold things together, and plenty of hot glue sprinkled around — field-expedient repairs, perhaps? The big find, though, is that the surveillance drone carried a rather commonplace — and cheap — Canon EOS Rebel camera. What’s more, the camera is nestled into a 3D printed cradle, strapped in with some hook-and-loop tape, and its controls are staked in place with globs of glue. It’s an interesting collection of hardware for a vehicle said to cost the Russian military something like $100,000 to field. The video below shows a teardown of a different Orlan with similar results, plus a lot of dunking on the Russians by a cheery bunch of Ukrainians.

Continue reading “Hackaday Links: April 17, 2022”

Copper Modding Helps Cool A Toasty GPU

[DandyWorks] had an NVIDIA RTX 3070 Ti GPU, and found it was running incredibly hot, with the card’s memory hitting temperatures of 110 °C. He decided to try “copper modding” to solve the problem, and made some impressive improvements along the way.

Copper modding is where small copper shims are used to connect hot chips on the GPU to the heatsink more effectively than the standard thermal pads used by the manufacturer. Copper has much better thermal conductivity than thermal pads, and thus can help improve cooling of components when used in this fashion.

With the GPU carefully disassembled, [DandyWorks] notes the design uses a sub-heatsink specifically for the memory chips. He then sets about removing the thermal pads from the chips with isopropyl alcohol to help. They’re replaced with copper shims of a precise thickness, with a thin layer of thermal paste to ensure good heat flow. [DandyWorks] also shields all surrounding parts of the board with Kapton tape to avoid shorts if the copper shims happen to shift at any point.

Running the same hashing operation, the GPU now operates with its memory at a much cooler temperature of just 64 °C. [DandyWorks] ran the test for hours and temperatures didn’t climb beyond there. It’s evidence that the copper shims do a far better job of conducting the heat out of the memory chips versus the stock thermal pad setup.

We’ve seen some other interesting mods in this vein before, such as CPU die lapping for better thermal performance. Video after the break.

Continue reading “Copper Modding Helps Cool A Toasty GPU”

Mini PC with the mod described, a large tower fan sticking out of a hole in the top cover

MiniPC Surgery Makes It 50% Cooler

[G3R] writes to us about a mod they did on a HP ProDesk/EliteDesk 400 G3 miniPC they use as a home emulation center. The miniPC would overheat as soon as the CPU load increased, resulting in frame drops and stutters, as well as throttling CPU. [G3R] took the original cooling solution, threw out half of it and modified the remaining half to accept a tower CPU cooler.

The modification is invasive in all the right ways. [G3R] shows how to de-fin the current heatsink and smooth it over with a… welder? Our guess is that the heatsink fins were soldered to the heatsink base, and in that case, a heat gun should also work. Afterwards, you’re supposed to cut a hole in the upper case, then re-wire the fan connections, and create custom brackets to attach the tower fan – [G3R] explains how to do it all and what to watch out for.

The results are fascinating. After performing the mod, both idle and under-load temps got cut down by 50%! Idle temps went from 50 to 25 °C, and under-load temps dropped from 79 to 40 °C – surely, with way less throttling involved. Not only this lets [G3R] play Breath Of The Wild without hiccups, it also certainly improves overall lifespan of the mini-PC, despite the intervention being mechanically harsh.

Making our devices, quite literally, cooler is a venerable tradition of hackers. Just a few weeks ago, we covered a simple 3D printable LGA 1700 CPU bracket which can gain you some much-desired thermal contact. Sometimes we encounter proprietary and weird cooling fans that fail, and then we understand their workings and build a substitute. And, even if your GPU was never meant to have a fan, you can add one anyway!

3D Printed CPU Bracket Reduces Temperatures

What do you do when your motherboard bends your CPU? If you’re [Karta] or [Luumi], you 3D print a new retaining bracket to fix the problem. [Karta] originated the design, and [Luumi] also tried it and produced the video you can see below.

We think we find flat surfaces all the time, but it is actually very difficult to create something truly flat. You usually learn this when you try to maximize heat transfer between two surfaces. Getting two supposedly flat surfaces to touch is quite hard. CPU brackets use a combination of pressure and some sort of thermal media or paste to fill in any gaps between the CPU case and the heat sink. Intel’s LGA1700 bracket is an example, but there’s been a problem. Apparently, with recent CPUs, the bracket is a little too tight, and it bends the CPU’s case. It doesn’t hurt the CPU, but it does inhibit thermal transfer.

Others have “fixed” this problem by adding some washers to slightly raise the bracket. In both cases, there has been some very small improvement in CPU temperatures. [Luumi] says part of the problem is his water cooling block is not completely flat and needs to be lapped. [Karta], however, reported a 7 degree drop in temperatures, which is pretty significant.

We love seeing how 3D printing can fix or improve things you own. They talk a lot about lapping in the video, and, in some cases, people actually risk lapping the IC die itself to make it flatter. It can help, but the risk is relatively high and the gain is relatively low.

Continue reading “3D Printed CPU Bracket Reduces Temperatures”

Teensy 4 Pushed To The Limit With 1 GHz Overclock

Do you need a microcontroller that runs at 1 GHz? No, probably not. But that didn’t stop [Visual Micro] from trying, and the results are pretty interesting. Not only did the plucky little chip not cook itself, it actually seemed to run fairly well; with the already powerful microcontroller getting a considerable boost in performance.

According to [Visual Micro] the Teensy 4.1, which normally has its ARM Cortex-M7 clocked at 600 MHz, can run at up to 800 MHz without any additional cooling. But beyond that, you’ll want to invite some extra surface area to the party. It’s easy enough to cut a chunk out of an old CPU/GPU cooler and stick it on with a dab of thermal compound, but of course there’s no shortage of commercially available heatsinks at this size that you could pick up cheap.

Cutting a custom heatsink.

With the heatsink installed, [Visual Micro] shows the Teensy running at around 62 °C during a benchmark. If that’s a little hot for your liking, they also experimented with an old laptop cooler which knocked the chip down to an impressive 38 °C while under load. It doesn’t look like a particularly practical setup to us, but at least the option is there.

[Visual Micro] unfortunately doesn’t go into a lot of detail about the benchmark results, but from what’s shown, it appears the overclock netted considerable gains. A chart shows that in the time it took a stock Teensy to calculate 15.2 million prime numbers, the overclocked chip managed to blow through 21.1 million. The timescale for this test is not immediately clear, but the improvement is obvious.

Even at the stock 600 MHz, the Teensy 4 is a very powerful MCU. Especially after the 4.1 refresh brought in support for additional peripherals and more RAM. But we suppose some people are never satisfied. Got a project in mind that could benefit from an overclocked Teensy? We’d love to hear about it.

Continue reading “Teensy 4 Pushed To The Limit With 1 GHz Overclock”

Exploring An Aftermarket LED Headlight Retrofit Kit

There’s plenty of debate about drop-in LED headlight bulbs, especially when they’re used with older reflector housings that were designed for halogen bulbs. Whether or not you personally feel the ultra-bright lights are a nuisance, or even dangerous, one thing we can all agree on is that they’re clearly the result of some impressive engineering.

Which is why we were fascinated to see the teardown [TechChick] did on a “Ultra 2 LED” retrofit from GTR Lighting. Apparently one of the diodes was failing, and as part of the warranty replacement process, she was informed she had to make it completely inoperable. Sounds like a teardown dream come true. If a manufacturer ever told us we needed to take something apart with extreme prejudice and provide photographic evidence that the deed was done, we’d be all too happy to oblige.

The driver itself ended up being completely filled with potting compound, so she doesn’t spend much time there. Some will no doubt be annoyed that [TechChick] didn’t break out the small pointy implements and dig all that compound out, but we all pretty much know what to expect when it comes to driving LEDs. The real interesting bit is the bulb itself.

As is common with these high-output automotive LEDs, the Ultra 2 is actively cooled with a small fan that’s actually enclosed within the heatsink. With the fan and the two-piece heatsink removed, she’s able to access the LED module itself. Here, two PCBs are sandwiched back to back with a hollow copper chamber that leads out of the rear of the module. When [TechChick] cut into the copper she said she heard a hiss, and assumed it was some kind of liquid cooling device. Specifically we think it’s a vapor chamber that’s being used to pull heat away from the diodes and into the heatsink at the rear of the module, which speaks to the advanced technology that makes these bulbs possible.

While laser headlights are arguably the future of automotive lighting, it’s going to be quite some time before they trickle down to those of us that don’t own supercars. Until then, when used responsibly, these LED retrofits can inject a bit of cutting-edge tech into your old beater without breaking the bank.

Continue reading “Exploring An Aftermarket LED Headlight Retrofit Kit”

Watercooling A Canon DSLR Leads To Serious Engineering Upgrades

The Canon EOS R5 is a highly capable, and correspondingly very expensive camera. Capable of recording video in 8K in a compact frame size, it unfortunately suffers from frustrating overheating issues. Always one to try an unconventional solution to a common problem, [Matt] decided to whip up a watercooling solution. What ensues is pure, top-notch engineering.

The watercooling setup is amusing, but the real star of the show is the custom copper heatsink that transforms the camera’s performance without spoiling its practicality.

Upon its original release, Canon had the R5 camera simply shut off on a 20 minute timer when recording 8K video. When the userbase complained, an updated firmware was released that used an onboard sensor and would only shutdown when excessive temperatures were reached. Under these conditions, the camera could record for around 25 minutes at 20 °C. [Matt] set about disassembling the camera to investigate, figuring out that the main processor was the primary source of heat. With a poor connection to its heatsink and buried under a power supply PCB, there simply wasn’t anywhere for heat to go, leaving the camera to regularly overheat and take hours to cool down.

After whipping up an amusing but impractical watercooling solution and verifying it allowed the camera to record indefinitely, [Matt] set about some proper thermal engineering. A custom copper heatsink was produced for inside the camera, bonded directly to the processor and DRAM with thermal paste instead of poor-quality thermal tape. This then directs heat out through the plastic back of the camera. In cool environments, this is enough to allow the camera to record continuously. In warmer environments, simply adding a small fan to the back of the camera was enough to keep things operational indefinitely.

[Matt] finishes the video by pointing out that Canon could have made the camera far more useful for videographers by simply investing a little more time into the camera’s cooling design, while also generating more profits by selling a cooling accessory for extended recording. We’ve seen some of [Matt’s] work before too, such as this DIY 4K projector build. Video after the break.

Continue reading “Watercooling A Canon DSLR Leads To Serious Engineering Upgrades”