Official Teardown Gives Unexpected Look Into PS5

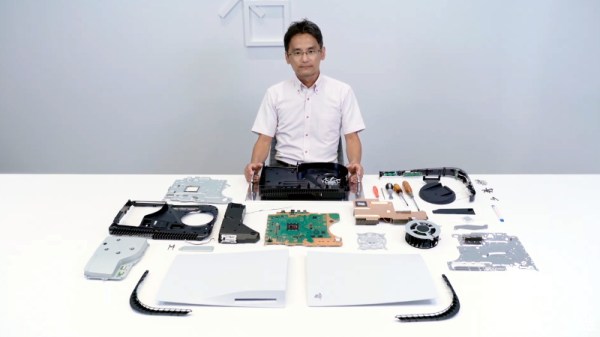
With Sony and Microsoft still a month away from the public release of their next-generation game consoles, you’d expect technical details of their respective systems to still be under a veil of secrecy. But both companies look to be taking things a bit differently this generation, as it becomes increasingly clear that modern consumers are interested in what makes their devices tick. Today, Sony really threw down the gauntlet by beating the tech media to the punch and posting their own in-depth teardown on the new PlayStation 5.

Unsurprisingly, the video after the break is almost entirely in Japanese. But even if you don’t know the language, there’s plenty of interesting details to be had. For one thing, the heatsink and fan that cools the PS5’s AMD CPU and GPU are collectively so massive that they appear to take up most of the console’s internal volume.

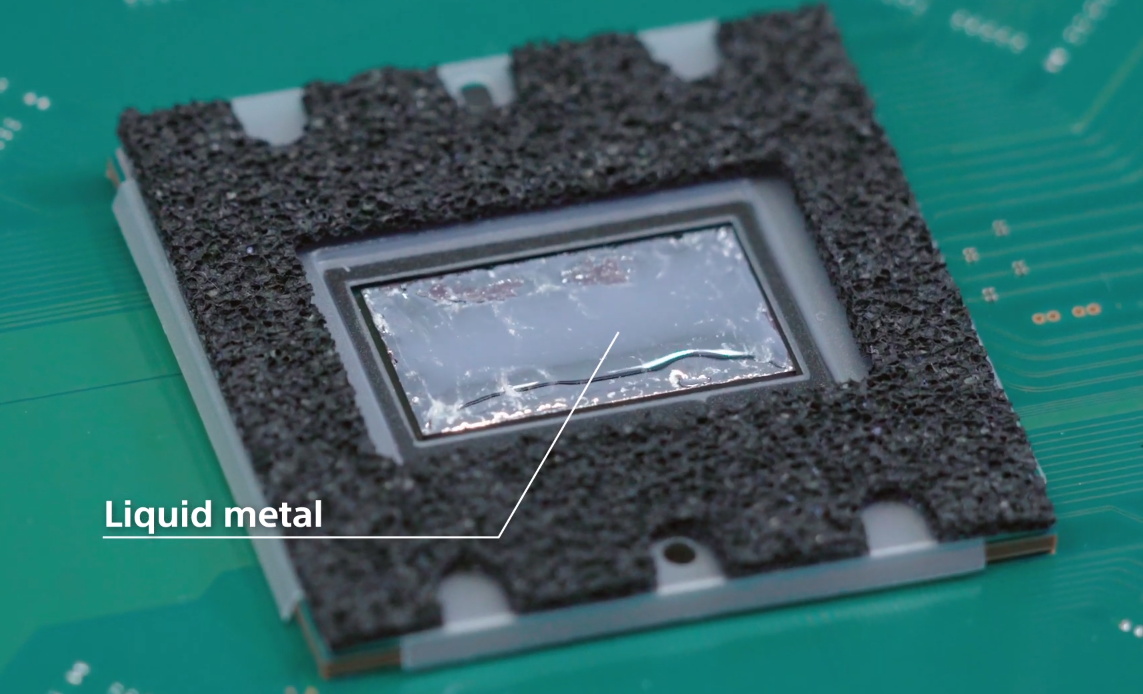
In fact, the heatsink itself is so large that the motherboard is actually mounted to it instead of the other way around. So if you want to take out the board, you have to unbolt it from the heatsink and remove it first. In the process you’ll expose the unique liquid metal thermal compound that Sony apparently developed specifically for this application. Good luck to you if any dust gets in that expensive-looking goop.

It’s also interesting to note that, unlike the previous two generations of Sony consoles, the PS5 has no discrete hard drive. Instead, onboard flash with a custom controller is used to provide 825 GB of storage for software. Hopefully Sony has put the requisite amount of R&D into their wear leveling, as a shot flash chip will mean a whole new motherboard. That said, gamers with extensive collections will be happy to see there appears to be an expansion bay where you can install your own M.2 drive.

Between this and the recent PS4 assembly line tour, it’s refreshing to see a company like Sony be a bit more transparent. After years of adversarial treatment from the tech giants, we’d almost forgotten that the customer is supposed to be king. Continue reading “Official Teardown Gives Unexpected Look Into PS5”

Raspberry Pi NAS Makes Itself At Home In Donor PC

It’s safe to say that most of us have at least one Raspberry Pi hanging from a USB cable someplace, silently hammering away at some unglamorous task that you’d rather not do on a “real” computer. With as cheap as they are, it’s not like there’s a big concern about where it sets up shop. But if you’re like [Jeremy S. Cook] and want your $35 Linux computer to be a permanent member of the family, then his tips on turning an old PC into a gloriously overkill Pi NAS may be of interest.

The main component [Jeremy] salvages from the old Lenovo desktop PC is, obviously, the case itself. Stripped of its original components, the case gives him plenty of room to mount the Pi as well as a couple of hard drives and a powered USB hub. To prevent the bottom of the Raspberry Pi from shorting out against the metal computer case, he designed and 3D printed a mount for it. Everything else is held down with hook and loop fastener, making it quick and easy to move things around and make adjustments.

While it might not be strictly necessary, [Jeremy] also took the time to salvage the computer’s old heatsink. Being far too large to fit on the Pi as-is, he ran a line down the back of it with his mill and snapped it in half. He uses a bit of thermal tape to hold the bisected heatsink onto the Pi’s SoC, with a couple pieces of electrical tape to make sure it doesn’t short out on anything.

Raspberry Pi NAS builds are exceptionally popular, and we’ve seen more than we can count over the years. You can build one out of parts from IKEA, and if you don’t mind plastic, you can always 3D print the whole thing. If you really want to go minimal, you can even hang some files on the network with little more than a Pi Zero stuck into a USB port.

Continue reading “Raspberry Pi NAS Makes Itself At Home In Donor PC”

ERRF 18: Slice Engineering Shows Off The Mosquito

With few exceptions, it seemed like every 3D printer at the first inaugural East Coast RepRap Festival (ERRF) was using a hotend built by E3D. There’s nothing inherently wrong with that; E3D makes solid open source products, and they deserve all the success they can get. But that being said, competition drives innovation, so we’re particularly interested anytime we see a new hotend that isn’t just an E3D V6 clone.

The Mosquito from Slice Enginerring is definitely no E3D clone. In fact, it doesn’t look much like any 3D printer hotend you’ve ever seen before. Tiny and spindly, the look of the hotend certainly invokes its namesake. But despite its fragile appearance, this hotend can ramp up to a monstrous 500 C, making it effectively a bolt-on upgrade for your existing machine that will allow you to print in exotic materials such as PEEK.

We spent a little time talking with Slice Engineering co-founder [Dan], and while there’s probably not much risk it’s going to dethrone E3D as the RepRap community’s favorite hotend, it might be worth considering if you’re thinking of putting together a high-performance printer.

Continue reading “ERRF 18: Slice Engineering Shows Off The Mosquito”

Thermoelectric Generator Shines Where The Sun Doesn’t

For off-grid renewable electricity, solar seems to make sense. Just throw some PV panels on the roof and you’re all set to stick it to the man, right? But the dirty little secret of the king of clean energy is that very few places on the planet get the sort of sunshine needed to make residential PV panels worth their installation cost in the short term, and the long-term value proposition isn’t very good either.

The drearier places on the planet might benefit from this high-power thermoelectric generator (TEG) developed and tested by [TegwynTwmffat] for use on a wood burning stove. The TEG modules [Tegwyn] used are commercially available and rated at 14.4 volts and 20 watts each. He wisely started his experiments with a single module; the video below shows the development of that prototype. The bulk of the work with TEGs is keeping the cold side of the module at a low enough temperature for decent performance, since the modules work better the higher the difference in temperature is across the module. A finned heatsink and a fan wouldn’t cut it for this application, so a water-cooled block was built to pump away the heat. A successful test led to scaling the generator up to 10 modules with a very impressive heatsink, which produced about 120 watts. Pretty good, but we wonder if some easy gains in performance would have come from using heat sink compound on the module surfaces.

Using thermal differences to generate electricity is nothing new, but a twist on the technique is getting attention lately as a potential clean energy source. And who knows? Maybe [TegwynTwmffat]’s or one of the other Hackaday Prize 2018 entries will break new ground and change the world. What’s your big idea?

Continue reading “Thermoelectric Generator Shines Where The Sun Doesn’t”

Stepper Driver Module With Swappable Heatsinks

At first glance, [Dean Gouramanis]’s stepper driver module for 3D printers looks like just another RAMPS-compatible stepper board. Except, what could that gold-plated copper peg sticking out of the PCB possibly be? That would be [Dean]’s PowerPeg Thermal Management System that he built and entered in the Hackaday Prize competition for 2015, where it rocked its way into the Finals. It’s a thermal connector peg that attaches to a variety of heatsinks so you can swap in whatever sink fits the bill.

In the case of this project, [Dean] created a custom PCB that accommodates the PowerPeg connector, onto which the heat sink screws. Needless to say, he machined his own heatsinks to go with the pegs, though it looks like you could use any sink with enough surface contact that can be secured by the same #0-80 screw.

You shouldn’t be surprised that hackers obsess over heatsinks. This heatsink tester project we published helps determine which sink  to use. Another post gives all the ins and outs of ordering a custom heatsink.

Chilling A Hot Camera

[Eric]’s camera has a problem. It overheats. While this wouldn’t be an issue if [Eric] was taking one picture at a time, this camera also has a video mode, which is supposed to take several pictures in a row, one right after the other. While a camera that overheats when it’s used is probably evidence of poor thermal engineering, the solution is extremely simple: strap a gigantic heat sink to the back. That’s exactly what [Eric] did, and the finished product looks great.

The heatsink chosen for this application is a gigantic cube of aluminum, most likely taken from an old Pentium 4 CPU cooler. Of course, there’s almost no way [Eric] would have found a sufficiently large heat sink that would precisely fit the back of his camera, which meant he had to mill down the sides of this gigantic heat sink. [Eric] actually did this in his drill press using a cross slide vice and an endmill. This is surely not the correct, sane, or safe way of doing things, but we’ll let the peanut gallery weigh in on that below.

The heatsink is held on by a technique we don’t see much around here — wire bending. [Eric] used 0.055″ (1.3 mm) piano wire, and carefully bent it to wrap around both the heatsink and the camera body. Does the heatsink cool the camera? Yes, and the little flip-up screen of the camera makes this camera a very convenient video recording device. You can check out the video of this build below.

Continue reading “Chilling A Hot Camera”

Hackaday Links Column Banner

Hackaday Links: June 28, 2015

The iBookGuy is using CPU heatsinks to cool microwave dinners. It’s an old Pentium II heatsink and a modern fan, cobbled together into a device that can quickly and effectively cool down a microwave dinner. I have several heatsinks from some old Xeon servers in my kitchen, but I don’t use them to cool food; I use them to defrost food. It’s very effective, and now I need to get some data on how effective it is.

[juangarcia] is working on a 3D printable PipBoy – the one in the upcoming Fallout 4. The extra special edition of Fallout 4 include a PipBoy that works with your cellphone, but if you want one before November, 3D printing is the way to go.

[Collin] over at Adafruit is teaching Oscilloscope Basics. Note the use of the square wave output to teach how to use the controls. Also note the old-school DS1052E; the Rigol 1054Z is now the de facto ‘My First Oscilloscope’

[Donovan] has one of those V212 toy quadcopters. The remote has a switch that controls a bunch of lights on the quad. This switch can be repurposed to control a small camera. All it takes is some wire, an optocoupler, and a bit of solder. Very cool. Video here.

I go to a lot of events where hackers, devs, and engineers spend hours banging away on their laptops. The most popular brand? Apple. The second most popular brand for savvy consumers of electronics? Lenovo, specifically ThinkPad X- and T-series laptops (W-series are too big, and do you really need a workstation graphics card for writing some node app?). They’re great computers, classic works of design, and now there might be a ThinkPad Classic. With a blue Enter key, 7-row keyboard, a multi-color logo, ThinkLights, a bunch of status LEDs, and that weird rubberized paint, it’s a modern realization of what makes a ThinkPad great. Go comment on that Lenovo blog post; the designer is actually listening. Now if we could just get a retina display in a MacBook Air (the one with ports), or get manufacturers to stop shipping displays with worse than 1080 resolution…

Need a fan guard? Know OpenSCAD? Good. Now you have all the fan guards you could ever want. Thanks [fridgefire] for sending this one in.