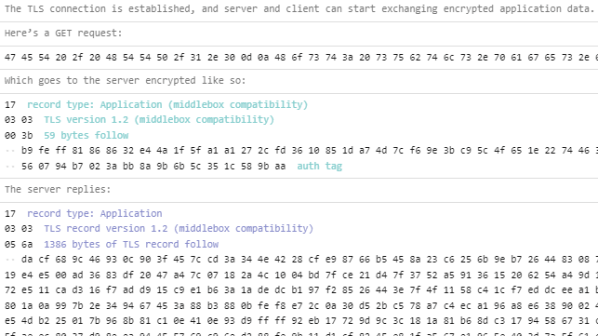
TLS, byte by byte performs an unusual and interesting function: it fetches itself over HTTPS, and provides a complete annotation of what’s going on in the process, one byte at a time. Visit the site and give the button a click to watch it happen, it’s neat!
Transport Layer Security (TLS) is what’s responsible for encrypting traffic over the internet, and it’s normally implemented on top of TCP to encrypt an application-layer protocol like HTTP (resulting in HTTPS and the little padlock icon in browsers indicating a connection with a web site is encrypted.) Back in the day, traffic over the internet was commonly unencrypted, but nowadays no communication or hardware is too humble for encryption and methods are easily accessible.
So for what purpose would someone actually need or use such an implementation of TLS? Well, probably no one actually needs it. But it is a userspace TLS implementation in javascript that may fit a niche for someone, and it certainly provides beautifully-indented and annotated binary data in the process. Sound up your alley? The GitHub repository for the project has all the details, so give it a look.
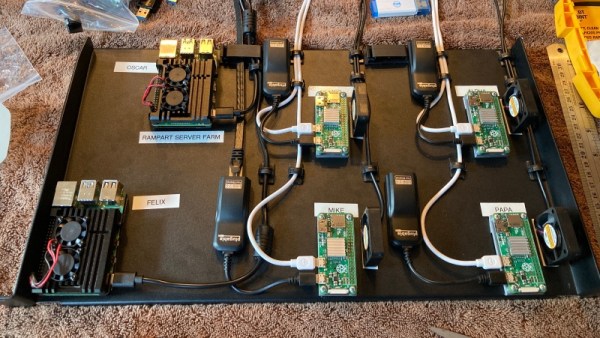
[P B Richards] and [Aaron Flin] were bemoaning the resource hunger of modern JavaScript environments and planned to produce a system that was much stingier with memory and CPU, that would fit better on lower-end platforms. Think Nginx, NodeJS, and your flavour of database and how much resource that all needs to run properly. Now try wedge that lot onto a Raspberry Pi Zero. Well, they did, creating Rampart: a JavaScript-based complete stack development environment.
The usual web applications have lots of tricks to optimise for speed, but according to the developers, Rampart is still pretty fast. Its reason for existence is purely about resource usage, and looking at a screen grab, the Rampart HTTP server weighs in at less than 10 MB of RAM. It appears to support a decent slew of technologies, such as HTTPS, WebSockets, SQL search, REDIS, as well as various utility and OS functions, so shouldn’t be so lightweight as to make developing non-trivial applications too much work. One interesting point they make is that in making Rampart so frugal when deployed onto modern server farms it could be rather efficient. Anyway, it may be worth a look if you have a reasonable application to wedge onto a small platform.
We’ve seen many JavaScript runtimes over the years, like this recent effort, but there’s always room for one more.
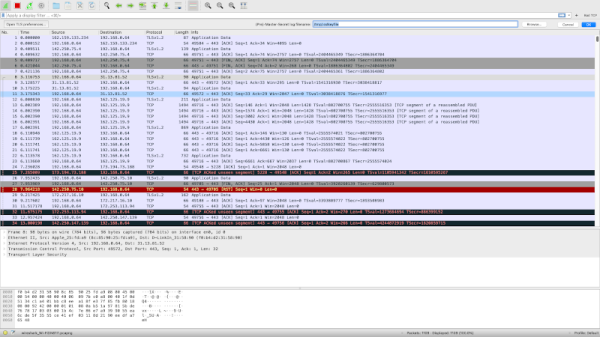
If you’ve done any network programming or hacking, you’ve probably used Wireshark. If you haven’t, then you certainly should. Wireshark lets you capture and analyze data flowing over a network — think of it as an oscilloscope for network traffic. However, by design, HTTPS traffic doesn’t give up its contents. Sure, you can see the packets, but you can’t read them — that’s one of the purposes of HTTPS is to prevent people snooping on your traffic from reading your data. But what if you are debugging your own code? You know what is supposed to be in the packet, but things aren’t working for some reason. Can you decrypt your own HTTPS traffic? The answer is yes and [rl1987] shows you how.
Don’t worry, though. This doesn’t let you snoop on anyone’s information. You need to share a key between the target browser or application and Wireshark. The method depends on the target applications like a browser writing out information about its keys. Chrome, Firefox, and other software that uses NSS/OpenSSL libraries will recognize an SSLKEYLOGFILE environment variable that will cause them to produce the correct output to a file you specify.
How you set this depends on your operating system, and that’s the bulk of the post is describing how to get the environment variable set on different operating systems. Wireshark understands the file created, so if you point it to the same file you are in business.
Of course, this also lets you creep on data the browser and plugins are sending which could be a good thing if you want to know what Google, Apple, or whoever is sending back to their home base using encrypted traffic.
Wireshark and helpers can do lots of things, even Bluetooth. If you just need to replay network data and not necessarily analyze it, you can do that, too.
After an electronic IoT device has been deployed into the world, it may be necessary to reprogram or update it. But if physical access to the device (or devices) is troublesome or no longer possible, that’s a problem.
OTA updates allow a device to download new firmware, install it, and reboot itself into the new version. Convenient? Yes. Secure? It definitely needs to be.
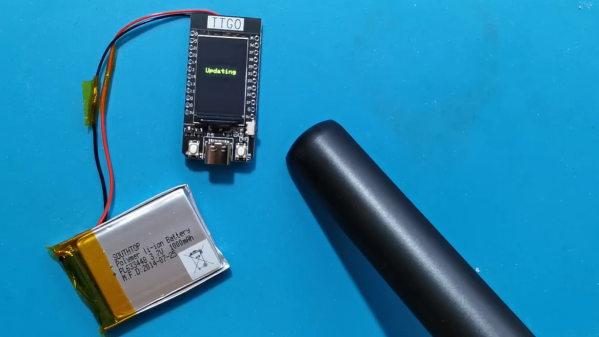
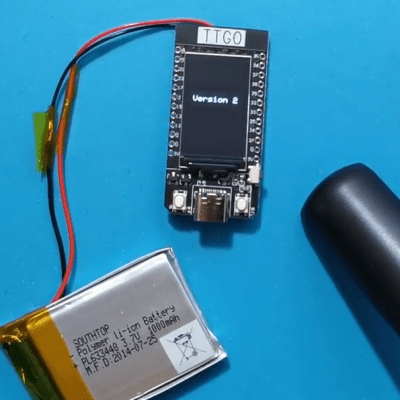
Fortunately, over-the-air (OTA) firmware updates are a thing, allowing embedded devices to be reprogrammed over their wireless data connection instead of with a physical hardware device. Security is of course a concern, and thankfully [Refik] explains how to set up a basic framework so that ESP32 OTA updates can happen securely, allowing one to deploy devices and still push OTA updates in confidence.
[Refik] begins by setting up a web server using Ubuntu Linux, and sets up HTTPS using a free SSL certificate from Let’s Encrypt, but a self-signed SSL certificate is also an option. Once that is done, the necessary fundamentals are in place to support deploying OTA updates in a secure manner. A bit more configuration, and the rest is up to the IoT devices themselves. [Refik] explains how to set things up using the esp32FOTA library, but we’ve also seen other ways to make OTA simple to use.
You can watch a simple secure OTA firmware update happen in the video, embedded below. There are a lot of different pieces working together, so [Refik] also provides a second video for those viewers who prefer a walkthrough to help make everything clear. Watch them both, after the break.
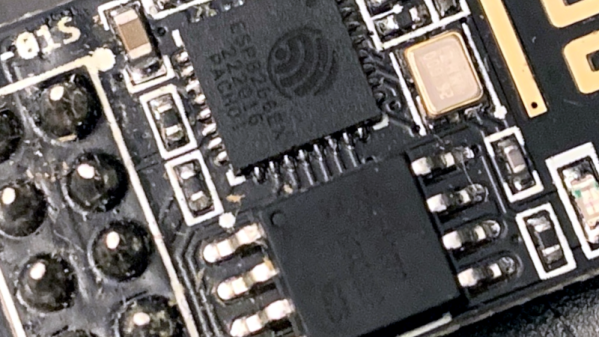
Security has always been an issue with IoT devices. Off the shelf devices often have terrible security while DIY solutions can be complicated, needing recompilation every time a website’s fingerprint changes. [Johannes] wrote in to let us know he’s been working on a way to make HTTPS requests easier to do on ESP devices.
The normal ways to do HTTPS with an ESP8266 is to either use Fingerprints, or to use client.setInsecure(). Fingerprints require the user to know exactly which pages the ESP will connect to and extract the Fingerprints from each of those websites. Since the fingerprints change yearly, this means the fingerprint will have to be re-extracted and the code recompiled each time a fingerprint changes. The use of client.setInsecure() is, obviously, insecure. This may not be an issue for your project, but it might be for others.
[Johannes’] solution is to extract the trusted root certificates and store them in PROGMEM. This allows access to any web page, but the root certificates do expire as well. As opposed to the fingerprints, though, they expire after 20 years, rather than every year, so the program can run for a long time before needing recompilation. This solution also doesn’t require any manual steps – the build process runs a script that grabs the certificates and stores them in files so that they can be uploaded to the SPIFFS written to PROGMEM to be used during HTTPS requests.
He’s come up with a fairly straightforward way to have your IoT device connect to whichever web page you want, without having to recompile every once in a while. Hopefully, this will lead to better security for your IoT devices. Take a look at some previous work in this area.
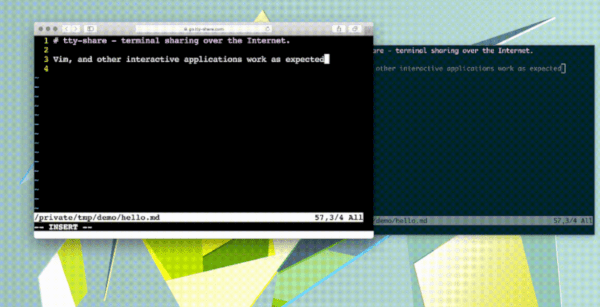
Thanks to the wonders of the internet, collaborating with others across great distances has become pretty simple. It’s easy now to share computer desktops over a network connection, and even take control of another person’s computer if the need arises. But these graphical tools are often overkill, especially if all we really need is to share a terminal session with someone else over a network.
A new project from [Elis] allows just that: to share an active terminal session over a web browser for anyone else to view. The browser accesses a “secret” URL which grants access to the terminal via a tunnel which is able to live stream the entire session. The server end takes care of all of the work of generating this URL, and it is encrypted with TLS and HTTPS. It also allows for remote control as well as viewing, so it is exceptionally well-featured for being simple and easy to run.
To run this software only a binary is needed, but [Elis] has also made the source code available. Currently he finds it a much more convenient way of administering his Raspberry Pi, but we can see a lot of use for this beyond the occasional headless server. Certainly this makes remote administration easy, but could be used collaboratively among a large group of people as well.
It’s no secret that I rather enjoy connecting things to the Internet for fun and profit. One of the tricks I’ve learned along the way is to spin up simple APIs that can be used when prototyping a project. It’s easy to do, and simple to understand so I’m happy to share what has worked for me, using Web2Py as the example (with guest appearances from ESP8266 and NodeMCU).
Barring the times I’m just being silly, there are two reasons I might do this. Most commonly I’ll need to collect data from a device, typically to be stored for later analysis but occasionally to trigger some action on a server in the cloud. Less commonly, I’ll need a device to change its behavior based on instructions received via the Internet.
Etherscan is an example of an API that saves me a lot of work, letting me pull data from Ethereum using a variety of devices.
In the former case, my first option has always been to use IoT frameworks like Thingsboard or Ubidots to receive and display data. They have the advantage of being easy to use, and have rich features. They can even react to data and send instruction back to devices. In the latter case, I usually find myself using an application programming interface (API) – some service open on the Internet that my device can easily request data from, for example the weather, blockchain transactions, or new email notifications.
Occasionally, I end up with a type of data that requires processing or is not well structured for storage on these services, or else I need a device to request data that is private or that no one is presently offering. Most commonly, I need to change some parameter in a few connected devices without the trouble of finding them, opening all the cases, and reprogramming them all.
At these times it’s useful to be able to build simple, short-lived services that fill in these gaps during prototyping. Far from being a secure or consumer-ready product, we just need something we can try out to see if an idea is worth developing further. There are many valid ways to do this, but my first choice is Web2Py, a relatively easy to use open-source framework for developing web applications in Python. It supports both Python 2.7 and 3.0, although we’ll be using Python 3 today.