Bigfoot Turns Classic Sewing Machine Into A Leather-Eating Monster

If you try to sew leather on a standard consumer-grade machine, more often than not you’ll quickly learn its limits. Most machines are built for speed, and trying to get them to punch through heavy material at the low motor speeds often needed for leather work is a lesson in frustration.

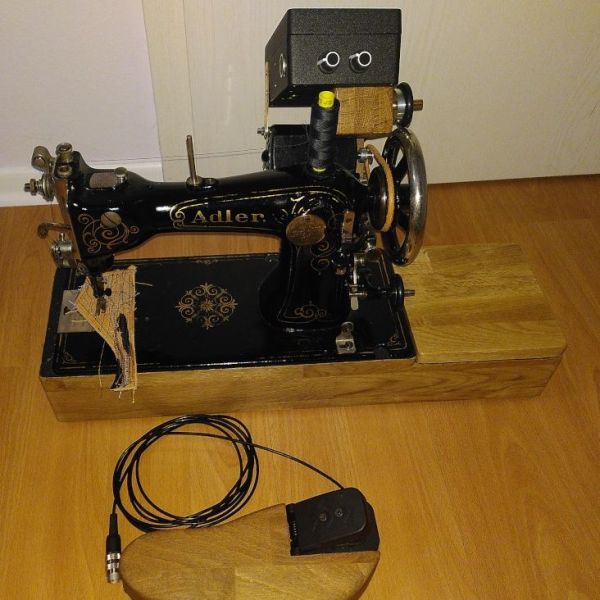
How frustrating? Enough so that [Joseph Eoff] expended considerable effort to create this sewing machine speed controller for his nearly century-old Adler sewing machine. The machine was once powered by a foot treadle, which is probably why the project is dubbed “Bigfoot,” but now uses a 230 V universal motor. Such motors don’t deliver much torque when run at low speeds with the standard foot-pedal rheostat control, so [Joseph] worked up an Arduino-based controller with a tachometer for feedback and a high-power PWM driver for the motor.

There are a ton of details in [Joseph]’s post and even more in the original blog article, which is well worth a read, but a couple really stand out. The first is with the tachometer, which uses an off-the-shelf photointerrupter and slotted disc. [Joseph] was displeased with the sensor’s asymmetrical and unreliable output, so he made some modifications to the onboard comparator to square up the signal. Also interesting is the PID loop auto-tuning function he programmed into Bigfoot; press a button and the controller automatically ramps the motor speed up and down and stores the coefficients in memory. Nice!

The short video below shows Bigfoot in action with varying thicknesses of faux leather; there are also some clips in the original article that show the machine dealing with a triple thickness of leather at slow speed and not even breaking a sweat. Hats off to [Joseph] on a solid build that keeps a classic machine in the game. And if you want to get into the textile arts but don’t know where to start, we’ve got you covered.

Continue reading “Bigfoot Turns Classic Sewing Machine Into A Leather-Eating Monster”

Adjustable, Piston-Damped Hammer

When all you have is a hammer, every problem is a constant quest for an even better hammer, as the popular saying goes. At least, that seems to be [Ebenisterie Éloïse]’s situation. She wanted a deadblow hammer that not only had an aesthetically pleasing wood and brass construction, but also one that included adjustable dampers to make sure that each hammer swing is as efficient as possible.

For those unfamiliar with specialty hammers, dead blow hammers typically have some movable mass such as sand or lead shot within the hammer head. This mass shifts forward when the hammer strikes an object, reducing rebound of the hammer off of the object and transferring more energy into each strike. This hammer omits a passive mass in favor of four custom-machined brass tubes, each of which holds a weighted fluid, a spring, and brass weight. Each piston acts as a damper in a similar way to a shock absorber on a vehicle, and a screw and o-ring at the top of each one allows them to be adjustable by adding different weight fluids as needed. Some detailed testing of the pistons shows a marked improvement over any of the passive mass varieties as well.

Not only is this an incredible amount of detail and precision for a tool that is often wielded in a non-precise way (at least among those of us for who aren’t skilled craftspeople), but it is also made out of wood, leather, and brass which gives it an improved look and feel over a plastic and fiberglass hammer that is typical of most modern deadblow hammers. It even rivals this engineer’s hammer with its intricate custom engraving in craftsmanship alone.

Continue reading “Adjustable, Piston-Damped Hammer”

Loads Of Testing Yields New, Reliable, And Cheap Leather Hardening Technique

Leather hardening has been around for such a long time that one might think that there was little left to discover, but [Jason F. Timmermans] certainly showed that is not the case. Right around the end of 2018 he set up experiments to compare different techniques for hardening leather, and empirically determine the best options. After considerable effort, he crafted a new method with outstanding results. It’s part of his exhaustive testing of different techniques for hardening leather, including some novel ones. It was a considerable amount of work but [Jason] says that he gathered plenty of really useful information, which we’re delighted that he took the time to share it.

According to [Jason], the various methods of hardening can be separated into four groups:

  1. Thermal: heat-treating at 180 ºF or higher, usually via some kind of boiling or baking process.
  2. Chemical: soaking in a substance that causes changes in the leather. Some examples include ammonia, vinegar, acetone, brine, and alcohol.
  3. Mechanical: hammering the leather.
  4. “Stabilizing” methods: saturating the leather with a substance to add rigidity and strength without otherwise denaturing the leather itself. Examples include beeswax, pine pitch, stearic acid, and epoxy.

We recommend making the time to follow the link in the first paragraph and read the full results, but to summarize: heat-treating generally yields a strong but brittle product, and testing revealed stearic acid  — which resembles a kind of hard, dense wax at room temperature — was an early standout for overall great results. Stearic acid has many modern uses and while it was unclear from [Jason]’s reasearch exactly when in history it became commonplace, at least one source mentioned it as a candidate for hardening leather.

But the story doesn’t stop there. Unsatisfied with simply comparing existing methods, [Jason] put a lot of work into seeing if he could improve things. One idea he had was to combine thermal treatment with a stabilizer, and it had outstanding results. The winning combination (named X1 in his writeup) was to preheat the leather then immerse it in melted stearic acid, followed by bringing the temperature of the combination to 200 ºF for about a minute to heat treat the leather at the same time. [Jason]’s observation was that this method “[B]lew the rest out of the water. Cutting the sample to view the cross section was like carving wood. The leather is very rigid and strong.”

The world may not revolve around leather the way it used to, but there’s still stuff to learn and new things to discover. For example, modern tools can allow for novel takes on old techniques, like using 3D printing to create custom leather embossing jigs.

Easily Deboss Notebooks With A 3D Printed Stamp

While it’s arguably a bit closer to the “Arts & Crafts” region of the making spectrum upon which we don’t usually tread on account our l33t sense of superiority, we’ve got to admit that the quick and easy notebook customization demonstrated by [Sean Hodgins] is very compelling. We don’t put ink to dead trees with nearly the frequency we used to, but when we do it might as well be Hemingway-style with a little black Hackaday emblazoned notebook.

As demonstrated in the video after the break, the process starts by designing the stamp in your CAD package of choice. For optimal results [Sean] suggests fairly large capital letters, but with practice you should be able to get into some more creative fonts. Potentially you could even use the logo of your favorite hacking blog, but who are we to dictate what you do?

Whatever you chose, it needs to be mirrored and placed on a relatively thick backing. He recommends a 2 mm thick “plate” with the letters raised on top. You’ll want to print it at a high infill percentage, but even still it shouldn’t take more than 30 minutes or so to run off. Remember there tends to be diminishing returns on infill past 50%, so taking it all the way to 100% is not going to do much but expend more time and plastic.

Once printed, [Sean] hot glues the stamp to a block of wood since putting pressure on the printed piece directly would likely crack it. Then it’s just a matter of getting your notebook, printed stamp, and blocks of wood lined up in to a suitably beefy bench vise. Getting everything aligned is one of those things that easier said than done, so expect to mess up the first couple until you get the hang of it.

When the alignment looks good, crank it down and let it sit for a few minutes. If you’re embossing the design into actual leather, wetting it a bit before putting the pressure on should help. The final effect is understated but undeniably very slick; and with the Holidays rapidly approaching this might be an excellent way to knock out some legitimately thoughtful gifts.

Ultimately the idea here is something of a lightweight version of the 3D printed press break dies used to bend aluminum or the punch and die set used for steel plates. At this point it seems there’s enough evidence to say that 3D printed objects are certainly strong enough (in compression, at least) to put some legitimate work in.

Continue reading “Easily Deboss Notebooks With A 3D Printed Stamp”

Leather Working With A 3D Printer

No, you can’t print in leather — at least not yet. But [Make Everything] has a tutorial about how to produce a custom leather embossing jig with a 3D printer. From a 3D printing point of view, this isn’t very hard to do and you might want to skip over the first six minutes of the video if you’ve done 3D printing before.

The real action is when he has the 3D print completed. He glues the stamp down to some wood and then fits the assembly to a vise that he’ll use as a press. After wetting the leather, the wood and 3D printed assembly sandwiches the piece and the vise applies pressure for ten minutes. He did make the leather a bit oversized to make alignment more forgiving. After the embossing is complete, he trims it out.

Continue reading “Leather Working With A 3D Printer”

DIY Designer Wallet From Designer Bag

Why do people drop hundreds of dollars on designer goods? The easy answer is that, in theory, the goods are worth the expense. The materials, craftsmanship, and attention to detail are all top-notch and culminate in the finest finery money can buy.

So, would you spend hundreds of dollars on a designer wallet? If you have leather crafting skills and a thrift store nearby, you could just follow [Corter Leather]’s example and make your own. He found a diamond in the rough—a genuine, well-loved Louis Vuitton bag languishing in a secondhand shop. The leather bottom and handles were dry and worn, but the signature LV canvas was still in great shape. Never crafted leather? If you can’t get free scraps for practicing, then deconstructing cheap, used stuff is the next best thing.

To isolate the canvas, [Corter] carefully removed the bag’s handles, bottom, liner, and zipper and then popped the rivets and peeled the backing from the fabric. He drew up a pattern in Illustrator that pays homage to the illustrious designer’s wallets and cut the pieces out of 3oz vegetable tanned leather using card stock templates.

[Corter] brought his A-game to the details. Every visible edge is painted Italian red, which he applied with an awl for a crisp line. The larger pockets have hidden stitches that keep cards from drifting to the bottom and throwing off the shape. No need to open your wallet to see how he did it—just watch the video after the break.

Though it technically isn’t a real Louis Vuitton, a thief wouldn’t know it until later. Maybe [Corter] should add a pickpocket alarm.

Continue reading “DIY Designer Wallet From Designer Bag”

Bisected Engine Makes Cute Lamp – Still Cranks

As a beginner’s step towards the famous Top Gear V8 coffee table, [English Tea] converted a small single cylinder engine into a desk lamp that uses the mechanical actuation of the piston to turn on and off. No able-bodied engines were harmed in the making of this hack as this one was already a corpse — perfect for [Mr. Tea] to prop up and display in his home.

Regrettably lacking a lightsaber, he settled for 30 minutes on a hacksaw to split the cylinder followed by some sandblasting to clean all the rust, paint, and gunk off all the internals. Once it was clean he repainted it himself. Between paint and clearcoats, he figured he added 20 layers onto the metal.

Next he created some wood sections and wet-formed leather over them which he later dyed black. Caring less about a new Walmart lamp than the motor, he vivisected it for its electrical components and wired it up.

Without a crank on the shaft it looks a bit awkward to twist the lamp on or off, but, only enough pressure is needed to poke a latching momentary pushbutton and it seems to work just fine. For any readers looking to make their own, dead compressors and gas power tools are fairly common and nearly free at the junkyard. Engine-based projects can be intimidating to start if you need a working engine again at the end. Becoming familiar with them on a project like this where you are mostly only using the engine as a building material is an easy way to get your foot in the door.

See the video after the break of the piston bumping the light on and off.

Continue reading “Bisected Engine Makes Cute Lamp – Still Cranks”