A Modular Logic Analyzer For FPGAs

When working on a project, it’s incredibly helpful to be able to visualize the various signals in play. This is important when attempting to determine if what is supposed to be happening is actually happening. However, logic analyzers can be expensive, so a group from [Bruce Land]’s ECE5760 class developed their own hardware solution instead.

The primary idea behind the project is modularity. The basic building blocks of the logic analyser are coded in Verilog. They’re designed so that the number of channels and added functions can be mixed and match to suit the given purpose and the capabilities of the target FPGA platform. The team’s logic analyzer is also capable of decoding SPI and I2C in hardware, and has a graphical user interface running on an attached laptop for visualizing signals.

It’s a tidy build, and an excellent project to learn the fundamentals of both FPGA programming and the various communications protocols involved. [Bruce Land]’s classes are a hotbed of FPGA projects, from pokerbots to NES chiptune emulators. Video after the break.

Continue reading “A Modular Logic Analyzer For FPGAs”

Loads Of Testing Yields New, Reliable, And Cheap Leather Hardening Technique

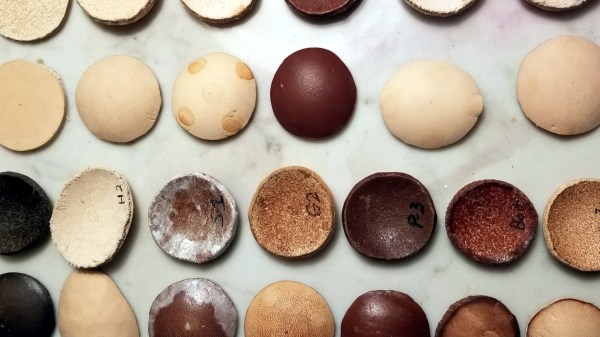
Leather hardening has been around for such a long time that one might think that there was little left to discover, but [Jason F. Timmermans] certainly showed that is not the case. Right around the end of 2018 he set up experiments to compare different techniques for hardening leather, and empirically determine the best options. After considerable effort, he crafted a new method with outstanding results. It’s part of his exhaustive testing of different techniques for hardening leather, including some novel ones. It was a considerable amount of work but [Jason] says that he gathered plenty of really useful information, which we’re delighted that he took the time to share it.

According to [Jason], the various methods of hardening can be separated into four groups:

  1. Thermal: heat-treating at 180 ºF or higher, usually via some kind of boiling or baking process.
  2. Chemical: soaking in a substance that causes changes in the leather. Some examples include ammonia, vinegar, acetone, brine, and alcohol.
  3. Mechanical: hammering the leather.
  4. “Stabilizing” methods: saturating the leather with a substance to add rigidity and strength without otherwise denaturing the leather itself. Examples include beeswax, pine pitch, stearic acid, and epoxy.

We recommend making the time to follow the link in the first paragraph and read the full results, but to summarize: heat-treating generally yields a strong but brittle product, and testing revealed stearic acid  — which resembles a kind of hard, dense wax at room temperature — was an early standout for overall great results. Stearic acid has many modern uses and while it was unclear from [Jason]’s reasearch exactly when in history it became commonplace, at least one source mentioned it as a candidate for hardening leather.

But the story doesn’t stop there. Unsatisfied with simply comparing existing methods, [Jason] put a lot of work into seeing if he could improve things. One idea he had was to combine thermal treatment with a stabilizer, and it had outstanding results. The winning combination (named X1 in his writeup) was to preheat the leather then immerse it in melted stearic acid, followed by bringing the temperature of the combination to 200 ºF for about a minute to heat treat the leather at the same time. [Jason]’s observation was that this method “[B]lew the rest out of the water. Cutting the sample to view the cross section was like carving wood. The leather is very rigid and strong.”

The world may not revolve around leather the way it used to, but there’s still stuff to learn and new things to discover. For example, modern tools can allow for novel takes on old techniques, like using 3D printing to create custom leather embossing jigs.

Hackaday Links Column Banner

Hackaday Links: May 26, 2019

Thinkpads are great, especially the old ones. You find a T420, and you can have a battery hanging off the back, a battery in the optical drive bay, and for some old Thinkpads, there’s a gigantic ‘slice’ battery that doubles the thickness of your laptop. Here’s the most batteries in a Thinkpad ever, with the requisite reddit post. It’s 27 cells, with an all-up capacity of 212 Watt-hours. There are two interesting takeaways from the discussion here. First, this may, technically, be allowed on a commercial flight. The FAA limit is 100 Watt-hours per battery, and the Ultrabay is a second battery. You’re allowed two additional, removable batteries on a carry on, and this is removable and reconfigurable into some form that the TSA should allow it on a plane. Of course no TSA agent is going to allow this on a plane so that really doesn’t matter. Secondly, the creator of this Frankenpad had an argument if Hatsune Miku is anime or not. Because, yeah, of course the guy with a Thinkpad covered in Monster energy drink stickers and two dozen batteries glued on is going to have an opinion of Miku being anime or not. That’s just the way the world works.

Prices for vintage computers are now absurd. The best example I can call upon is expansion cards for the Macintosh SE/30, and for this computer you have a few choice cards that have historically commanded a few hundred dollars on eBay. The Micron XCEED Color 30 Video Card, particularly, is a special bit of computer paraphernalia that allows for grayscale on the internal monitor. One of these just sold for two grand. That’s not all, either: a CPU accelerator just sold for $1200. These prices are double what they were just a few years ago. We’re getting to the point where a project to reverse engineer and produce clones of these special cards may make financial sense.

The biggest news in consumer electronics this week is the Playdate. It’s a pocket game console that has a crank. Does the crank do anything? No, except that it has a rotary encoder, so this can nominally be used for games. It will cost $150, and there are zero details on the hardware other than the industrial design was done by Teenage Engineering. There’s WiFi, and games will be delivered wireless on a weekly basis. A hundred thousand people are on the wait list to buy this.

If you want a pick and place in your garage workshop, there aren’t many options. There’s a Neoden for about ten grand, but nothing cheaper or smaller. The Boarditto is a two thousand dollar pick and place machine that fits comfortably on your desk. It has automatic tape feeders, a vision system, and for the most part it looks like what you’d expect a small, desktop pick and place machine to be. That’s all the information for now, with the pre-order units shipping in December 2019.

Chatterbox Voice Assistant Knows To Keep Quiet For Privacy

Cruising through the children’s hands-on activity zone at Maker Faire Bay Area, we see kids building a cardboard enclosure for the Chatterbox smart speaker kit. It would be tempting to dismiss the little smiling box as “just for kids” but doing so would overlook something more interesting: an alternative to data-mining corporations who dominate the smart speaker market. People are rightly concerned about Amazon Echo and Google Home, always-listening devices for online retail sending data back to their corporate data centers. In order to be appropriate for children, Chatterbox is none of those things. It only listens when a button is pressed, and its online model is designed to support the mission of CCFC (Campaign for a Commercial-Free Childhood.)

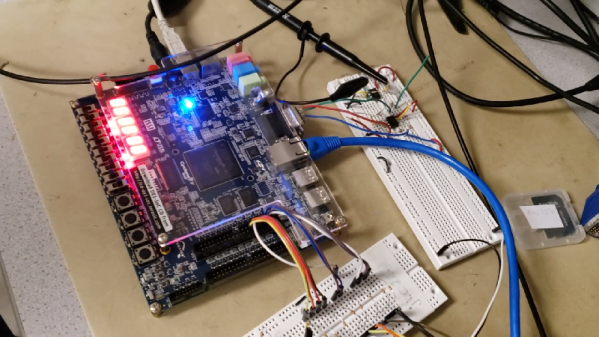
Getting started with a Chatterbox is much like other products designed to encourage young makers. The hardware — Raspberry Pi, custom HAT, speaker and button inside a cardboard enclosure — is conceptually similar to a Google AIY Voice kit but paired with an entirely different software experience. Instead of signing in to a Google developer account, children create their own voice interaction behavior with a block-based programming environment resembling MIT Scratch. Moving online, Chatterbox interactions draw upon resources of similarly privacy-minded entities like DuckDuckGo web search. Voice interaction foundation is built upon a fork of Mycroft with changes focused on education and child-friendliness. If a Chatterbox is unsure whether a query was for “Moana” or “Marijuana”, it will decide in favor of the Disney movie.

Many of these privacy-conscious pieces are open source or freely available, but Chatterbox pulls them all together into a single package that’s an appealing alternative to the big brand options. Based on conversations during Hackaday’s Maker Faire meetup, there’s a market beyond parents of young children. From technically aware adults who lack web API coding skills, to senior citizens unaware of dark corners of the web. Chatterbox Kickstarter campaign has a few more weeks to run but has already reached funding goals. We look forward to having a privacy-minded option in voice assistants.

Vintage Monoscope Tubes Generate Classic TV Test Patterns Once Again

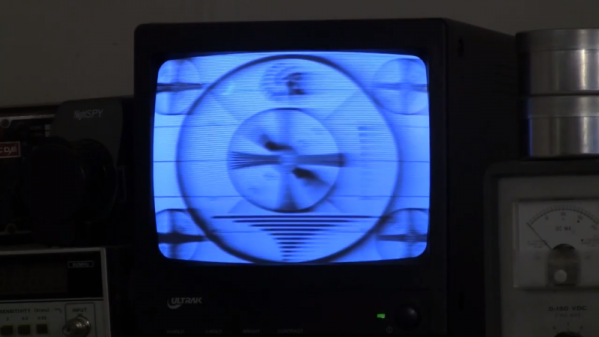
Night creatures and insomniacs of a bygone era may fondly recall a TV test pattern appearing once [Jack Parr] or [Steve Allen] had had their say and the local TV station’s regular broadcast day had concluded. It was affectionately known as the Indian Head test pattern, for the stylized Native American, resplendent in a feathered headdress, that featured prominently in the graphic.

Unknown to most viewers was exactly how that test pattern and others like it were generated. But thanks to [Rich “The Lab Guy” Diehl] and his monoscope restoration project, we can all share in the retro details. It turns out that while some test patterns were merely a studio camera trained on a printed card, most were generated by a special tube called a monoscope. It functioned in basically the same manner as a studio camera, but rather than scanning the incident light of a scene with an electron beam, the image was permanently etched into a thin aluminum plate. [Rich] laid hands on two vintage monoscope tubes, one containing the Indian Head test pattern, and set about building a device to use them. “The Chief” can hold either tube in a Faraday cage of thin, flexible PCB material and 3D-printed parts, with supporting electronics like the power supply and video amplifiers in an aluminum chassis below.

It’s a nice piece of work and a great lesson in how it used to be done, and the lithophane of the Indian head is a nice touch. Hats off to [The Lab Guy] for build quality and great documentation, including a detailed video series that starts with the video below. If you need a little more background on how video came to be, [Philo Farnsworth]’s story is a good place to start.

Continue reading “Vintage Monoscope Tubes Generate Classic TV Test Patterns Once Again”

Radio Controlled Wheelbarrows Tear Up The Track

The wheelbarrow is a trusty companion to the gardening set, helping move heavy loads to and fro. [James Bruton] has an active imagination however, deciding to build a motorized racing barrow, and challenging his friends to do the same (Youtube link, embedded below).

[James] went with a straightforward design, fitting two wheels to the rear, and powering them with brushless inrunner motors. The original front wheel was then fitted with a caster mechanism to allow the barrow to be skid steered. A pair of lithium polymer batteries provide the juice, with [James] using VESC skateboard ESCs to run the motors. The whole contraption is radio controlled, with an Arduino handling the mixing for steering duties.

The motorized barrow performed well against its competition, a propeller-powered barrow from [Tom Stanton] and a leaf-blower propelled barrow from [Ivan Miranda]. Inclement weather did cause some issues, but the trio were kind enough to treat us to a destruction derby with their racing machines.

You may be familiar with [James]’ earlier work on the openDog project. Video after the break.

Continue reading “Radio Controlled Wheelbarrows Tear Up The Track”

DIY Vactrols Give MIDI-Controlled Video Distortion

It’s one thing to assemble your own circuits from scratch using off the shelf components. It’s quite another to build the components first, and then build the circuit.

That’s the path [Joris Wegner] took with this video distortion effects box, dubbed PHOSPHOR. One might wonder why you’d want a box that makes a video stream look like playback from a 1980s VHS player with tracking problems, but then again, audio distortion for artistic effect is a thing, so why not video? PHOSPHOR is a USB MIDI device, and therein lies the need for custom components. [Joris] had a tough time finding resistive optoisolators, commonly known as Vactrols and which are used to control the distortion effects. He needed something with a wide dynamic range, so he paired up a bright white LED and a cadmium sulfide photoresistor inside a piece of heat shrink tubing. A total of 20 Vactrols were fabricated and installed on a PCB with one of the coolest silkscreens we’ve ever seen, along with the Sparkfun Pro Micro that takes care of MIDI chores. Now, distortions of the video can be saved as presets and played back in sync with music for artistic effects.

This isn’t the first time Vactrols have made an appearance here, of course. We saw them a while back with this Arduinofied electric guitar, and more recently with a triple-555 timer synth.

Continue reading “DIY Vactrols Give MIDI-Controlled Video Distortion”