A 360° View Of A Classic Drive-In Speaker

Readers of a certain vintage no doubt have pleasant memories of drive-in theaters, and we are chuffed to see that a few hundred of these cinematic institutions endure today. While most theaters broadcast the audio on an FM station these days, the choice is still yours to use the chunky, often crackly speaker that attaches to the car window.

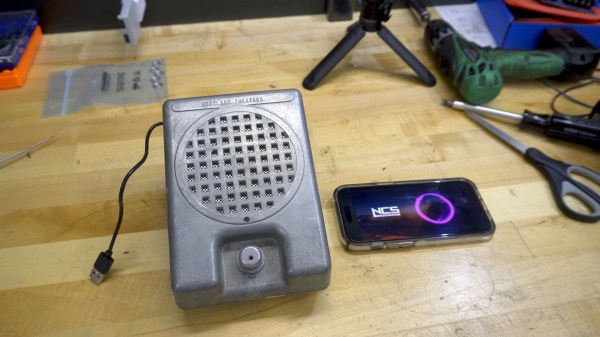
Seeking to relive the drive-in audio experience at home, [codemakesitgo] picked up a drive-in theater speaker on eBay and turned it into a Bluetooth device that sounds much better than it did in its weather-beaten days outside.

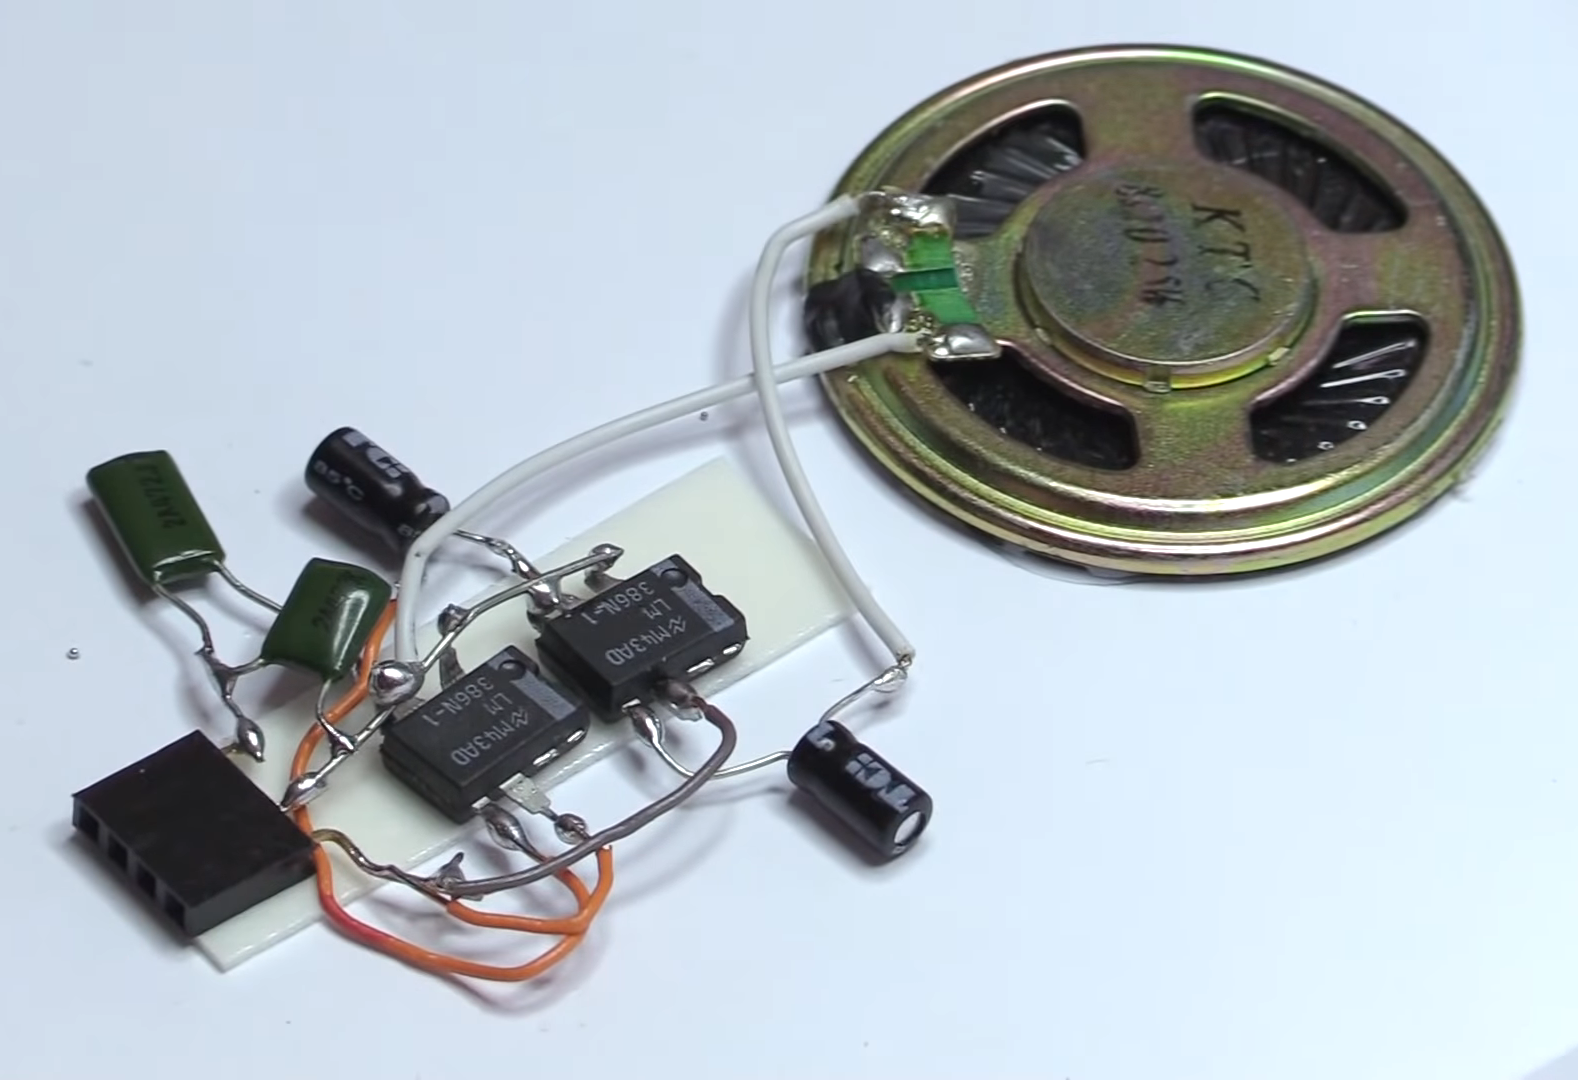
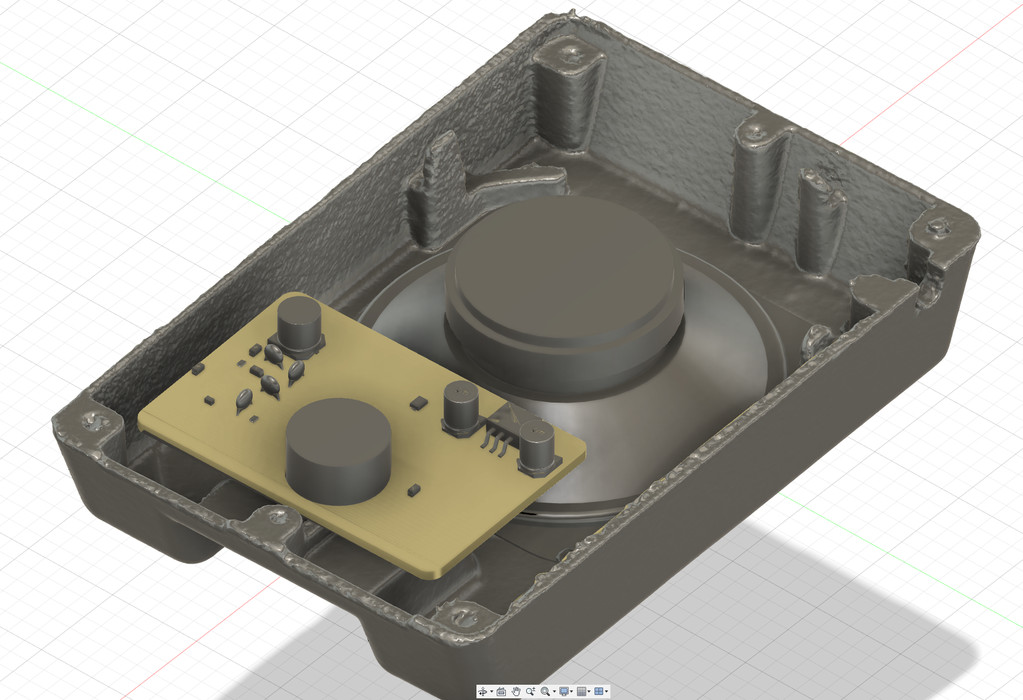
There isn’t a whole lot to this build — it’s essentially a new speaker cone, a Bluetooth receiver, an amp, and a battery. The real story is in the way that [codemakesitgo] uses Fusion360 to bring it all together.

After 3D scanning the case, [codemakesitgo] made sure each piece would fit, using a custom-built model of the new speaker and a 3D model of a custom PCB. Good thing, too, because there is barely enough clearance for the speaker. Be sure to check out the brief demo video after the break.

Continue reading “A 360° View Of A Classic Drive-In Speaker”

An LM386 Oscillator Thanks To Tungsten Under Glass

Once ubiquitous, the incandescent light bulb has become something of a lucerna non grata lately. Banned from home lighting, long gone from flashlights, and laughed out of existence by automotive engineers, you have to go a long way these days to find something that still uses a tungsten filament.

Strangely enough, this lamp-stabilized LM386 Wien bridge oscillator is one place where an incandescent bulb makes an appearance. The Wien bridge itself goes back to the 1890s when it was developed for impedance measurements, and its use in the feedback circuits of vacuum tube oscillators dates back to the 1930s. The incandescent bulb is used in the negative feedback path as an automatic gain control; the tungsten filament’s initial low resistance makes for high gain to kick off oscillation, after which it heats up and lowers the resistance to stabilize the oscillation.

For [Grug Huler], this was one of those “just for funsies” projects stemming from a data sheet example circuit showing a bulb-stabilized LM386 audio oscillator. He actually found it difficult to source the specified lamp — there’s that anti-tungsten bias again — but still managed to cobble together a working audio oscillator. The first pass actually came in pretty close to spec — 1.18 kHz compared to the predicted 1.07 kHz — and the scope showed a very nice-looking sine wave. We were honestly a bit surprised that the FFT analysis showed as many harmonics as it did, but all things considered, the oscillator performed pretty well, especially after a little more tweaking. And no, the light bulb never actually lights up.

Thanks to [Grug] for going down this particular rabbit hole and sharing what he learned. We love builds like this that unearth seemingly obsolete circuits and bring them back to life with modern components. OK, calling the LM386 a modern component might be stretching things a bit, but it is [Elliot]’s favorite chip for a reason.

Continue reading “An LM386 Oscillator Thanks To Tungsten Under Glass”

A Practical Discrete 386

There are some chips that no matter how much the industry moves away from them still remain, exerting a hold decades after the ranges they once sat alongside have left the building. Such a chip is the 386, not the 80386 microprocessor you were expecting but the LM386, a small 8-pin DIP audio amplifier that’s as old as the Ark. the ‘386 can still be found in places where a small loudspeaker needs to be powered from a battery. SolderSmoke listener [Dave] undertook an interesting exercise with the LM386, reproducing it from discrete components. It’s a handy small discrete audio amplifier if you want one, but it’s also an interesting exercise in understanding analogue circuits even if you don’t work with them every day.

A basic circuit can be found in the LM386 data sheet (PDF), but as is always the case with such things it contains some simplifications. The discrete circuit has a few differences in the biasing arrangements particularly when it comes to replacing a pair of diodes with a transistor, and to make up for not being on the same chip it requires that the biasing transistors must be thermally coupled. Circuit configurations such as this one were once commonplace but have been replaced first by linear ICs such as the LM386 and more recently by IC-based switching amplifiers. It’s thus instructive to take a look at it and gain some understanding. If you’d like to know more, it’s a chip we’ve covered in detail.

Dub Siren, a 555-powered synthesizer

Classic Chip Line-Up Powers This Fun Dub Siren Synth

There’s a certain elite set of chips that fall into the “cold, dead hands” category, and they tend to be parts that have proven their worth over decades, not years. Chief among these is the ubiquitous 555 timer chip, which nearly 50 years after its release still finds its way into the strangest places. Add in other silicon stalwarts like the 741 op-amp and the LM386 audio amp, and you’ve got a Hall of Fame lineup for almost any project.

That’s exactly the complement of chips that powers this fun little dub siren. As [lonesoulsurfer] explains, dub sirens started out as actual sirens from police cars and the like that were used as part of musical performances. The ear-splitting versions were eventually replaced with sampled or synthesized siren effects for recording studio and DJ use, which leads us to the current project. The video below starts with a demo, and it’s hard to believe that the diversity of sounds this box produces comes from just a pair of 555s coupled by a 741 buffer. Five pots on the main PCB control the effects, while a second commercial reverb module — modified to support echo effects too — adds depth and presence. I built-in speaker and a nice-looking wood enclosure complete the build, which honestly sounds better than any 555-based synth has a right to.

Interested in more about the chips behind this build? We’ve talked about the 555 and how it came to be, taken a look inside the 741, and gotten a lesson in LM386 loyalty.

Continue reading “Classic Chip Line-Up Powers This Fun Dub Siren Synth”

The Retro Shield, an Arduino Proto Shield for making many different circuits.

Retro Shield Replaces Springs With Jumpers, Includes Blinkenlights!

Is it an AM radio? Yes. It is a 555 LED flashing circuit? Yep. How about a hex counter with a 7 segment display? That too. Five different colored LED’s to satisfy your need for blinkenlights? Even that! What is this magical contraption? Is it one of those old school 30-in-1 or 50-in-1 “Science Fair” kits with the jumper wires and the springs? Almost!

When [grandalf]’s friend showed them a project where a 555 timer was installed on an Arduino shield, they realized two things: This whole “could have done that with a 555 timer” meme is a lot of fun, and “I’ve got an old 556 chip, I wonder if I can build one?” The answer is yes, and so much more.

Starting with the 556 timer, and inspired by the old spring-and-jumper kits of the past, [grandalf]’s “556 on a Proto Shield” project evolved into a creation they call the Retro Shield. Snowballing like so many hacker projects, it now includes several built in circuits and components. Breadboard jumpers are used to connect components through strategically placed pin headers, of which there are quite a few!

To make it all fit, some parts were substituted with more compact pieces such as an LM386 instead of an LM380.  The AM radio portion is supplied by an all-in-one radio chip, the ZN414. With the scope creep picking up steam, [grandalf] eventually added so called sidecars- bits of board that contain controls and a speaker hanging off the side of the Proto Shield.

It is not mentioned if the Retro Shield integrates with the Arduino or not. All the same, the Retro Shield has been used to pick up local AM stations, blink LED’s and amplify audio with the LM386. Like [grandalf] we’re sure that the Retro Shield can be used for much more. We hope that [grandalf] expands on the concept and inspires future hackers to answer the question “I wonder what happens if I try this.” 

If you haven’t set eyes on one of the all-in-one kits, check out this 200-in-1 kit teardown and review. And of course, if you have your own hacked up projects to share, be sure to let us know through the Tip Line!

Hack Together Your Own Bat Signal

Bats use echolocation to see objects in front of them. They emit an ultrasonic pulse around 20 kHz (and up to 100 kHz) and then sense the pulses as they reflect off an object and back to the bat. It’s the same type of mechanism used by ultrasonic proximity sensors for object-avoidance. Humans (except perhaps the very young ones) can’t hear the ultrasonic pulses since the frequency is too high, but an inexpensive microphone in a simple bat detector could. As it turns out bat detectors are available off the shelf, but where’s the fun in that? So, like any good hacker, [WilkoL] decided to build his own.

[WilkoL’s] design is composed primarily of an electret microphone, microphone preamplifier, CD4040 binary counter, LM386 audio amplifier, and a speaker. Audio signals are analog and their amplitudes vary based on how close the sound is to the microphone. [WilkoL] wanted to pick up bat sounds as far away as possible, so he cranked up the gain of the microphone preamplifier by quite a bit, essentially railing the amplifiers. Since he mostly cares about the frequency of the sound and not the amplitude, he wasn’t concerned about saturating the transistor output.

The CD4040 then divides the signal by a factor of 16, generating an output signal within the audible frequency range of the human ear. A bat signal of 20 kHz divides down to 1.25 kHz and a bat signal of up to 100 kHz divides down to 6.25 kHz.

He was able to test his bat detector with an ultrasonic range finder and by the noise generated from jingling his keychain (apparently there are some pretty non-audible high-frequency components from jingling keys). He hasn’t yet been able to get a recording of his device picking up bats. It has detected bats on a number of occasions, but he was a bit too late to get it on video.

Anyway, we’re definitely looking forward to seeing the bat detector in action! Who knows, maybe he’ll find Batman.

Continue reading “Hack Together Your Own Bat Signal”

[Fran] Is Helping Santa Slay This Year

We know at least one person who ought to make Santa’s ‘nice’ list this year. [Fran] was probably near the top of it already, but sending Santa a handmade greeting card with a fully-functioning guitar amp inside will probably make him rewrite her name in glitter, or silver Sharpie.

This stocking stuffer-sized amp is based around the LM386 and the bare minimum components necessary to make it rock. Everything is dead-bug soldered and sandwiched between two pieces of card stock. The first version with a single 386 sounded okay, but [Fran] wanted it louder, so she added another stage with a second 386. [Fran] glued the rim of the speaker directly to the card so it can act like a cone and give a better sound than the speaker does by itself.

All Santa needs to rock out is his axe and a small interface made of a 1/4″ jack and a 9 V wired to a 3-pin header that plugs into the card. He can take a break from Christmas music and let some of those cookies digest while he jams. Be sure to check out the build video after the break if you want to stay off the ‘naughty’ list.

Want to make your own musical greeting card? If you can program an ATtiny85, you won’t need much more than that to send a smile. If visual art is more your thing, 3D print them a 2D picture.

Continue reading “[Fran] Is Helping Santa Slay This Year”