Machining A Golf Ball To Make A Lovely Tactile Volume Knob

Golf balls are wonderfully tactile things. They have a semi-grippy covering, and they’re a beautiful size and weight that sits nicely in the hand. Sadly, most of them just get smacked away with big metal clubs. [Jeremy Cook] recognized their value as a human interface device, though, and set about turning one into a useful volume knob.

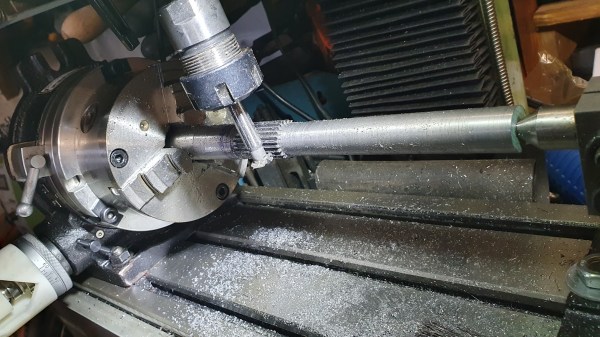
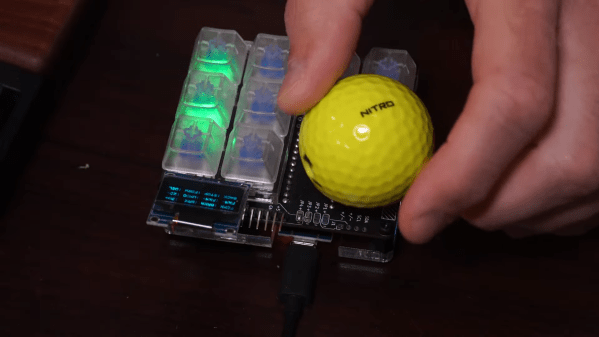
The trick here is in the machining. [Jeremy] used a 3D printed jig to hold a golf ball tightly in place so that it could be machined using a milling machine. With the bottom taken off and a carefully-designed 3D printed insert in the bottom, the golf ball is ready to be used as a knob for a volume control. As for the hardware side of things, [Jeremy] used an existing USB keypad, fitting the golf ball onto the encoder for volume and seek control in various programs.

The results sadly weren’t ideal. While the golf ball sits nicely upon the encoder, [Jeremy] found the device uncomfortable to use. Size may be an issue, but we also suspect the crowding of the surrounding buttons has a role to play. It forces the wrist into an uncomfortable curve to access the ball without hitting the surrounding controls. Without that, it may be greatly improved.

Files are available for those wishing to make their own. We don’t get a lot of golf ball builds here on Hackaday, but we’d love to see more. Hit up the tipsline if you’ve got ’em. Video after the break.

Continue reading “Machining A Golf Ball To Make A Lovely Tactile Volume Knob”

Tactical Build Makes Machining Splined Shaft A Snap

Quick, what’s 360 divided by 23? It’s easy enough to get the answer, of course, but if you need to machine a feature every 15.652 degrees around a shaft, how exactly would you accomplish that? There are a number of ways, but they all involve some degree of machining wizardry. Or, you can just make the problem go away with a little automation.

The story behind [Tony Goacher]’s Rotary Table Buddy begins with some ATV tracks he got off AliExpress. His idea is to build a specialty electric vehicle for next year’s EMF Camp. The tracks require a splined shaft to drive them, which would need to be custom-made on a milling machine. A rotary table with a dividing plate — not as fancy as this one, of course –is usually the answer, but [Tony] was a little worried about getting everything set up correctly, so he embarked on a tactical automation solution to the problem.

An RP2040 provided the brains of the project, while a NEMA 23 stepper provides the brawn. [Tony] whipped up a quick PCB and 3D printed a case for the microcontroller, a stepper driver, an LCD display, and a few buttons. He 3D printed an adapter and a shaft coupler to mount the stepper motor to a rotary table. From there it was just a matter of coming up with a bit of code to run everything.

There’s a brief video in [Tony]’s blog post that shows Rotary Table Buddy in action, indexing to the next position after cutting one of the 23 splines. He says it took about ten minutes to cut each spline using this setup, which probably makes to total cutting time far less than the amount of time invested in the tool. But that’s hardly the point, and besides, now he’s set up for all kinds of machining operations in the future.

And we sure hope we hear about the EMF Camp build, too.

Stripped Clock Wheel Gets A New Set Of Teeth, The Hard Way

If there’s one thing we’ve learned from [Chris] at Clickspring, it’s that a clockmaker will stop at nothing to make a clock not only work perfectly, but look good doing it. That includes measures as extreme as this complete re-toothing of a wheel from a clock. Is re-toothing even a word?

The obsessive horologist in this case is [Tommy Jobson], who came across a clock that suffered a catastrophic injury: a sudden release of energy from the fusee, the cone-shaped pulley that adjusts for the uneven torque created by the clock’s mainspring. The mishap briefly turned the movement into a lathe that cut the tops off all the teeth on the main wheel.

Rather than fabricate a completely new wheel, [Tommy] chose to rework the damaged one. After building a special arbor to hold the wheel, he turned it down on the lathe, leaving just the crossings and a narrow rim. A replacement blank was fabricated from brass and soldered to the toothless wheel, turned to size, and given a new set of teeth using one of the oddest lathe setups we’ve ever seen. Once polished and primped, the repair is only barely visible.

Honestly, the repaired wheel looks brand new to us, and the process of getting it to that state was fascinating to watch. If the video below whets your appetite for clockmaking, have we got a treat for you.

Continue reading “Stripped Clock Wheel Gets A New Set Of Teeth, The Hard Way”

A metal watch is held in a man's fingers. The watchface has a laser etched chess board with miniature chess pieces made of brass enacting a match. The time is told on an etched chess clock to the right hand side of the timepiece and a small window on the rightmost "clock" shows the date.

A Little Chess With Your Timepiece

Some things remain classics, even after centuries, and chess and watches have certainly stood the test of time. [W&M Levsha] decided to combine them both in this “Chess Club” watch containing a miniature chess game frozen in time.

[W&M Levsha] used an off-the-shelf wristwatch for the mechanism and case, but rearranged the parts and built a custom watchface that’s much nicer than the original. The new watchface was cut and etched on a fiber laser after disassembly of the original watch.

The real magic happens when [W&M Levsha] turns those teeny little chess pieces on the lathe. The knight was a two piece affair with the horse head being laser cut out of brass sheet and then soldered onto a turned base. As you can see from the video embedded below, all of the chess pieces inside the watch could fit on the maker’s fingernail! It’s probably a good thing that this tiny set isn’t playable since trying to play on a board that size would be an exercise in patience.

We’ve seen machined chess sets here before at a larger scale, but if you’re more into 3D printing, how about teaching your printer to play?

Continue reading “A Little Chess With Your Timepiece”

Powercore Aims To Bring The Power Of EDM To Any 3D Printer

The desktop manufacturing revolution has been incredible, unleashing powerful technologies that once were strictly confined to industrial and institutional users. If you doubt that, just look at 3D printing; with a sub-$200 investment, you can start making parts that have never existed before.

Sadly, though, most of this revolution has been geared toward making stuff from one or another type of plastic. Wouldn’t it be great if you could quickly whip up an aluminum part as easily and as cheaply as you can print something in PLA? That day might be at hand thanks to Powercore, a Kickstarter project that aims to bring the power of electric discharge machining (EDM) to the home gamer. The principle of EDM is simple — electric arcs can easily erode metal from a workpiece. EDM machines put that fact to work by putting a tool under CNC control and moving a precisely controlled electric arc around a workpiece to machine complex shapes quickly and cleanly.

Compared to traditional subtractive manufacturing, EDM is a very gentle affair. That’s what makes EDM attractive to the home lab; where the typical metal-capable CNC mill requires huge castings to provide the stiffness needed to contain cutting forces, EDM can use light-duty structures and still turn out precision parts. In fact, Powercore is designed to replace the extruder of a bog-standard 3D printer, and consists almost entirely of parts printed on the very same machine. The video below shows a lot of detail on Powercore, including the very interesting approach to keeping costs down by creating power resistors from PCBs.

While we tend to shy away from flogging crowdfunded projects, this one really seems like it might make a difference to desktop manufacturing and be a real boon to the home lab. It’s also worth noting that this project has roots in the Hackaday community, being based as it is on [Dominik Meffert]’s sinker EDM machine.

Continue reading “Powercore Aims To Bring The Power Of EDM To Any 3D Printer”

Two pairs of steel parallel pliers sit on a rough wooden benchtop. The pair on the left is open and the pair on the right is closed, demonstrating the parallel nature of the pliers' jaws over their entire range of motion. There are three brass pins flush with the steel surface of the handles and you can just barely make out the brass and copper filler material between the steel outer surfaces of the handles.

Producing A Pair Of Parallel Pliers

A regular pair of pliers is fine most of the time, but for delicate work with squarish objects you can’t go wrong with a pair of parallel pliers. [Neil Paskin] decided to make his own pair from scratch. (YouTube)

The jaws were machined down from round stock in [Paskin]’s mill before heat treating and tempering. The steel portions of the handles were cut from 16 gauge plate steel and half of them were stamped on a fly press to make the bridging section around the pivot bolt. The filler for the handles is copper on one side and brass on the other as [Paskin] didn’t have enough brass of the correct size to do both.

The steel and filler were joined with epoxy and copper pins before beveling the edges and sanding to give a comfortable contour to the handles. The bolts for the pliers started as ordinary hex bolts before being machined down on the lathe to a more aesthetically-pleasing shape and size. The final touches included electrolytically etching a logo into the bridge and then spraying down the pliers with a combination lubricant and corrosion preventative spray. This is surely a pair of pliers worth handing down through the generations.

For more mesmerizing machining, checkout this pocket safe or this tiny adjustable wrench.

Continue reading “Producing A Pair Of Parallel Pliers”

Hackaday Links Column Banner

Hackaday Links: February 12, 2023

So, maybe right now isn’t the best time to get into the high-altitude ballooning hobby? At least in the US, which with the downing of another — whatever? — over Alaska, seems to have taken a “Sidewinders first, threat identification later” approach to anything that floats by. The latest incident involved an aircraft of unknown type, described as “the size of a small car” — there’s that units problem again — that was operating over Prudhoe Bay off the northern coast of Alaska. The reason that was given for this one earning a Sidewinder was that it was operating much lower than the balloon from last week, only about 40,000 feet, which is well within the ceiling of commercial aviation. It was also over sea ice at the time of the shootdown, making the chance of bothering anyone besides a polar bear unlikely. We’re not taking any political position on this whole thing, but there certainly are engineering and technical aspects of these shootdowns that are pretty interesting, as well as the aforementioned potential for liability if your HAB goes astray. Nobody ever really benefits from having an international incident on their resume, after all.

Continue reading “Hackaday Links: February 12, 2023”