A Dedicated GPU For Your Favorite SBC

The Raspberry Pi is famous for its low cost, versatile and open Linux environment, and plentiful I/O, making it a perfect device not only for its originally-intended educational purposes but for basically every hobbyist from gardeners to roboticists to amateur radio operators. Most builds tend to make use of the GPIO pins which allow easy connections to various peripherals and sensors, but the Pi also supports PCI devices which means that, in theory, it could use a GPU in much the same way that a modern computer would. After plenty of testing and development, [Jeff Geerling] brings us this custom graphics card interface for the Raspberry Pi.

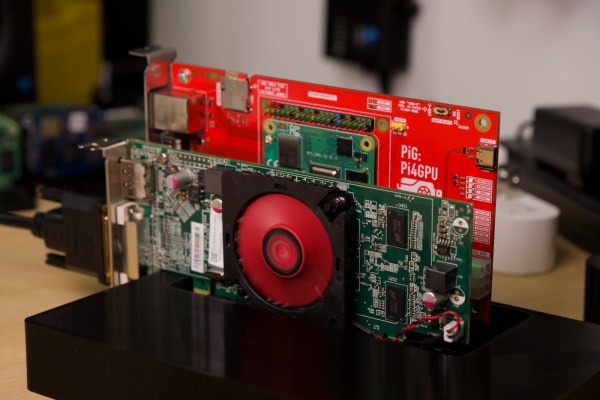
The testing for all of these graphics cards has been done with a Pi Compute Module 4 and the end result is an interface device which looks much like a graphics card itself. It splits the PCI bus out onto a more familiar x16 slot connector and adds physical connections for power, USB, and Ethernet. When plugged into the carrier board, the Compute Module can be attached to any of a number of graphics cards, including the latest and highest-end of Nvidia and AMD offerings.

Perhaps unsurprisingly, though, the 4090 and 7900 cards don’t work with the Raspberry Pi. This is partially due to the 32-bit limitations of the Pi and other memory mapping issues, but even after attempting some workarounds Nvidia’s cards aren’t open-source enough to test properly (although the card is recognized by the Pi) and AMD’s drivers crash the system even after compiling a custom kernel. [Jeff] did find an Nvidia card that worked, although it requires using the USB interface and second-hand cards are selling for around $3000 USD. For a more economical choice there are some other graphics cards that he was eventually able to get working, albeit not with perfect performance, including some of the ones we’ve seen him test already.

Continue reading “A Dedicated GPU For Your Favorite SBC”

Leaked Internal Google Document Claims Open Source AI Will Outcompete Google And OpenAI

In the world of large language models (LLM), the focus has for the longest time been on proprietary technologies from companies such as OpenAI (GPT-3 & 4, ChatGPT, etc.) as well as increasingly everyone from Google to Meta and Microsoft. What’s remained underexposed in this whole discussion about which LLM will do more things better are the efforts by hobbyists, unaffiliated researchers and everyone else you may find in Open Source LLM projects. According to a leaked document from a researcher at Google (anonymous, but apparently verified), Google is very worried that Open Source LLMs will wipe the floor with both Google’s and OpenAI’s efforts.

According to the document, after the open source community got their hands on the leaked LLaMA foundation model, motivated and highly knowledgeable individuals set to work to take a fairly basic model to new levels where it could begin to compete with the offerings by OpenAI and Google. Major innovations are the scaling issues, allowing these LLMs to work on far less powerful systems (like a laptop or even smartphone).

An important factor here is Low-Rank adaptation (LoRa), which massively cuts down the effort and resources required to train a model. Ultimately, as this document phrases it, Google and in extension OpenAI do not have a ‘secret sauce’ that makes their approaches better than anything the wider community can come up with. Noted is also that essentially Meta has won out here by having their LLM leak, as it has meant that the OSS community has been improving on the Meta foundations, allowing Meta to benefit from those improvements in their products.

The dire prediction is thus that in the end the proprietary LLMs by Google, OpenAI and others will cease to be relevant, as the open source community will have steamrolled them into fine, digital dust. Whether this will indeed work out this way remains to be seen, but things are not looking up for proprietary LLMs.

(Thanks to [Mike Szczys] for the tip)

Holograms Display Time With ESP32

Holograms and holographic imagery are typically viewed within the frame of science fiction, with perhaps the most iconic examples being Princess Leia’s message to Obi-Wan in Star Wars, or the holodecks from Star Trek. In reality, holograms have been around for a surprising amount of time, with early holographic images being produced in the late 1940s. There are plenty of uses outside of imagery for modern holographic systems as well, and it’s a common enough technology that it’s possible to construct one using an ESP32 as well.

In this build, [Fiberpunk] demonstrates the construction and operation of a holographic clock. The image is three-dimensional and somewhat transparent and is driven by an ESP32 microcontroller. The display is based around a beamsplitter prism which, when viewed from the front, is almost completely invisible to the viewer. The ESP32 is housed in a casing beneath this prism, and [Fiberpunk] has two firmware versions available for the device. The first is the clock which displays an image as well as the time, and the second is more of a demonstration which can show more in-depth 3D videos using gcode models and also has motion sensing controls.

For anyone interested in holography, a platform like this is might make an excellent entry point to explore, and with the source for this build available becomes even easier. It’s almost certainly less expensive than these 3D printers that can turn out custom holographic images, and has the added benefit of being customizable and programmable as well.

Continue reading “Holograms Display Time With ESP32”

Tactical Build Makes Machining Splined Shaft A Snap

Quick, what’s 360 divided by 23? It’s easy enough to get the answer, of course, but if you need to machine a feature every 15.652 degrees around a shaft, how exactly would you accomplish that? There are a number of ways, but they all involve some degree of machining wizardry. Or, you can just make the problem go away with a little automation.

The story behind [Tony Goacher]’s Rotary Table Buddy begins with some ATV tracks he got off AliExpress. His idea is to build a specialty electric vehicle for next year’s EMF Camp. The tracks require a splined shaft to drive them, which would need to be custom-made on a milling machine. A rotary table with a dividing plate — not as fancy as this one, of course –is usually the answer, but [Tony] was a little worried about getting everything set up correctly, so he embarked on a tactical automation solution to the problem.

An RP2040 provided the brains of the project, while a NEMA 23 stepper provides the brawn. [Tony] whipped up a quick PCB and 3D printed a case for the microcontroller, a stepper driver, an LCD display, and a few buttons. He 3D printed an adapter and a shaft coupler to mount the stepper motor to a rotary table. From there it was just a matter of coming up with a bit of code to run everything.

There’s a brief video in [Tony]’s blog post that shows Rotary Table Buddy in action, indexing to the next position after cutting one of the 23 splines. He says it took about ten minutes to cut each spline using this setup, which probably makes to total cutting time far less than the amount of time invested in the tool. But that’s hardly the point, and besides, now he’s set up for all kinds of machining operations in the future.

And we sure hope we hear about the EMF Camp build, too.

Op-Amp Challenge: Light Up Breadboard Shows Us The Signals

Most Hackaday readers will no doubt at some point used a solderless breadboard for prototyping. They do the job, but sometimes their layout can be inflexible and keeping track of signals can be a pain. There’s a neat idea from [rasmusviil0] which might go some way to making the humble breadboard easier to use, it’s a breadboard in which each line is coupled via an op-amp buffer to an LED. In this way it can be seen at a glance some indication of the DC voltage present.

It’s an idea reminiscent of those simple logic probes which were popular years ago, but its implementation is not entirely easy. Each circuit is simple enough, but to replicate it across all the lines in a breadboard makes for a huge amount of quad op-amp chips stuffed onto one piece of stripboard as well as a veritable forest of wires beneath the board.

The effect is of a breadboard crossed with a set of blinkenlights, and we could see that for simple digital circuits it could have some utility if not so much for higher frequency or analogue signals. Certainly it’s an experiment worth doing, and indeed it’s not the first tricked out breadboard we’ve seen.

Linux Fu: Supercharge Bash History

Having a history of shell commands is a great idea. It is, of course, enormously handy when you have to run something repetitively or you make a simple mistake that needs correction. However, as I’ve mentioned in the past, bash history isn’t without its problems. For one thing, by default, you don’t get history in one window from typing in another window. If you use a terminal multiplexer or a GUI, you are very likely to have many shells open. You can make them share history, but that comes with its own baggage. If you think about it, we have super fast computers with tons of storage compared to the “old days,” yet shell history is pretty much the same as it has been for decades. But [Rcaloras] did think about it and created Bashhub, a history database for bash, zsh, and probably some other shells, too.

Command detail screen

You might think you don’t need anything more than what you have, and, of course, you don’t. However, Bashhub offers privately stored and encrypted history across machines. It also provides context about commands you’ve executed in the past. In other words, you can see the directory you were in, the exact time and date, the system you were on, and the last return code of the command.

Continue reading “Linux Fu: Supercharge Bash History”

Hackaday Podcast 217: The Unintentional Space And 3D Printing Episode

Hackaday Editors Elliot Williams and Tom Nardi definitely didn’t plan on devoting most of this episode to 3D printing and space stories, but let’s be honest, it was bound to happen sooner or later. After an update on the Hackaday Prize, the discussion moves on to a pair of troubled spacecraft and the challenges of exploring the final frontier. From there you’ll hear about a chocolate 3D printer we’ve had our eyes on for years, the tools you should have next to your own (non-chocolate) 3D printer, and a bit of contemplation of what it really means to design for 3D printing versus traditional manufacturing methods. But it’s not all plastic fantastic — by the end of the episode you’ll also hear about some particularly bold high-altitude aviators and the surprisingly short time we have left with the humble barcode.

Check out the links below if you want to follow along, and as always, tell us what you think about this episode in the comments!

Going to be stranded on a desert island? Download the podcast now!

Continue reading “Hackaday Podcast 217: The Unintentional Space And 3D Printing Episode”