Sound Generation Board Makes The Tunes

[Mcjack123] has been getting into chiptunes lately and realized that his original interest started in 2018 when he used an Arduino to turn a TI-84 calculator into a sound machine. His latest iteration is a custom-designed soundboard and he takes us through the design and construction of it in a recent post.

The work models classic sound generators like the 2A03 or the Commodore 64 SID. You have a bunch of simple waveform generators along with filters and modulators to make various effects. These boards eventually gave way to FM synthesis devices like the Yamaha OPL2 and OPL3 chips. All of these cards accepted commands and generated audio on their own. More modern boards are more likely to simply convert digital data from the computer into audio.

Continue reading “Sound Generation Board Makes The Tunes”

Comfortable, wearable packaging for biometric device for monitoring physiological data and pushing the data to the cloud

A DIY Biometric Device With Some Security Considerations

Biohacking projects are not new to Hackaday and it’s certainly a genre that really piques our interest. Our latest biohacking device comes courtesy of [Manivannan] who brings his flavor of a wearable biosensor with some security elements built-in through AWS.

The hardware is composed of some impressive components we have seen. He has an AD8232 electrocardiogram front end, the MAX30102 integrated pulse oximeter IC for determining blood oxygen and heart rate, and the ever-popular LM35 for measuring body temperature. Either of these chips would be perfect for your next DIY biosensor project though you might try the MAX30205 body temperature sensor given its 0.1-degree Celsius accuracy. However, what really piqued our interest was the use of Microchip’s AVR-IoT WA Development Board. Now we’ve talked about this board before and also mentioned you could probably do all the same things with an ESP-device, but perhaps now we get to see the board a bit more in action.

[Manivannan] walks the reader through the board’s setup and everything looks to be pretty straightforward. He ultimately rigged together a very primitive dashboard for viewing all his vitals in real-time, demonstrating how you could put together your own patient dashboard for remote monitoring of vitals or other sensor signals. He emphasizes that all this is powered through AWS, giving him some added security layers that are critical for protecting his data from unwanted viewers.

Though [Manivannan’s] security implementation doesn’t rise to the standard of medical devices, maybe it will serve as a case study in the growing open-source medical device movement.

Continue reading “A DIY Biometric Device With Some Security Considerations”

AVR Configurable Custom Logic As A Frequency Divider At 4x Chip’s Clock Speed

What a time to be alive when you can find inexpensive microcontrollers that come with programmable(ish) logic that can operate independently of the system clock. [David Johnson-Davies] recently built a proof of concept using the Configurable Custom Logic (CCL) that is available in some of the newer AVR microcontroller designs. It’s a simple implementation, a set of frequency dividers that blink three LEDs with up to a 90 MHz input signal. But the simplicity is the reason to love his write-up — you can wrap your head around it right away.

There are four lookup table (LUTs) used to form the frequency divider. Think of these like a NAND or XOR gate, but you get to decide how the output truth tables will perform. The output is fed into a sequencer which can be configured as a D/JK flip-flop or a D/RS latch, plus you can specify the signal edge, and of course define the clock source. An interesting trick here is to hold the G input of both D flip-flops high by feeding them LUTs set to all ones. Note that the output of the first divider (PA3) is feeding the external input (PD2) of the second divider.

While the CCL is configured using the C code you flash to the microcontroller, it’s a hardware peripheral capable of operating independent of the chip’s system clock. The AVR128DA28 that’s used here tops out at 24 MHz (double that if you use the PLL) but [David] got reliable results from his clock divider feeding a signal as high as 90 MHz to the input pin. Of course you have the option of feeding internal clock signals to the CCL, but that wouldn’t seem nearly as interesting here. For the demo, [David] is actually toggling an IO pin which is connected to PA2 as the external input for the logic. Make sure you click through to his write-up linked above as he does an excellent job of walking through the sample code (just a couple-dozen lines to set this all up). Here’s the datasheet for this chip (PDF, page 447 for pertinent registers) and for a deeper dive the appnote on CCL (PDF).

So what is this all good for? We already saw an answer to that question back in January when [SM6VFZ] used the CCL peripheral to build a software-defined switch-mode converter. How awesome is that?

Minimal TinyAVR 0 Programming

When [Alain] wanted to use some of the new TinyAVR 0 chips — specifically, the Attiny406 — it seemed overkill to use the Windows IDE. There are plenty of sources of information on programming other AVR chips using simple command line tools, but not for these newer 0-series parts which use a new programming protocol known as UPDI. That led to a deep diving into how to program a TinyAVR 0 with a text editor, makefile, and USB-to-serial cable.

The Attiny406 has 4K of flash, 256 bytes of RAM and can run at 20 MHz with no external clock. You might think programming would be similar to a regular AVR part, but these tiny devices use UPDI (Unified Programming and Debug Interface) which uses 3 pins for programming. Older devices used different protocols.

It is very easy to create a UPDI programmer. A USB to logic-level serial cable and a 4.7K resistor is all it takes. There’s Python code that knows how to drive the protocol, too. You can also use the logic-level serial port on the Raspberry Pi with some device tree modifications explained in the code’s documentation.

[Alain] made a nice breakout board for the device. It fits a breadboard, allows for 5V or 3.3V operation, and has an LED and switch. Nothing fancy, but handy. Once you know how to ship a hex file to the chip, the rest is pretty standard. While the AVR version of gcc doesn’t cross-compile for the ATTiny out of the box, there is a device pack from Microchip that enables that feature.

The trend is to go to bigger processors, not smaller, but when you need to cram something in a small space, save a few pennies per unit, or draw very little power, these tiny processors can be just the ticket. The processors may be small, but if you work you can do some pretty big things with them.

Analog Meter Clock Uses Parts From A Simpler Time

Clocks with hands that turn are all well and good for the common folk, but hacker types prefer something different. [Sjm4306] is one such person, and developed this analog dial clock with parts we’d almost consider retro by modern standards.

The microcontroller at the heart of the build is a PIC16F886. An 8-bit micro from the Microchip brand, it features no Arduino bootloader or USB interface, being flashed via a dedicated programmer. This is combined with a DS1302 real-time clock to keep accurate time, and a MCP4922 DAC which is responsible for generating the output to drive the dials. The dials themselves are sourced from eBay, being simple voltmeters. They’re given a new backing to display hours and minutes instead of volts, and backlit with LEDs for style.

In this day and age, we’re more used to seeing high-end micros used with integrated DACs and USB programming, but it’s nice to see the parts of yesteryear being used, too. It’s not the first clock we’ve seen from [sjm4306], either. Video after the break.

Continue reading “Analog Meter Clock Uses Parts From A Simpler Time”

Rad-Hard ARM Microcontrollers, Because Ceramic Components Are Just Cooler

If you’re building a cubesat, great, just grab a microcontroller off the shelf, you probably don’t need to worry about radiation hardening. If you’re building an experiment for the ISS, just use any old microcontroller. Deep space? That’s a little harder, and you might need to look into radiation tolerant and radiation hardened microcontrollers. Microchip has just announced the release of two micros that meet this spec, in both radiation-tolerant and radiation-hardened varieties.

The new devices are the SAMV71Q21RT (radiation-tolerant) and the SAMRH71 (rad-hard), both ARM Cortex-M7 chips running at around 300 MHz with enough RAM to do pretty much anything you would want to do with a microcontroller. Peripherals include CAN-FD and Ethernet-AVB, analog front-end controllers, and the usual support for I2C, SPI, and other standards. This chip does it in space, and comes in a ceramic quad flat package with gold lead frames. These are beautiful devices.

Microchip has an incredible number of space-rated, rad-hard hardware; this is mostly due to their acquisition of Atmel a few years ago, and yes, it absolutely is possible to build a rad-hard Arduino Mega using the chip, space rated.

Of course, there are very, very, very few people who would actually ever need a rad-hard microcontroller; I would honestly expect this to be relevant to only one or two people reading this, and they too probably got the press release. If you’ve ever wanted to build something that goes to space, and you’d like to over-engineer everything about it, you now have the option for an ARM Cortex-M7.

New AVR-IOT Board Connects To Google

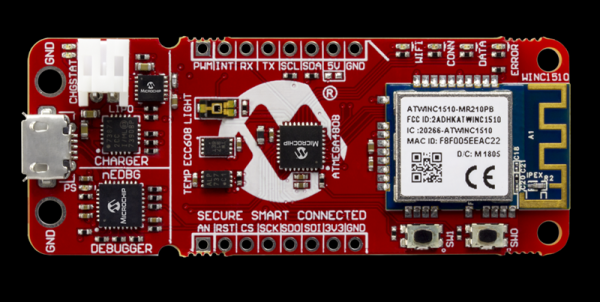
Readers of Hackaday are no strangers to using a microcontroller to push data to WiFi. Even before the ESP8266 there were a variety of ways to do that. Now Microchip is joining the fray with a $29 board called the AVR-IOT WG that contains an 8-bit ATmega4808, a WiFi controller, and hardware-based crypto chip for authenticating with Google Cloud.

The board has a section with a USB port for charging a battery and debugging that looks like it is made to cut away. There are a number of LEDs and buttons along with a light sensor and a temperature sensor. It feels like the goal here was to pack as many Microchip parts onto a single dev board as possible. You’ll find the ATmega4808 as the main controller, an ATWINC1510 WiFi controller (a castellated module reminiscent of the ESP8266), the ATECC608A cryptographic co-processor, MCP73871 LiPo charger, MIC33050 voltage regulator, and an MCP9808 temperature sensor. We can’t find much info about the “nEDBG Programmer/Debugger” chip. If you’ve used it on one of a handful of other dev board, let us know in the comments about off-board programming and other possible hacks.

Naturally, the board works with AVR Studio or MPLAB X IDE (Microchip bought Atmel, remember?). Of course, Atmel START or MPLAB Code Configurator can configure the devices, too. There’s also an AVR-IoT-branded website that lets you use Google cloud to connect your device for development. The headers along the top and bottom edges are compatible with MicroElektronika Click boards which will make anyone with a parts bin full of those happy.

Looks like you can pick up the Microchip boards now from the usual places. From reading what Microchip is saying, they would like to position this as the “IoT Arduino” — something someone without a lot of experience could pick up and use to pipe data into Google cloud. While that’s probably good, it isn’t that hard to use an ESP-device to do the same thing using the Arduino IDE and then you have a 32-bit processor and you can use whatever cloud vendor you want. Sure, it would be a little more work, so maybe that’s where this offering will appeal.

On the plus side, we really liked that there was a battery option with a charger already on board — it seems like that’s something we always have to add anyway. It may be buried in the documentation, but the user’s guide and the technical guide didn’t appear to have an average and maximum current draw specified, so battery life is an open question, although the video says “low power.”

Although it isn’t quite the same thing, we’ve seen ESP8266’s talk to Google servers for interfacing with Google Home. And while it is on the Amazon cloud, we’ve even seen a 6502 up there.

Continue reading “New AVR-IOT Board Connects To Google”