Recreating The Quadrophonic Sound Of The 70s

For plenty of media center PCs, home theaters, and people with a simple TV and a decent audio system, the standard speaker setup now is 5.1 surround sound. Left and right speakers in the front and back, with a center speaker and a subwoofer. But the 5.1 setup wasn’t always the standard (and still isn’t the only standard); after stereo was adopted mid-century, audio engineers wanted more than just two channels and briefly attempted a four-channel system called quadrophonic sound. There’s still some media from the 70s that can be found that is built for this system, such as [Alan]’s collection of 8-track tapes. These tapes are getting along in years, so he built a quadrophonic 8-track replica to keep the experience alive.

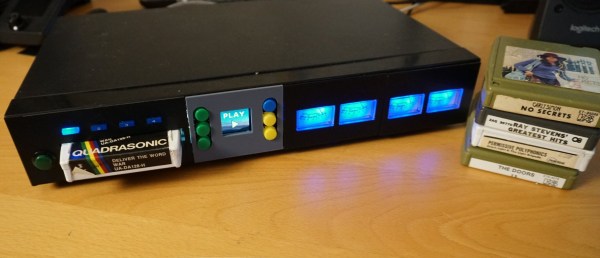
The first thing needed for a replica system like this is digital quadrophonic audio files themselves. Since the format died in the late 70s, there’s not a lot available in modern times so [Alan] has a dedicated 8-track player connected to a four-channel audio-to-USB device to digitize his own collection of quadrophonic 8-track tapes. This process is destructive for the decades-old tapes so it is very much necessary.

With the audio files captured, he now needs something to play them back with. A Raspberry Pi is put to the task, but it needs a special sound card in order to play back the four channels simultaneously. To preserve the feel of an antique 8-track player he’s cannibalized parts from three broken players to keep the cassette loading mechanism and track indicator display along with four VU meters for each of the channels. A QR code reader inside the device reads a QR code on the replica 8-track cassettes when they are inserted which prompts the Pi to play the correct audio file, and a series of buttons along with a screen on the front can be used to fast forward, rewind and pause. A solenoid inside the device preserves the “clunk” sound typical of real 8-track players.

As a replica, this player goes to great lengths to preserve the essence of not only the 8-track era, but the brief quadrophonic frenzy of the early and mid 70s. There’s not a lot of activity around quadrophonic sound anymore, but 8-tracks are popular targets for builds and restorations, and a few that go beyond audio including this project that uses one for computer memory instead.

Continue reading “Recreating The Quadrophonic Sound Of The 70s”

You Can Use A Crappy Mixer As A Neat Synthesizer

[Simon the Magpie] found himself in possession of a Behringer mixer that turned up in someone’s garbage. They’re not always the most well-regarded mixers, but [Simon] saw an opportunity to do something a bit different with it. He decided to show us all how you can use a mixer as a synthesizer.

[Simon] actually picked up the “no-input” technique from [Andreij Rublev] and decided to try it out on his own equipment. The basic idea is to use feedback through the mixer to generate tones. To create a feedback loop, connect an auxiliary output on the mixer to one of the mixer’s input channels. The gain on the channel is then increased on the channel to create a great deal of feedback. The mixer’s output is then gently turned up, along with the volume on the channel that has formed the feedback loop. If you’ve hooked things up correctly, you should have some kind of tone feedbacking through the mixer. Want to change the pitch? Easy – just use the mixer’s EQ pots!

It’s pretty easy to get some wild spacey sounds going. Get creative and you can make some crunchy sounds or weird repeating tones if you play with the mixer’s built in effects. Plus, the benefit of a mixer is that it has multiple channels. You can create more feedback loops using the additional channels if you have enough auxiliary sends for the job. Stack them up or weave them together and you can get some wild modulation going.

Who needs a modular synth when you can do all this with a four channel mixer and some cables? Video after the break.

Continue reading “You Can Use A Crappy Mixer As A Neat Synthesizer”

Raspberry Pi Pico Becomes Emotionally-Aware Music Visualizer

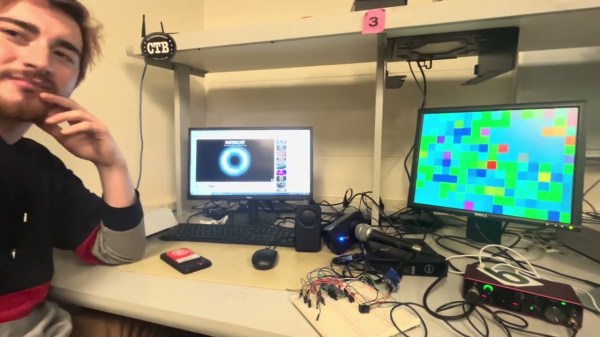
Back in the late 1990s and early 2000s, the nascent world of digital music was incredibly exciting. We all cultivated huge MP3 collections and spent hours staring at the best visualizers Winamp and Windows Media Player had to offer. [Rafael] and [Eric] decided to bring back those glory days with their music visualizer that runs on the Raspberry Pi Pico.

The design is quite interesting, going beyond the usual simplistic display of waveforms and spectrograms. Instead, the Pi Pico uses a Fast Fourier Transform analysis to determine the frequencies of the music, ideally then to determine the key, and thus the mood, of the tune.  Then, the visualizer uses different colors to represent those moods, such as green for happy music in a major key, or deeper blues for a sad piece in a minor key. The output of the visualizer is via Bruce Land’s 8-bit color VGA library, which allows the Pi Pico to drive a monitor directly.

Whether the visualizer really gets the music is up for debate.  The visuals simply don’t look sad and depressing enough when listening to Hallelujah, but maybe that’s just the lack of Jeff Buckley’s vocals in the instrumental. Furthermore, getting an FFT analysis to pull out reliable musical information from an audio recording is finicky to say the least. In any case, the blocky and colorful animations are nice to watch nonetheless. They’d make an excellent basis for visuals at your next underground chiptune show, that much is for certain. Video after the break.

Continue reading “Raspberry Pi Pico Becomes Emotionally-Aware Music Visualizer”

Audio Synthesizer Hooked Up With ChatGPT Interface

ChatGPT is being asked to handle all kinds of weird tasks, from determining whether written text was created by an AI, to answering homework questions, and much more. It’s good at some of these tasks, and absolutely incapable of others. [Filipe dos Santos Branco] and [Edward Gu] had an out of the box idea, though. What if ChatGPT could do something musical?

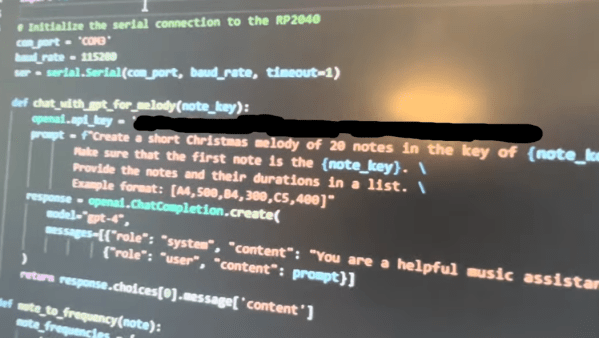
They built a system that, at the press of a button, would query ChatGPT for a 10-note melody in a given musical key. Once the note sequence is generated by the large language model, it’s played out by a PWM-based synthesizer running on a Raspberry Pi Pico.

Ultimately, ChatGPT is no musical genius. It’s simply picking a bunch of notes from a list that are known to work together melodically; that’s the whole point of musical keys. It would have been wild if it generated some riffs on the level of Stairway to Heaven or Spontaneous Devotion, but that might be asking for too much.

Here’s the question, though. If you trained a large language model, but got it to digest sheet music instead of written texts… could it learn to write music in various genres and styles? If someone isn’t working on that already, there’s surely an entire PhD you could get out of that idea alone. We should talk!

In any case, it’s one of the more creative projects from the ever-popular ECE 4760 class at Cornell. We’ve featured a bunch of projects from the class over the years, and noted how the course now runs on the RP2040. Continue reading “Audio Synthesizer Hooked Up With ChatGPT Interface”

Robot Pianist Runs On Arduino Nano

The piano has been around for a long time now. Not long after its invention, humans started contemplating how they could avoid playing it by getting a machine to do the job instead. [vicenzobit] is the latest to take on this task, building a “Robot Pianista” that uses a simple mechanism to play a tune under electronic command (Spanish language, Google Translate link).

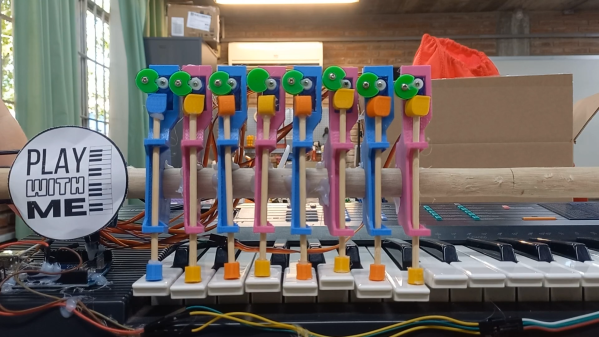
An Arduino Nano is the heart of the build, paired with a shield that lets it run a number of servo motors. The servos, one per key, are each assembled into a 3D-printed bracket with a cam-driven rod assembly. When the servo turns, the cam turns, and pushes down a rod that presses the piano key.

The build is limited in the sense that you can only play as many keys as you have servo channels, but nonetheless, it does the job. With eight servos, it’s able to play a decent rendition of Ode to Joy at a steady tempo, and that’s an excellent start.

We’ve featured some great mechanized instruments before, too. Video after the break.

Continue reading “Robot Pianist Runs On Arduino Nano”

Turning A Saxophone Into A MIDI Controller

Most of the time, if you’re looking for a MIDI controller, you’re going to end up with some kind of keyboard or a fancy button pad. The saxophone is an altogether more beguiling instrument that makes for one hell of an interface, but there’s a problem: they’re seldom MIDI-compatible. This build from [AndrewChi] changes all that.

This digitized sax relies on a SparkFun ESP32 Thing as the brains of the operation. It uses Hall effect sensors, the digital switch type, to detect the action of the keys of the sax. Choosing parts that are quick to respond is key for musical use, so [AndrewChi] selected the Texas Instruments DRV5023 for its unipolar operation, short output delay and fast rise time. Beyond setting up the basic keys to send MIDI notes, the instrument also received additional octave controls for greater range. With sensors and magnets attached to the saxophone and keys with Sugru, the instrument is ready to serve as a capable MIDI controller. Thanks to the ESP32, it’s capable of sending MIDI data wirelessly over Bluetooth for the maximum freedom of performance.

It’s a nifty build, and a great way for wind players to get into the world of controlling digital synthesizers in an intuitive fashion. We’ve seen some great MIDI controller builds before, too.

Continue reading “Turning A Saxophone Into A MIDI Controller”

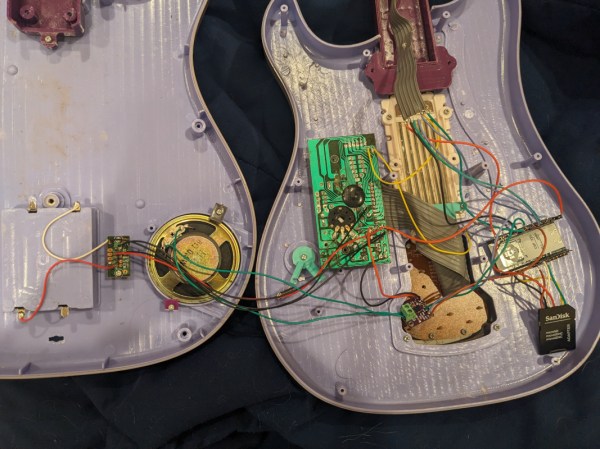
Upgraded Toy Guitar Plays Music

Getting the finishing details on a Halloween costume completed is the key to impressing friends and strangers alike on the trick-or-treat rounds. Especially when it comes to things like props, these details can push a good Halloween costume to great with the right touches. [Jonathan]’s friend’s daughter will be well ahead of the game thanks to these additions to a toy guitar which is part of her costume this year.

The toy guitar as it was when it arrived had the capability to play a few lackluster sound effects. The goal here was to get it to play a much more impressive set of songs instead, and to make a couple upgrades along the way as well. To that end, [Jonathan] started by dismantling the toy and investigating the PCBs for potential reuse. He decided to keep the buttons in the neck of the guitar despite their non-standard wiring configuration, but toss out the main board in favor of an ESP32. The ESP32 is tasked with reading the buttons, playing a corresponding song loaded on an SD card, and handling the digital to analog conversion when sending it out to be played on the speaker.

The project doesn’t stop there, though. [Jonathan] also did some custom mixing for the songs to account for the lack of stereo sound and a working volume knob, plus he used the ESP32’s wireless capabilities to set the guitar up as a local file server so that songs can be sent to and from the device without any wires. He also released the source code on the project’s GitHub page for anyone looking to use any parts of this project. Don’t forget there’s a Halloween contest going on right now, so be sure to submit the final version of projects like these there!

Continue reading “Upgraded Toy Guitar Plays Music”