Building A Mouse That’s Also A Computer

Once upon a time, a computer was a big metal brick of a thing that sat on or next to your desk. Now, it’s possible to fit decent computing power into a board the size of a stick of gum. [Electo] took advantage of this to build an entire computer into a mouse form factor.

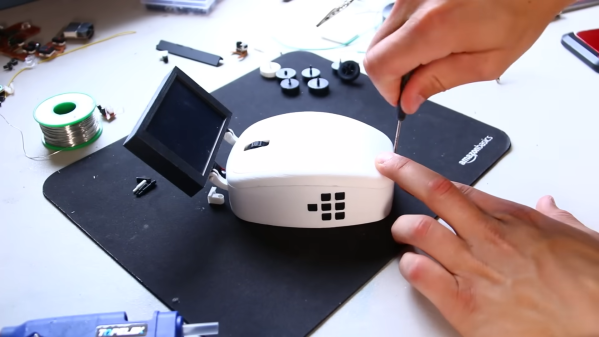
[Electo] had tried this before years ago, and built something pretty sloppy. This time, he wanted to build a version that had an actually-legible screen and fit better in the hand. He whipped up a giant 3D-printed mouse housing, and fitted the sensor board from an optical mouse inside. That was hooked up to an Intel NUC PC that fits inside the housing. A small LCD screen was then installed on a rack system that lets it pop out the front of the mouse. Data entry is via a laser keyboard mounted in the side of the mouse.

Of course, being based on an Intel NUC means the thing was the size of a couple of phonebooks. That’s not really a mouse. Starting again, he reworked the build around a tiny palm-sized computer running Windows 11. It was stripped out of its case and wedged into a compact 3D-printed housing only slightly larger than a typical mouse. It has a keyboard of a sort – really it’s just an array of buttons covering W, A, S, D, and a couple others for playing simple games. Amazingly, it’ll even run Minecraft or Fortnight if you really want to try and squint at that tiny screen.

Having a computer with a screen that moves every time you move the mouse isn’t ideal. At the same time, it’s fun to see someone explore a fun (and silly) form factor. It’s interesting to see how the project works compared to the original version from a few years ago. Video after the break.

Continue reading “Building A Mouse That’s Also A Computer”

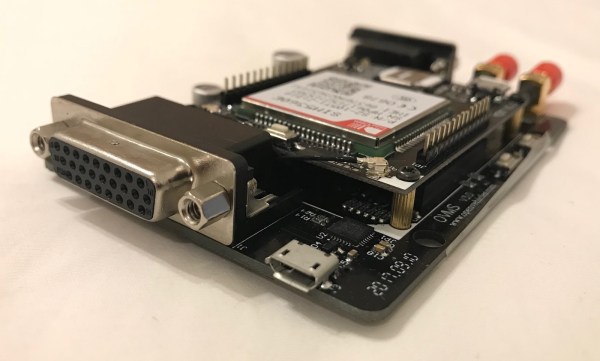
A black PCB with a cellular modem board piggy backed on top. It has a micro-USB and DB-type connector on the end facing the camera.

Open Vehicle Monitoring System Is The Window To Your EV’s Soul

Electric cars have more widgets than ever, but manufacturers would rather you don’t have direct access to them. The Open Vehicle Monitoring System intends to change that for the user. [via Transport Evolved]

As car manufacturers hoover up user data and require subscriptions for basic features, it can be a frustrating time to make such a big purchase. Begun in 2011, OVMS now interfaces with over a dozen different EVs and gives you access to (or helps you reverse engineer) all the data you could want from your vehicle. Depending on the vehicle, any number of functions can be accessed including remote climate start or cell-level battery statistics.

The hardware connects to your car’s OBDII port and uses an ESP32 microcontroller connected to a  SIMCOM SIM7600G modem (including GPS) to provide support for 3 CAN buses as well as Wi-Fi and Bluetooth connections. This can be particularly useful for remote access to data for vehicles that can no longer phone home via their originally included cellular modems as older networks shut down.

Do you wish EVs weren’t so complicated? Read our Minimal Motoring Manifesto.

So Long And Thanks For All The Flights: Ingenuity Permanently Grounded After 72 Flights

Just a few hours ago, NASA dropped some devastating news: Ingenuity will fly no more. Three years after dropping from the belly of the Perseverance rover and after 72 flights through the thin Martian atmosphere, the little helicopter that could now can’t, after having sustained damage to one or more of its rotors during its final landing.

Shadow of Ingenuity‘s rotor blade, showing damage suffered during a rough landing.

NASA’s terminal diagnosis of Ingenuity comes from a photo from one of the helicopter’s cameras, which shows a chunk missing from the tip of one of its rotors, likely caused by a rough landing after transiting a flat, sandy area that may have confused the aircraft’s navigational cameras.

While this is anything but good news, it’s not at all unexpected and in a way long overdue. Ingenuity was designed for a primary mission of just five flights, which it accomplished all the way back in May of 2021. There was heavy speculation at the time that Ingenuity might not even do that; we can recall one of the team members suggesting the odds were that Ingenuity’s tenure as the first controlled powered flying machine on another world would end as twisted wreckage in the newest, smallest crater on Mars.

But happily, Ingenuity proved the oddsmakers — and possibly those wishing to temper expectations — spectacularly wrong. In fact, by the fourth flight, it was clear that Ingenuity was in it for the long haul, enough so that NASA redefined its mission to “operational demonstration” and gave it another 30 sols of flight time. This gave the team the flight time needed to prove the helicopter’s worth as a scout for Perseverance and not just a distracting sideshow from the primary mission of searching for signs of ancient life on Mars.

Continue reading “So Long And Thanks For All The Flights: Ingenuity Permanently Grounded After 72 Flights”

You Can Use A Crappy Mixer As A Neat Synthesizer

[Simon the Magpie] found himself in possession of a Behringer mixer that turned up in someone’s garbage. They’re not always the most well-regarded mixers, but [Simon] saw an opportunity to do something a bit different with it. He decided to show us all how you can use a mixer as a synthesizer.

[Simon] actually picked up the “no-input” technique from [Andreij Rublev] and decided to try it out on his own equipment. The basic idea is to use feedback through the mixer to generate tones. To create a feedback loop, connect an auxiliary output on the mixer to one of the mixer’s input channels. The gain on the channel is then increased on the channel to create a great deal of feedback. The mixer’s output is then gently turned up, along with the volume on the channel that has formed the feedback loop. If you’ve hooked things up correctly, you should have some kind of tone feedbacking through the mixer. Want to change the pitch? Easy – just use the mixer’s EQ pots!

It’s pretty easy to get some wild spacey sounds going. Get creative and you can make some crunchy sounds or weird repeating tones if you play with the mixer’s built in effects. Plus, the benefit of a mixer is that it has multiple channels. You can create more feedback loops using the additional channels if you have enough auxiliary sends for the job. Stack them up or weave them together and you can get some wild modulation going.

Who needs a modular synth when you can do all this with a four channel mixer and some cables? Video after the break.

Continue reading “You Can Use A Crappy Mixer As A Neat Synthesizer”

POTS At A Hacker Camp

For those of us off the Atlantic coast of Europe it’s a frigid winter as our isles are lashed by continuous storms. Summer seems a very long time ago, and the fun of the EMF 2022 hacker camp is an extremely distant memory. But the EMF team have been slowly releasing videos from the talks at that camp, the latest of which comes from [Matthew Harrold]. He was the force behind the public POTS phone network at the camp, providing anyone within range of one of his endpoints with the chance to have a wired phone line in their tent.

We’d love to imagine a mesh of overhead wires converging on a Strowger mechanical exchange somewhere on the field, but in a more practical move he used an array of redundant Cisco VOIP gear, and a multi-modem rack to provide dial-up services. Even then there were a few hurdles to overcome, but on the field it was definitely worth it as an array of unusual phone kit was brought along by the attendees. Our favourite is the Amstrad eMailer, an all-in-one phone and internet appliance from a couple of decades ago which perhaps due to its expensive pay as you go model, failed commercially. The video is below the break.

It’s a good time for this talk to come out, because it’s reminded us that the next EMF camp is on this summer. Time to dust off an old phone to bring along. Meanwhile, we’ve seen [Matthew] before, as he refurbished a sluggish dial mechanism.

Continue reading “POTS At A Hacker Camp”

Displays We Love Hacking: Parallel RGB

You might have seen old display panels, from 3″ to 10″, with 40-pin FFC connectors where every pin seems to be used for some data signal. We call these displays parallel RGB, or TTL RGB, or DPI, and you can find them in higher-power MCU, Raspberry Pi, and other Linux SBC projects. You deserve to know what to do with those – let’s take a look.

The idea is simple – this interface requires you to constantly send a stream of pixels to the display, and you need to send those pixels through a parallel bus. You can send up to 8 bits per color channel per pixel, which makes for 24 bits, and the 24-bit mode is indeed the standard, but in practice, many parallel RGB implementations don’t bother with more than 5-6 bits of color – two common kinds of parallel RGB links are RGB565 and RGB666. The parallel RGB interface is a very straightforward approach to sending pixels to your display, and in many cases, you can also convert parallel RGB to LVDS or VGA interfaces relatively easily!

If you’re new to it, the easiest way you can drive a parallel RGB display is from a Raspberry Pi, where the parallel RGB interface is known as DPI. This is how 800 x 480 display Pi HATs like the Pimoroni HyperPixel work – they use up almost all of the GPIOs on your Pi, but you get a reasonably high-resolution display with a low power footprint, and you don’t need any intermediate ICs either. FPGAs and some higher-grade MCUs also often have parallel RGB output capability, and surely, someone could even use the RP2040 PIO as well!

Throughout the last decade, parallel RGB has been used less and less, but you will still encounter it – maybe you’re working with an old game console like the PSP and would like to put new guts into it, maybe you’re playing with some tasty display that uses parallel RGB, or maybe you’d like to convert parallel RGB into something else while treating it with respect! Let’s go through what makes parallel RGB tick, what tools you have got to work with it, and a few tips and tricks. Continue reading “Displays We Love Hacking: Parallel RGB”

Bus Pirate 5 Now Shipping

It’s happened to all of us at one time or another. There’s some component sitting on the bench, say an I2C sensor, a new display, or maybe a flash chip, and you want to poke around with it. So you get out the breadboard, wire it to a microcontroller, write some code, flash it…you get the idea. Frankly, it’s all kind of a hassle. Which is why [Ian Lesnet] created the Bus Pirate: a USB multi-tool designed to get you up and running with a new piece of hardware as quickly as possible.

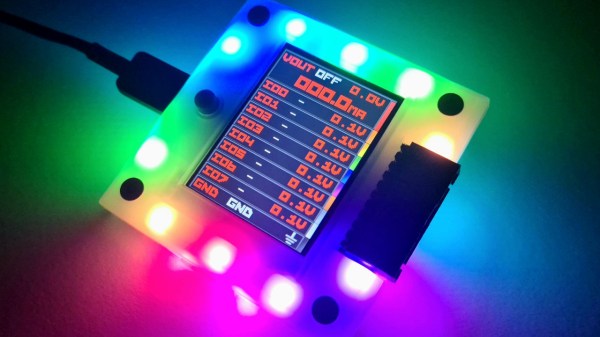
Now, after years of development, the Bus Pirate 5 is available for purchase. Completely redesigned to take advantage of the impressive I/O capabilities of the RP2040, the new Bus Pirate also features a 240 x 320 IPS LCD that can show real-time voltage data and pin assignments. But despite the new display, and the bevy of RGB LEDs lurking under the injection molded enclosure, the primary interface for the device remains the VT100 terminal interface — now with the addition of a color status bar running along the bottom.

Continue reading “Bus Pirate 5 Now Shipping”