Clever PCB Brings Micro USB To The Arduino Uno

Even with more and more devices making the leap to USB-C, the Arduino Uno still proudly sports a comparatively ancient Type-B port. It wouldn’t be a stretch to say that many Hackaday readers only keep one of these cables around because they’ve still got an Uno or two they need to plug in occasionally.

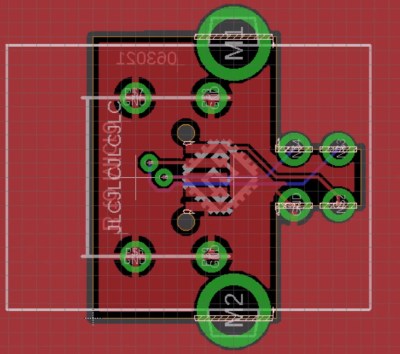
Looking to at least move things in the right direction, [sjm4306] recently set out to create a simple board that would let him mount a micro USB connector in place of the Uno’s original Type-B. Naturally there are no components on the PCB, it simply adapts the original through-hole footprint to the tight grouping of surface mount pads necessary to mount a female micro USB port.

Making castellated holes on the cheap.

The design is straightforward, but as [sjm4306] explains in the video below, there’s actually more going on here than you might think. Looking to avoid the premium he’d pay to have the board house do castellated holes, he cheated the system a bit by having the board outline go right through the center of the standard pads.

Under a microscope, you can see the downside of this approach. Some of the holes got pretty tore up as the bit routed out the edges of the board, with a few of them so bad [sjm4306] mentions there might not be enough of the pad left to actually use. But while they may not be terribly attractive, most of them were serviceable. To be safe, he says anyone looking to use his trick with their own designs should order more boards than they think they’ll actually need.

Of course you could go all the way and retrofit the Uno with a USB-C port, as we’ve seen done with devices in the past. But the latest-and-greatest USB interface can be a bit fiddly, especially with DIY gadgets, so we can’t blame him for going with the more reliable approach.

Continue reading “Clever PCB Brings Micro USB To The Arduino Uno”

DOOM On A Bootloader Is The Ultimate Cheat Code

Porting DOOM to run on hardware never meant to run it is a tradition as old as time. Getting it to run on embedded devices, ancient computers, virtual computers, and antique video game consoles are all classic hacks, but what DOOM ports have been waiting for is something with universal applicability that don’t need a bespoke solution for each piece of hardware. Something like DOOM running within a bootloader.

The bootloader that [Ahmad] works with is called Barebox and is focused on embedded systems, often those running Linux. This is the perfect environment for direct hardware access, since the bootloader doubles as a bare metal hardware bring-up toolkit. Now that DOOM runs on this bootloader, it effectively can run anywhere from embedded devices to laptops with minimal work, and although running it in a bootloader takes away a lot of the hard work that would normally need to be done during a port, it may still need some tweaking for specific hardware not otherwise supported.

For those already running Barebox, the bareDOOM code can be found on [Ahmad]’s GitHub page. For those not running Barebox, it does have a number of benefits compared to other bootloaders, even apart from its new ability to play classic FPS games. For those who prefer a more custom DOOM setup, though, we are always fans of DOOM running within an NES cartridge.

Photo: AntonioMDA, CC BY-SA 4.0 via Wikimedia Commons

Guitar Effects With No (Unwanted) Delay

MIDI has been a great tool for musicians and artists since its invention in the 1980s. It allows a standard way to interface musical instruments to computers for easy recording, editing, and production of music. It does have a few weaknesses though, namely that without some specialized equipment the latency of the signals through the various connected devices can easily get too high to be useful in live performances. It’s not an impossible problem to surmount with the right equipment, as illustrated by [Philip Karlsson Gisslow].

The low-latency MIDI interface that he created is built around a Raspberry Pi Pico. It runs a custom library created by [Philip] called MiGiC which specifically built as a MIDI to Guitar interface. The entire setup consists of a preamp to boost the guitar’s signal up to 3.3V where it is then fed to the Pi. This is where the MIDI sampling is done. From there it sends the information to a PC which is able to play the sound back quickly with no noticeable delay.

[Philip] also had to do a lot of extra work to port the software to the Pi which lacks a lot of the features of its original intended hardware on a Mac or Windows machine, and the results are impressive, especially at the end of the video where he uses the interface to play a drum machine via his guitar. And, while MIDI is certainly a powerful application for a guitarist, we have also seen the Pi put to other uses in this musical realm as well.

Continue reading “Guitar Effects With No (Unwanted) Delay”

Raspberry Pi Tally Lights

Running a camera studio is a complicated affair from pretty much every angle. Not only is the camera gear expensive but the rest of the studio setup takes care and attention down to the lighting as well. When adding multiple cameras to the mix, like for a television studio, the level of complexity increases exponentially. It’s great to have a few things that simplify the experience of running all of this equipment too, without the solution itself causing more problems than it solves, like these network-operated Raspberry Pi-powered tally lights.

A tally light is the light on a camera that lets the person being recorded know which camera is currently in use. Networking them all together often requires complex wiring or at least some sort of networking solution, which is what this particular build uses. However, the lights are controlled directly over HTTP rather than using a separate application which might need a port open on a firewall or router, which not only simplifies their use but doesn’t decrease network security.

The HTTP interface, plus all of the software and schematics for this build, are available on the project’s GitHub page. We imagine the number of people operating a studio and who are in need of a tally light system to be fairly low, but the project is interesting from a networking point-of-view regardless of application. If you do have a studio like this and are looking for other ways to improve it, we do have a simple teleprompter hack that might be right up your alley.

Displaying Incoming Server Attacks By Giving Server Logs A Scoreboard

In the server world, it’s a foregone conclusion that ports shouldn’t be exposed to the greater Internet if they don’t need to be. There are malicious bots everywhere that will try and randomly access anything connected to a network, and it’s best just to shut them off completely. If you have to have a port open, like 22 for SSH, it’ll need to be secured properly and monitored so that the administrator can keep track of it. Usually this is done in a system log and put to the side, but [Nick] wanted a more up-front reminder of just how many attempts were being made to log into his systems.

This build actively monitors attempts to log into his server on port 22 and notifies him via a numerical display and series of LEDs. It’s based on a Raspberry Pi Zero W housed in a 3D-printed case, and works by interfacing with a program called fail2ban running on the server. fail2ban‘s primary job is to block IP addresses that fail a certain number of login attempts on a server, but being FOSS it can be modified for situations like this. With some Python code running on the Pi, it is able to gather data fed to it from fail2ban and display it.

[Nick] was able to see immediate results too. Within 24 hours he saw 1633 login attempts on a server with normal login enabled, which was promptly shown on the display. A video of the counter in action is linked below. You don’t always need a secondary display if you need real-time information on your server, though. This Pi server has its own display built right in to its case.

Continue reading “Displaying Incoming Server Attacks By Giving Server Logs A Scoreboard”

Automate The Freight: Shipping Containers Sorted By Robot Stevedores

Towering behemoths are prowling the docks of Auckland, New Zealand, in a neverending shuffle of shipping containers, stacking and unstacking them like so many out-sized LEGO bricks. And they’re doing it all without human guidance.
It’s hard to overstate the impact containerized cargo has had on the modern world. The ability to load and unload ships laden with containers of standardized sizes rapidly with cranes, and then being able to plunk those boxes down onto a truck chassis or railcar carrier for land transportation has been a boon to the world’s economy, and it’s one of the main reasons we can order electronic doo-dads from China and have them show up at our doors essentially for free. At least eventually.
As with anything, solving one problem often creates other problems, and containerization is no different. The advantages of being able to load and unload one container rather than separately handling the dozen or more pallets that can fit inside it are obvious. But what then does one do with a dozen enormous containers? Or hundreds of them?
That’s where these giant self-driving cranes come in, and as we’ll see in this installment of “Automate the Freight”, these autonomous stevedores are helping ports milk as much value as possible out of containerization.

Continue reading “Automate The Freight: Shipping Containers Sorted By Robot Stevedores”

WebAssembly: What Is It And Why Should You Care?

If you keep up with the field of web development, you may have heard of WebAssembly. A relatively new kid on the block, it was announced in 2015, and managed to garner standardised support from all major browsers by 2017 – an impressive feat. However, it’s only more recently that the developer community has started to catch up with adoption and support.

So, what is it? What use case is so compelling that causes such quick browser adoption? This post aims to explain the need for WebAssembly, a conceptual overview of the technical side, as well as a small hands-on example for context.

Continue reading “WebAssembly: What Is It And Why Should You Care?”