2024 Home Sweet Home Automation: Simple Window Closer Relies On Gravity

While most pet owners are happy to help out their furry friends, everyone has a limit. For [Gauthier], getting up to open or close the window every three minutes so their cat can go out on the balcony was a bridge too far, so they decided to take a crack at automating the window. The end result not only does the job, it’s extremely low-tech and pretty much invisible except when in use.

Of course, [Gauthier] didn’t arrive at this solution immediately. Their first thoughts went to RFID or perhaps a pressure sensor to detect the cats, coupled with something motorized to open and shut the window, like a belt or maybe a linear actuator. But ultimately, the system has to be robust, so that’s when [Gauthier] got the idea to employ gravity by using pulleys and weights.

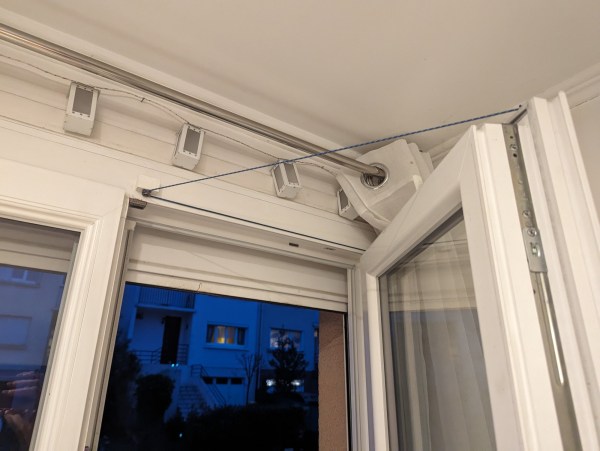
Due to the configuration of the space and the shape of the window, [Gauthier] was able to to hide cable pretty well — you can’t really see anything when the window is closed. Be sure to check it out in action after the break. Continue reading “2024 Home Sweet Home Automation: Simple Window Closer Relies On Gravity”

Light Meets Movement With A Minimum Of Parts

We often say that hardware hacking has never been easier, thanks in large part to low-cost modular components, powerful microcontrollers, and highly capable open source tools. But we can sometimes forget that what’s “easy” for the tinkerer that reads datasheets for fun isn’t always so straightforward for everyone else. Which is why it’s so refreshing to see projects like this LED chandelier from [MakerMan].

Despite the impressive final result, there’s no microcontrollers or complex electronics at work here. It’s been pieced together, skillfully we might add, from hardware that wouldn’t be out of place in a well-stocked parts bin. No 3D printed parts or fancy laser cutter involved, and even the bits that are welded together could certainly be fastened some other way if necessary. This particular build is not a triumph of technology, but ingenuity.

The video below is broken up roughly into two sections, the first shows how the motorized crank and pulley system was designed and tested; complete with various bits of scrip standing in for the final LED light tubes. Once the details for how it would move were nailed down, [MakerMan] switches over to producing the lights themselves, which are nothing more than some frosted plastic tubes with LED strips run down the center. Add in a sufficiently powerful 12 VDC supply, and you’re pretty much done.

As it so happens, this isn’t the first motorized lighting fixture that [MakerMan] has put together.

Continue reading “Light Meets Movement With A Minimum Of Parts”

Ski lift in at a European ski resort

Ski Lift Design Does The Impossible

Tis The Season, for those who are so inclined, to loft themselves to the top of a steep snow-covered hill and then go downhill, really fast. And if something gets in their way, turn. Whether they be on skis, a snowboard, or some other means, getting down usually involves using gravity. Getting up, on the other hand, usually involves a ski lift. And in the video by [kalsan15] after the break, we learn how technology has stepped in to make even the most inaccessible slopes just a lift ride away.

Ski lift in at a European ski resort
A ski lift that can only turn left.

In its most simple form, a ski lift is two pulleys connected by a steel cable. The pulley at the bottom of the hill is powered, and the pulley at the top of the hill serves as an idler. Attached to the steel cable are some means for a person to either sit down or grab a handle and be hoisted to the top of the hill.

Such a simple arrangement works fine if the geography allows for it, but what if there are turns, or there need to be multiple idlers to keep the wire taut but also close to the ground? Again, the most basic ski lifts have limitations. If the cable turns left around the idler, then the attachment for the handle or chair has to be on the right, making a right turn around the idler an impossibility.

How then can this problem be solved? We won’t spoil the outcome, but we recommend checking out [kalsan15]’s video for an excellent description of the problem and the solution that’ll leave you wondering “Why didn’t I think of that!?”

If you don’t find this hacky enough, then take a moment to learn how you too can not just make a gas-powered ski lift for your cabin in the woods, but then ride your slope down on your DIY Ski Bike!

Continue reading “Ski Lift Design Does The Impossible”

an image of the graffomat at work

Automate Your Graffiti With The Graffomat!

In Banksy’s book, Wall and Piece, there is a very interesting quote; “Imagine a city where graffiti wasn’t illegal, a city where everybody could draw whatever they liked…”. This sounds like it would be a very exciting city to live in, except for those of us who do not have an artistic bone in their body. Luckily, [Niklas Roy] has come up with the solution to this problem; the Graffomat, a spray can plotter.

The Graffomat is, in its creator’s own words, a “quick and dirty graffiti plotter.” It is constructed primarily from wood and driven by recycled cordless drills that pulls string pulleys to move the gantry.  The Arduino Nano at the heart of the Graffomat can be controlled by sending coordinates over serial. This allows for the connection of an SD card reader to drip-feed the machine, or a computer to enable real-time local or over-the-internet control.

We are especially impressed with how [Niklas] handled positional tracking. The cordless drills were certainly not repeatable like a stepper motor, as to allow for open-loop control. Therefore, the position of the gantry and head needed to be actively tracked. To achieve this, the axes are covered with black and white striped encoder strips, that is then read by a pair of phototransistors as the machine moves along. These can then be paired with the homing switches in the top left corner to determine absolute position.

Graffomat is not the first automated graffiti machine we’ve covered. Read here about the robot that painted murals by climbing smokestacks in Estonia. 

Continue reading “Automate Your Graffiti With The Graffomat!”

A 3D-Printed Block And Tackle For Those Annoying Lifts

Perhaps the humble block and tackle — multiple parallel pulleys to reduce the effort of lifting — is not such a common sight as it once was in this age of hydraulic loaders, but it remains a useful mechanism for whenever there is a lifting task. To that end [semi] has produced a 3D-printed block and tackle system, which as can be seen in the video below the break, makes lifting moderately heavy loads a breeze.

It’s a simple enough mechanism, with the 3D printer supplying pulleys, chocks, and attachment points, and steel bolts holding everything together. It’s demonstrated with a maximum weight of 20 kilograms (44 pounds), and though perhaps some hesitation might be in order before trusting it with 200 Kg of engine, we’re guessing it would be capable of much more that what we’re shown. Should you wish to give it a try, the files can be found on Thingiverse.

The block and tackle should hold a special place in the hearts of engineers everywhere, as the first product manufactured using mass-production techniques. It shouldn’t be a surprise that this early-19th century factory came from the work of Marc Brunel, father of Isambard Kingdom Brunel who we’ve made the subject of a previous Hackaday piece.

Continue reading “A 3D-Printed Block And Tackle For Those Annoying Lifts”

3D Printing Restores Bandsaw

A great addition to a home shop is a bandsaw, but when [Design Prototype Test] got a well-used one, he found it wasn’t in very good shape. The previous owner put in an underpowered motor and made some modifications to accommodate the odd-sized blade. Luckily, 3D printing allowed him to restore the old saw to good working order.

There were several 3D printed additions. A pulley, a strain relief, and even an emergency stop switch. Honestly, none of this stuff was something you couldn’t buy, but as he points out, it was cheaper and faster than shipping things in from China. He did wind up replacing the initial pulley with a commercial variant and he explains why.

Continue reading “3D Printing Restores Bandsaw”

Sliding Screen Has Wheels, Will Travel

For a recent event, [MakerMan] was tasked with creating an interactive display that could move back and forth along an image of the Moscow skyline to highlight different points of interest. The end result is certainly gorgeous, but since this is Hackaday, we were more excited to see all the behind the scenes video of how it was built.

As with many of his projects, this one started with little more than scrap parts. Two metal I-beams were welded together to make a track, and a wheeled cart was fashioned to ride on it. Using a belt and pulley system that’s not unlike a scaled up version of what you might see on a desktop 3D printer, the motor in the cart is able to move the arrangement back and forth with minimal slop.

Installing the motor and pulley in the cart.

The cart actually holds all of the electronics in the project, including the power supplies, MA860H motor controller, a pair of endstop switches, and the Arduino that pulls it all together. A drag chain is used to keep the wires tight to the side of the rail without getting tangled up in anything.

[MakerMan] doesn’t explain much of the software side of this one, though we suppose he might only have been contracted to develop the hardware. But towards the end of the video you can see how the cart, now with large touch screen display mounted on top, moves back and forth when the appropriate commands are sent to the Arduino.

We’re not really sure what application such a contraption would have for the average hacker, but that doesn’t mean we can’t be jealous. There’s just something about huge illuminated screens that just speaks to us.

Continue reading “Sliding Screen Has Wheels, Will Travel”