2023 Cyberdeck Contest: Cyberdeck Red Is Ready For Action

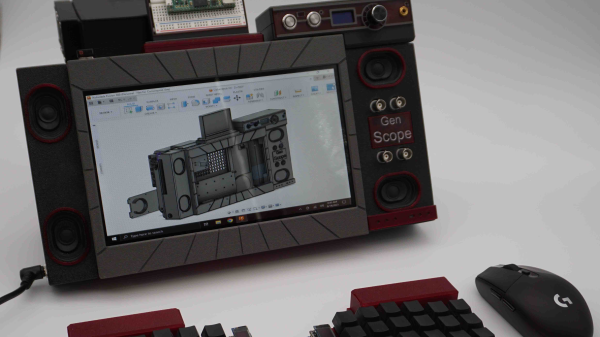
What exactly constitutes a cyberdeck is up for debate, but for us, one thing is clear: A cyberdeck needs to look like it’s ready to go to battle. When the machines finally rise up and try to wipe us all out, someone toting around a machine like Cyberdeck Red is probably going to be a sight for sore eyes; clearly, such a person would be equipped to help us fight back the robotic scourge.

If this cyberdeck looks familiar, it’s for a good reason — it’s [Gabriel]’s second stab at this build. We thought the original was pretty keen, enough so that it won second prize in the 2022 contest. But like many cyberdeck builders, good enough isn’t good enough, and so rather than rest on his laurels, he set about improving a few things. The most visible of the changes are the spiffy new case, which is far less utilitarian than version one, and the new custom-made split keyboard. Things are a little different under the hood too; gone is the Raspberry Pi 4, which was replaced by Latte Panda 3 Delta running Windows. And like the original, version two is absolutely stuffed with sensors and diagnostic gear — a Hack RF SDR for radio work, plus an Analog Discovery 2 which provides everything from an oscilloscope and signal generator to a spectrum analyzer and an impedance tester.

But possibly the most useful feature of Cyberdeck Red is the onboard HDMI projector. The palm-sized, short-throw projector would be perfect for an impromptu combat briefing in an improvised command post, or just watching Netflix. If the machines will allow it, of course.

The 2023 Cyberdeck Contest wraps up August 15, so it looks like [Gabriel] just squeaked this one in on time. We wish him and all the other entrants the best of luck!

Listening In On A Deep-Space Satellite As It Returns Home

We’ve covered dozens of projects about getting images of Earth’s weather straight from the source. It’s not too much of a trick to download images straight from our constellation of weather satellites, but what about space weather? We’ve got satellites for that too, of course, but to get a good look at the Sun, they’re out of reach of most homebrew ground stations.

That’s about to change, though, as STEREO-A returns to our neighborhood after a 17-year absence, making citizen science a reasonable proposition. The STEREO mission — Solar Terrestrial Relations Observatory — was launched in 2006 with a pair of satellites in heliocentric orbits. STEREO-B was lost in 2014 due to a navigational glitch, but STEREO-A has spent a lot of the intervening years watching the backside of the Sun relative to the Earth. As [Scott Tilley] explains, the satellite is now approaching inferior conjunction, where it will pass between the Earth and the Sun.

This close pass makes STEREO-A’s X-band deep-space beacon readily available to hobbyist-scale equipment, like [Scott]’s 66-cm dish antenna. The dish is mounted on an alt-az telescope mount for tracking, and sports a host of gear at the focus, like LNAs, filters, mixers, and an Ettus B200 SDR. It’s not a cheap setup, but compared to what’s usually needed to listen to STEREO-A, it’s a bargain. The process of demodulating and decoding the signals was a bit more involved, though, requiring not only SatDump and some custom code but also a lot of patience. The images are worth the wait, though; [Scott] shares some amazing shots of our increasingly active Sun as well as animations of recent sunspot activity.

If you’re interested in getting in on the STEREO-A action, you’d better get hopping — the satellite will only be in the neighborhood for a few more months before heading off for another pass around the back of the Sun.

Using An Old Satellite To See The Earth In A New Light

Snooping in on satellites is getting to be quite popular, enough so that the number of people advancing the state of the art — not to mention the wealth of satellites transmitting signals in the clear — has almost made the hobby too easy. An SDR, a homebrew antenna, and some off-the-shelf software, and you too can see weather satellite images on your screen in real time.

But where’s the challenge? That seems to be the question [dereksgc] asked and answered by tapping into S-band telemetry from an obsolete satellite. Most satellite hunters focus on downlinks in the L-band or even the VHF portion of the spectrum, which are within easy reach of most RTL-SDR dongles. However, the Coriolis satellite, which was launched in 2003, has a downlink firmly in the S-band, which at 2.2-GHz puts it just outside the high end of an RTL-SDR. To work around this, [dereksgc] bought a knock-off HackRF SDR and couple it with a wideband low-noise amplifier (LNA) of his own design. The dish antenna is also homebrewed from a used 1.8-m dish and a custom helical antenna for the right-hand circular polarized downlink signal.

As the video below shows, receiving downlink signals from Coriolis with the rig wasn’t all that difficult. Even with manually steering the dish, [dereksgc] was able to record a couple of decent passes with SDR#. Making sense of the data from WINDSAT, a passive microwave polarimetric radiometer that’s the main instrument that’s still working on the satellite, was another matter. Decoded with SatDump and massaged with Gimp, the microwave images of Europe are at least recognizable, mostly due to Italy’s distinctive shape.

Despite the distortion, seeing the planet’s surface via the microwaves emitted by water vapor is still pretty cool. If more traditional weather satellite images are what you’re looking for, those are pretty cool too.

Continue reading “Using An Old Satellite To See The Earth In A New Light”

Russian Weather Satellite Reuses Name, Yields Images

Which Russian weather satellite has the name Meteor 2? According to [saveitforparts], pretty much all of them. He showed how to grab images from an earlier satellite with the same name a while back. That satellite, though, met with some kind of disaster, so he’s posted a new video about reading data from the new Meteor 2 and you can watch it below.

The interesting part, we thought, was that the software he’s using, Raspberry-NOAA v2, doesn’t know about this incarnation of the bird which has only been up for a few weeks. That means he had to find a satellite with similar orbital parameters. Eventually, the program will have the setup for this satellite.

Continue reading “Russian Weather Satellite Reuses Name, Yields Images”

Minimal Mods Make Commodity LNBs Work For QO-100 Reception

A word of advice: If you see an old direct satellite TV dish put out to the curb, grab it before the trash collector does. Like microwave ovens, satellite dishes are an e-waste wonderland, and just throwing them away before taking out the good stuff would be a shame. And with dishes, the good stuff basically amounts to the bit at the end of the arm that contains the feedhorn and low-noise block downconverter (LNB).

But what does one do with such a thing once it’s harvested? Lots of stuff, including modifying it for use with the QO-100 geosynchronous satellite (German link). That’s what [Sebastian Westerhold] and [Celin Matlinski] did with a commodity LNB, although it seems more like something scored on the cheap from one of the usual sources rather than picking through trash. Either way, these LNBs are highly integrated devices that at built specifically for satellite TV use, but with just a little persuasion can be nudged into the K-band to receive the downlink signals from hams using QO-100 as a repeater.

The mods are simple — snipping out the 25 MHz reference crystal on the LNB board and replacing it with a simple LC bandpass filter. This allows the local oscillator on the LNB to be referenced to an external signal generator; when fed with a 25.78 MHz signal, it’s enough to goose the LNB up to 10,490 MHz — right about the downlink frequency. [Sebastian] and [Celin] tested the mods and found that it was easily able to detect the third harmonics of a 3.5-ish GHz signal.

As for testing on actual downlink signals from the satellite, that’ll have to wait. For now, if you’re interested in satellite comms, and you live on the third of the planet covered by QO-100, keep an eye out for those e-waste LNBs and get to work.

Long-Distance Wi-Fi With Steam Deck Server

It’s no secret that the Steam Deck is a powerful computer, especially for its price point. It has to be capable enough to run modern PC games while being comfortable as a handheld, all while having a useful amount of battery life. Thankfully Valve didn’t lock down the device like most smartphone manufacturers, allowing the computer to run whatever operating system and software the true owner of the device wants to run. That means that a whole world of options is open for this novel computer, like using it to set up an 802.11ah Wi-Fi network over some pretty impressive distances.

Of course the Steam Deck is more of a means to an end for this project; the real star of the show is DragonOS, a Debian-based Linux distribution put together by [Aaron] to enable easy access to the tools needed for plenty of software-defined radio projects like this one. Here, he’s using it to set up a long-distance Wi-Fi network on one side of a lake, then testing it by motoring over to the other side of the lake to access the data from the KrakenSDR setup running on the Deck, as well as performing real-time capture of IQ data that was being automatically demodulated and feed internally to whispercpp.

While no one will be streaming 4K video over 802.11ah, it’s more than capable of supporting small amounts of data over relatively large distances, and [Aaron] was easily able to SSH to his access point from over a kilometer away with it. If the lake scenery in the project seems familiar at all, it’s because this project is an extension of another one of his DragonOS projects using a slightly lower frequency to do some impressive direction-finding, also using the Steam Deck as a base of operations.

Continue reading “Long-Distance Wi-Fi With Steam Deck Server”

Getting Into NMR Without The Superconducting Magnet

Exploring the mysteries of quantum mechanics surely seems like an endeavor that requires room-sized equipment and racks of electronics, along with large buckets of grant money, to accomplish. And while that’s generally true, there’s quite a lot that can be accomplished on a considerably more modest budget, as this as-simple-as-it-gets nuclear magnetic resonance spectroscope amply demonstrates.

First things first: Does the “magnetic resonance” part of “NMR” bear any relationship to magnetic resonance imaging? Indeed it does, as the technique of lining up nuclei in a magnetic field, perturbing them with an electromagnetic field, and receiving the resultant RF signals as the nuclei snap back to their original spin state lies at the heart of both. And while MRI scanners and the large NMR spectrometers used in analytical chemistry labs both use extremely powerful magnetic fields, [Andy Nicol] shows us that even the Earth’s magnetic field can be used for NMR.

[Andy]’s NMR setup couldn’t be simpler. It consists of a coil of enameled copper wire wound on a 40 mm PVC tube and a simple control box with nothing more than a switch and a couple of capacitors. The only fancy bit is a USB audio interface, which is used to amplify and digitize the 2-kHz-ish signal generated by hydrogen atoms when they precess in Earth’s extremely weak magnetic field. A tripod stripped of all ferrous metal parts is also handy, as this setup needs to be outdoors where interfering magnetic fields can be minimized. In use, the coil is charged with a LiPo battery for about 10 seconds before being rapidly switched to the input of the USB amp. The resulting resonance signal is visualized using the waterfall display on SDR#.

[Andy] includes a lot of helpful tips in his excellent write-up, like tuning the coil with capacitors, minimizing noise, and estimating the exact resonance frequency expected based on the strength of the local magnetic field. It’s a great project and a good explanation of how NMR works. And it’s nowhere near as loud as an MRI scanner.