3d Printed Hexapod Robot

3d-printed-hexapod

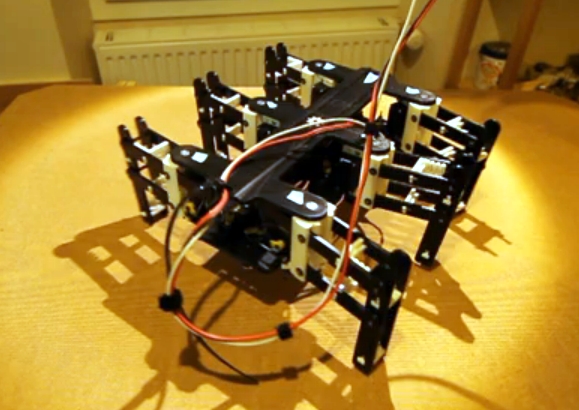
This hexapod was made almost entirely via 3d printing (translated). The parts that you need to supply include a few fasteners to make connections, twelve servo motors, and a method of driving them. As you can see in the video after the break, all those parts come together into a little robot that functions quite well. The only thing that we think is missing are some grippy feet to help prevent slipping.

[Hugo] calls the project Bleuette. It is completely open source, with the cad files and source code available on his Github repository. There is additional information in the wiki page of that repo. This gives us a good look at the electronic design. He’s controlling the legs with an Arduino, but it’s all dependent on his own shield which features a PIC 18F452 to take care of the signals used to drive all of the servo motors. The board also has some peripherals to monitor the current draw and regulate the incoming power.

Continue reading “3d Printed Hexapod Robot”

MSP430 Launchpad Game Of Life Shield

[100uf] built an LED matrix shield for the MSP430 launchpad. His goal with this design was to have it play Conway’s Game of Life. It does just that, as you can see in the clip after the break. But it’s just waiting to learn some more tricks. After he tires of watching the cellular automaton he can try his hand at making some LED pendant animations.

As you can tell, the board was made in his home workshop. It’s not etched, but milled using the CNC machine shown in this image gallery. This is a single-sided PCB, which works well enough for the surface mount components and the downward facing pin sockets. But we wonder how difficult it was to solder the legs of that 8×8 LED matrix. It does have plastic feet at each corner that serve as standoffs to separate the body from the copper layer. But it still looks like a tight space into which he needed to get his iron and some solder.

Continue reading “MSP430 Launchpad Game Of Life Shield”

Stacking GPS, GSM, And An SD Card Into An Arduino Shield

A few years ago, [Phang Moh] and his compatriots were asked by a client if they could make a vehicle tracking device for oil tankers all around Indonesia. The request of putting thousands of trackers on tanks of explosives was a little beyond [Phang Moh]’s capability, but he did start tinkering around with GPS and GSM on an Arduino.

Now that tinkering has finally come to fruition with [Phang]’s TraLog shield, a single Arduino shield that combines GPS tracking with a GSM and GPRS transceiver. There’s also an SD card thrown in for good measure, making this one of the best tracking and data logging shields for the Arduino.

The shield can be configured to send GPS and sensor data from devices attached to an I2C bus to remote servers, or a really cool COSM server. [Phang] is selling his TraLog for $150, a fairly good deal if you consider what this thing can do.

Seems like the perfect piece of kit for just about any tracking project, whether you want to know the location of thousands of oil tankers or just a single high altitude balloon.

Tip ‘o the hat to [Brett] for finding this one.

Cellular Vehicle Information And Control

This hardware, which was built as a Computer Engineering project by [Bryon] and his classmates, gives you feedback and control of a car though a cellular phone network. It uses text messages to communicate with a control device. This can be pretty much any cellphone, but in the clip after the break they show off an Android app which puts a pretty GUI in front of you and abstracts away the tedium of specially formatted messages.

At the heart of the system is an Arduino Mega board. It has a cellular shield with an external antennae for connectivity. A GPS device, relay board, and ODB-II module provide feedback and control to the system. The relays allow the car to be started and the doors to be locked. The GPS and ODB-II module can send back location and vehicle information (anything available from the car’s sensors). There were some issues with the text messages being blocked during testing. The team thinks that the automated back-and-forth triggered some kind of spam filter from the telecom.

There’s still more work to be done if they want to actually drive the car via remote control.

Continue reading “Cellular Vehicle Information And Control”

Using Arduino Shields With The Raspi

With hundreds of Arduino shields available for any imaginable application, it’s a shame they can’t be used with the Raspberry Pi. Breaking out the Raspi GPIO pins to Arduino-compatible headers would allow makers and tinkerers to reuse their shields with a far more capable computing platform.

The folks over at Cooking Hacks realized a Raspi to Arduino shield bridge would be an awesome device, so they made their own, complete with a software library that allows you to port your Arduino code directly to the Raspberry Pi.

There are a few limitations with the Raspberry Pi’s GPIO headers; the Raspi doesn’t have analog inputs, so the Cooking Hacks team added an 8-channel ADC. Along with analog inputs and the headers required to pop a shield on the board, there’s also a socket for an XBee module.

The software library contains most of the general Arduino functions such as digitalWrite() and digitalRead(). There Serial, Wire, and SPI libraries are also implemented, allowing any device that communicates through UART, I2C, or SPI to talk directly to the Raspberry Pi.

While the Raspi Arduino bridge doesn’t allow for PWM in the same capacity as an Arduino, you’re always welcome to whip up a servo or LED shield for this neat little adapter.

Qube Robots Use Well-designed Laser-cut Acrylic

These robot cubes, called BOXZ, use an interesting interlocking part design to mount and protect the parts within. But to really make them pop you need to color and apply your own papercraft skins.

The actual hardware is quite simple. They’ve used an Arduino, along with motor driver and Bluetooth shields, to control a set of geared DC motors. There’s a battery pack which holds four AA cells and a pair of servo motors which seem to be there to act as arms. This base can then be adorned with sensors to add functionality (line following, wall following, obstacle avoidance, etc.).

Despite the simple appearance of the cube, the chassis is the most complicated part. It uses sixteen pieces of acrylic, but they may also be hand cut from cardboard by printing out templates and gluing them onto the material. The parts are designed with interlocking tabs which we often see used on laser-cut wooden box parts.

We’ve embedded the video presentation of BOXZ after the break.

Continue reading “Qube Robots Use Well-designed Laser-cut Acrylic”

S.H.I.E.L.D. Heli Carrier Brought To Life

This fantastic work by [Native18] shows a quad copter reproduction of the Heli carrier used by the Avengers. Following this thread (translated), you can follow along his thought process as well as his build process as he proceeds. The construction is mainly paper and lightweight foam, but it still manages to float and even take off from the water.

We’ve seen other aircraft carrier designs before, but not many this well polished, and none that took off from water.

[via technabob]

Continue reading “S.H.I.E.L.D. Heli Carrier Brought To Life”