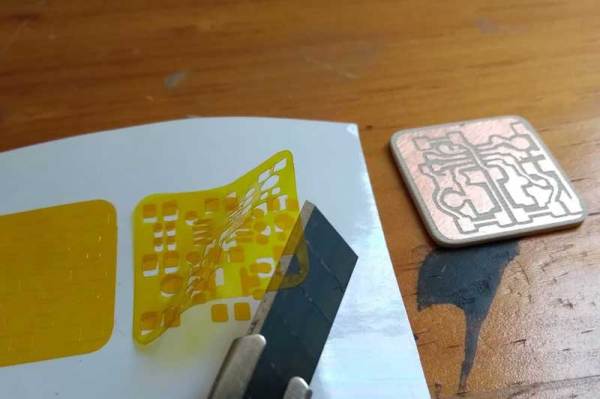
You might assume that you need a lot of expensive stuff to make your own PCBs, but that isn’t the case: you can do it with a vinyl cutter and a few common chemicals and tools. [Emiliano Valencia] has laid out the entire process. While we’ve seen plenty of make your own PCB guides before, this one goes a bit further as it covers using the vinyl cutter to make solder masks, so you can use it for surface mount designs.
The end result of the process that [Emilano] lays out is the tinyDice, a cute little electronic die that can fit on a keyring. The whole process is very well written up, and even experienced PCB makers will probably find a few useful tricks here.
The really interesting part for us was using the vinyl cutter to make three parts of the process: the etching mask, the solder mask that protects the traces and the solder stencil that applies the solder to the pads for surface mounting. Continue reading “Making PCBs With A Vinyl Cutter”→
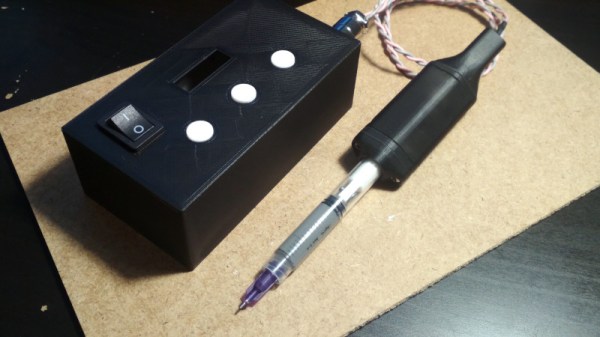
When doing surface-mount assembly you can certainly use a soldering iron in the traditional way, but it’s far more convenient to cover the pads with solder paste, place the components, and bake the board in a reflow oven. If you’re lucky enough to have a precut stencil this can be done in one go, otherwise a tiny blob of paste must be laboriously placed on each pad by hand. [Kevarek] has made this a bit easier by designing a low-cost handheld solder paste dispenser.
The unit takes the form of a handheld 3D printed wand containing a geared motor and a threaded shaft, that engages with a syringe full of paste clamped onto its end. There’s a control box powered by an STM32 microcontroller that not only allows adjustment of flow rate, but provides advanced features such as performing a slight retraction at the end of dispensing to avoid excess paste. There’s a push-button on the wand for control, as well as a set on the control box to adjust its parameters.
If you’ve ever handled solder paste, you’ll know it can be a uniquely annoying and finicky substance. Either it’s too stiff and clumps together, or too runny and spreads out. No doubt some readers are lucky enough to always have fresh paste of the highest quality to hand, but too often a hackerspace will have a tub of grey goop with uncertain provenance. We like this tool, and while it won’t make up for poor quality or badly stored paste, at least it’ll make applying paste a breeze.
Even for the simplest of products, production at scale can be big challenge. For example, you might find yourself spending many hours manually counting and cutting strips of component tape to go with the DIY electronics kit your selling on Tindie. [Tom Keddie] found himself in similar position some time ago, and built himself an automated component counter and tape cutter.
[Tom] posted the video of his old machine (see it after the break) after a call for help from another Twitter user who found himself with a lot of component strips to cut. The frame of the machine is made from 20×20 aluminium extrusions and laser cut plexiglass. The tape is pulled off the reel by a stepper motor using a 3D printed sprocket, with the tape held on by Lego wheel and tension spring. A second idler sprocket with tensioner is used to guide the tape through two photo-interrupters that can count holes in opaque tape or the components in clear tape. The cutter itself it an Exacto blade mounted on a wooden block in a guillotine-like arrangement, driven by another stepper motor and a threaded rod as lead screw. Everything is of course controlled by an Arduino. Although not used any more, [Tom] says it worked very well in its day.
The availability of cheap laser cutting, 3D printing and components like aluminium extrusions and stepper motors have really made it possible for anyone to add some automation to production in the home workshop. You won’t be surprised that we’ve seen something like this before, but we’ve also seen similar machines for wiring prep and through-hole resistors. Let us hear your production hacks in the comments, or drop us a tip if you’ve documented it!
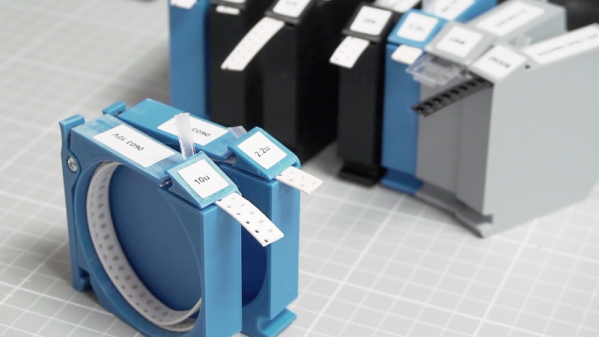
Chances are pretty good that you’ve got a box or a bin somewhere in your shop with coils of SMD component tapes in it. If you’re lucky, the coils are somewhat contained in their conductive Mylar bags; if you’re more like us, the tapes are flopping around loose in an attempt to seemingly tie themselves together. In either case, these 3D-printed SMD magazines will bring a little order to the chaos, and make board assembly a little bit easier.
When we saw [Robin Reiter]’s build, we thought these would be cassettes for some sort of pick-and-place machine. But while they certainly look like they could be adapted to an automated PnP setup, [Robin]’s main goal was to provide organized storage for loose tapes. Each magazine has a circular reservoir to hold the coiled tape, with an exit slot at the front and a wedge that directs the cover tape in the opposite direction. This removes the cover tape to expose the components, clears it away from the pickup area, and as a bonus, allows the component tape to be advanced just by pulling back on the cover. Each magazine has a spring-loaded latch that clips onto a base that looks a bit like a DIN-rail; the weighted base holds several magazines and makes it easy to set up a manual pick-and-place session. The video below shows all the details.
For certain personality types, this really scratches an itch. We love the modular design, and the organization that these would bring to our shop would really help clean things up a bit. And if [Robin] were ever to take this design to the next level, adding something like this could be useful.
Just a section from a render of the board in question. It’s a daunting task for anyone facing it with a set of tweezers or a vacuum pencil.
A friend of ours here at Hackaday has an audacious design in the works that we hope will one day become a prototype that we can feature here. That day may be a little while coming though, because it has somewhere close to a thousand of the smaller SMD components in multiple repeated blocks on a modestly sized board, and his quote from a Chinese board house for assembly is eye-watering. He lacks a pick-and-place machine of his own, and unsurprisingly the idea of doing the job by hand is a little daunting.
We can certainly feel his pain, for in the past we’ve been there. The job described in the linked article had a similar number of components with much more variety and on a much larger board, but still took two experienced engineers all day and into the night to populate. The solder paste had started to spread by the end, morphing from clearly defined blocks to an indistinct mush often covering more than one pad. Our eyes meanwhile were somewhat fatigued by the experience, and it’s not something any sane person would wish to repeat.
Mulling over our friend’s board and comparing it with the experience related above, are we on the edge of what is possible with hand pick-and-place, or should we be working at the next level? Board assembly is a finely judged matter of economics at a commercial level, but when at a one-off personal construction level the option of paying for assembly just isn’t there, is there a practical limit to the scale of the task? Where do you, our readers, draw the line? We’d love to hear your views.
Meanwhile our friend’s audacious project is still shrouded in a bit of secrecy, but we’ll continue to encourage him to show it to the world. It’s not often that you look at a circuit diagram and think “I wish I’d thought of that!”, but from what we’ve seen this fits the category. If he pulls it off then we’ll bring you the result.
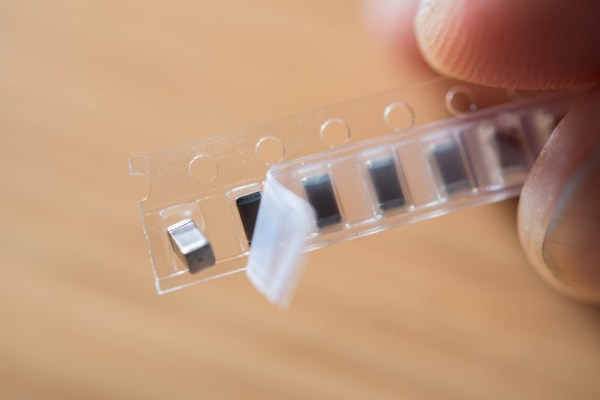
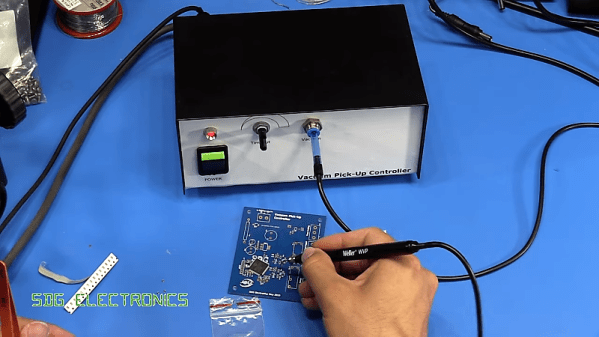
The tapes that surface-mount devices come in may be optimized for automated pick and place, but woe betide those who try to dig components out manually. No matter what size package, the well on the tape seems to be just a wee bit too small to allow tweezers to grip it, so you end up picking the thing up edgewise or worse, pinching too tight and launching the tiny thing into The Void. We hope you ordered extra.
Such circumstances are why vacuum handlers were invented, but useful as they are for picking and placing SMDs, they aren’t perfect. [Steve Gardener]’s sub-optimal experience with such tools led him to build this custom vacuum pick-and-place tool. It’s based on an off-the-shelf Weller unit, of which only the handpiece remains. A bigger, more powerful vacuum pump is joined in a custom enclosure by a PCB with a PIC18F13K22 microcontroller, a power supply, a solenoid to control the vacuum, and a relay to switch the pump. A footswitch starts the pump and closes the vacuum vent; letting off the pedal opens the vent to drop the part, while the pump keeps running for a variable time. This lets him rapidly work through a series of parts without having to build vacuum back up between picks. The video below shows the build and the tool in action.
We love the idea of this tool, and the polished look is pretty slick too. If manual pick-and-place isn’t for you, though, maybe converting a 3D-printer into an automated PnP is something to check out.
Radioactivity stirs up a lot of anxiety, partially because ionizing radiation is undetectable by any of the senses we were born with. Anytime radiation makes the news, there is a surge of people worried about their exposure levels and a lack of quick and accurate answers. Doctors are flooded with calls, detection devices become scarce, and fraudsters swoop in to make a quick buck. Recognizing the need for a better way, researchers are devising methods to measure cumulative exposure experienced by commodity surface mount resistors.
Cumulative exposure is typically tracked by wearing a dosimeter a.k.a. “radiation badge”. It is standard operating procedure for people working with nuclear material to wear them. But in the aftermath of what researchers euphemistically call “a nuclear event” there will be an urgent need to determine exposure for a large number of people who were not wearing dosimeters. Fortunately, many people today do wear personal electronics full of components made with high purity ingredients to tightly controlled tolerances. The resistor is the simplest and most common part, and we can hack a dosimeter with them.
Lab experiments established that SMD resistors will reveal their history of radiation exposure under high heat. Not to the accuracy of established dosimetry techniques, but more than good enough to differentiate people who need immediate medical attention from those who need to be monitored and, hopefully, reassure people in neither of those categories. Today’s technique is a destructive test as it requires removing resistors from the device and heating them well above their maximum temperature, but research is still ongoing in this field of knowledge we hope we’ll never need.