Tracking Drone Flight Path Via Video, Using Cameras We Can Get

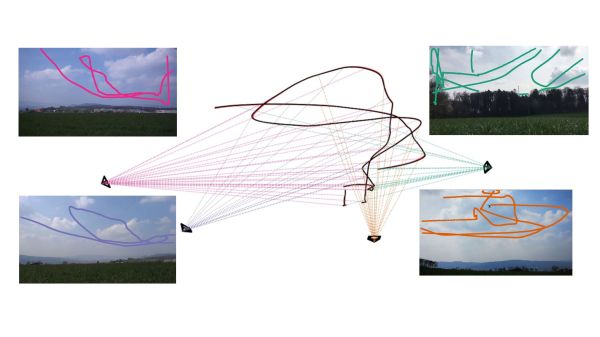
Calculating three-dimensional position from two-dimensional projections are literal textbook examples in geometry, but those examples are the “assume a spherical cow” type of simplifications. Applicable only in an ideal world where the projections are made with mathematically perfect cameras at precisely known locations with infinite resolution. Making things work in the real world is a lot harder. But not only have [Jingtong Li, Jesse Murray et al.] worked through the math of tracking a drone’s 3D flight from 2D video, they’ve released their MultiViewUnsynch software on GitHub so we can all play with it.

Instead of laboratory grade optical instruments, the cameras used in these experiments are available at our local consumer electronics store. A table in their paper Reconstruction of 3D Flight Trajectories from Ad-Hoc Camera Networks (arXiv:2003.04784) listed several Huawei cell phone cameras, a few Sony digital cameras, and a GoPro 3. Video cameras don’t need to be placed in any particular arrangement, because positions are calculated from their video footage. Correlating overlapping footage from dissimilar cameras is a challenge all in itself, since these cameras record at varying framerates ranging from 25 to 59.94 frames per second. Furthermore, these cameras all have rolling shutters, which adds an extra variable as scanlines in a frame are taken at slightly different times. This is not an easy problem.

There is a lot of interest in tracking drone flights, especially those flying where they are not welcome. And not everyone have the budget for high-end equipment or the permission to emit electromagnetic signals. MultiViewUnsynch is not quite there yet, as it tracks a single target and video files were processed afterwards. The eventual goal is to evolve this capability to track multiple targets on live video, and hopefully help reduce frustrating public embarrassments.

[IROS 2020 Presentation video (duration 14:45) requires free registration, available until at least Nov. 25th 2020.]

A More Open Raspberry Pi Camera Stack With Libcamera

As open as the Raspberry Pi Foundation has been about their beloved products, they would be the first to admit there’s always more work to be done: Getting a Pi up and running still requires many closed proprietary components. But the foundation works to chip away at it bit by bit, and one of the latest steps is the release of a camera stack built on libcamera.

Most Linux applications interact with the camera via V4L2 or a similar API. These established interfaces were designed back when camera control was limited and consisted of a few simple hardware settings. Today we have far more sophisticated computational techniques for digital photography and video. Algorithms have outgrown dedicated hardware, transforming into software modules that take advantage of CPU and/or GPU processing. In practice, this trend meant bigger and bigger opaque monolithic pieces of proprietary code. Every one a mix of “secret sauce” algorithms commingling with common overhead code wastefully duplicated for each new blob.

We expect camera makers will continue to devise proprietary specialties as they seek a competitive advantage. Fortunately, some of them see benefit in an open-source framework to help break up those monoliths into more manageable pieces, letting them focus on just their own specialized parts. Leveraging something like libcamera for the remainder can reduce their software development workload, leading to faster time to market, lower support cost, and associated benefits to the bottom line that motivates adoption by corporations.

But like every new interface design borne of a grandiose vision, there’s a chicken-and-egg problem. Application developers won’t consume it if there’s no hardware, and hardware manufacturers won’t implement it if no applications use it. For the consumer side, libcamera has modules to interop with V4L2 and other popular interfaces. For the hardware side, it would be useful to have a company with wide reach who believes it is useful to open what they can and isolate the pieces they can’t. This is where the Raspberry Pi foundation found a fit.

The initial release doesn’t support their new High-Quality Camera Module though that is promised soon. In the short term, there is still a lot of work to be done, but we are excited about the long term possibilities. If libcamera can indeed lower the barrier to entry, it would encourage innovation and expanding the set of cameras beyond the officially supported list. We certainly have no shortage of offbeat camera sensor ideas around here, from a 1-kilopixel camera sensor to a decapped DRAM chip.

[via Hackster.io]

Air Knife Keeps GoPro Lens Clean In Messy Environments

Before the GoPro, shooting video of messy, fast-paced, or dangerous things was very different. There were commercial sports camera rigs and various industrial solutions, but the GoPro, with its waterproof housings and diminutive size, was the revolutionary, stick-it-anywhere camera. Despite this, the team at [tarkka] were having issues with the lens getting covered in coolant while shooting videos of their CNC machining projects. To solve this, they created an air knife to clean the lens.

The air knife consists of a wide, flat nozzle that is designed to blow fluid off of the lens. It’s a tidy 3D printed design, which wraps around the GoPro housing. Felt pads are used to give a snug fit, so the device simply slides into place and stays there. The device is fed from a hand-operated nozzle at present, though the team notes that this could be changed to a more permanent connection.

In testing, the device has performed well, even when under a constant barrage of coolant spray. This should make shooting CNC videos much easier for the team, who were formerly required to manually wipe the camera down several times during a shoot. The build was actually inspired by an earlier build by [Edge Precision], which used machined aluminum parts to create a similar tool.

The GoPro remains a popular camera wherever a small and rugged device is required. Consider mounting one to a toy car for a weekend’s worth of fun. Video after the break.

Continue reading “Air Knife Keeps GoPro Lens Clean In Messy Environments”

Real-Time Polarimetric Imager From 1980s Tech

It’s easy to dismiss decades old electronics as effectively e-waste. With the rapid advancements and plummeting prices of modern technology, most old hardware is little more than a historical curiosity at this point. For example, why would anyone purchase something as esoteric as 1980-era video production equipment in 2018? A cheap burner phone could take better images, and if you’re looking to get video in your projects you’d be better off getting a webcam or a Raspberry Pi camera module.

But occasionally the old ways of doing things offer possibilities that modern methods don’t. This fascinating white paper from [David Prutchi] describes in intricate detail how a 1982 JVC KY-1900 professional video camera purchased for $50 on eBay was turned into a polarimetric imager. The end result isn’t perfect, but considering such a device would normally carry a ~$20,000 price tag, it’s good enough that anyone looking to explore the concept of polarized video should probably get ready to open eBay in a new tab.

Likely many readers are not familiar with polarimetric imagers, it’s not exactly the kind of thing they carry at Best Buy. Put simply, it’s a device that allows the user to visualize the polarization of light in a given scene. [David] is interested in the technology as, among other things, it can be used to detect man-made materials against a natural backdrop; offering a potential method for detecting mines and other hidden explosives. He presented a fascinating talk on the subject at the 2015 Hackaday SuperConference, and DOLpi, his attempt at building a low-cost polarimetric imager with the Raspberry Pi, got him a fifth place win in that year’s Hackaday Prize.

While he got good results with his Raspberry Pi solution, it took several seconds to generate a single frame of the image. To be practical, it needed to be much faster. [David] found his solution in an unlikely place, the design of 1980’s portable video cameras. These cameras made use of a dichroic beamsplitter to separate incoming light into red, blue, and green images; and in turn, each color image was fed into a dedicated sensor by way of mirrors. By replacing the beamsplitter assembly with a new 3D printed version that integrates polarization filters, each sensor now receives an image that corresponds to 0, 45, and 90 degrees polarization.

With the modification complete, the camera now generates real-time video that shows the angle of polarization as false color. [David] notes that the color reproduction and resolution is quite poor due to the nature of 30+ year old video technology, but that overall it’s a fair trade-off for running at 30 frames per second.

In another recent project, [David] found a way to hack optics onto a consumer-level thermal imaging camera. It’s becoming abundantly clear that he’s not a big fan of leaving hardware in an unmodified state.

Sony VTR with replacement foam brushes

Resurrecting A 1960’s VTR With Foam

Nearly fifty years back, Sony launched the DVC-2400, their first consumer grade video camera. This unit weighed in at 10 pounds, and recorded only 20 minutes of footage per reel. It left something to be desired for $1250, or nearly $9000 in today’s dollars.

[NeXT] got his hands on one of these camera kits, and began bringing it back to life. While all the pieces were included, the Video Tape Recorder (VTR), which is used to play back the footage, didn’t power up. A little poking found a dead transistor. After determining a modern replacement part, the voltages checked out. However, the drum still wasn’t spinning.

Further disassembly found that the drum’s DC motor was made on the cheap, using a foam instead of springs to apply pressure on the brushes. This foam had worn out and lost its springy qualities, so no electrical contact was made. New foam was cut out as a replacement. Once reassembled, the drum spun successfully. After some adjustment, the VTR was running at the correct speed once again.

With this working, the VTR should be ready to go. However, camera still isn’t working, so we’re awaiting a part 2.

This Analog Cambot Plays Outside The Lines

There are quite a few flavors of line following robot. No matter how they’re made, most are built for speed and accuracy. The Cambot by [Jorge Fernandez] however makes use of a traditional video camera to read visual input instead of the reflective sensors we’re used to seeing in these types of robots. Because of this it lacks those swift and agile qualities, but scores points with its unique analog design, over-sized tricycle wheels, and stylish RCA jacks poking out on the side.

Coupled with a PIC 16F84A microcontroller, [Fernandez] divides the video input from the camera into 625 lines. The PIC is responsible for scanning horizontally across these lines and translating the proportions of black and white into PWM pulses. The duration these proportions are seen by the camera determines the PWM frequency fed to the left and right servo motors driving the robot.

As far as line-followers go, this is a refreshing retro approach to the concept. [Hernandez] outlines the finesse about driving his cambot on his blog (an English translation can be read here) and provides a complete schematic for those who are interested in whipping up their own quirky little machine.

Continue reading “This Analog Cambot Plays Outside The Lines”

USB Microscope Used For Soldering Very Small Things

solder

Lasik eye surgery is pretty common these days, but there are of course easier and cheaper ways to solder SMD components. [techpawpanda] wanted a video camera to see what was going on when he placed and soldered very tiny components on his board, but commercial SMD video cameras were terribly expensive. He wound up using a USB microscope to place and solder these tiny parts, and we’re thinking his SMD soldering station is the bee’s knees.

[techpawpanda]’s video-based SMD station is built around a USB microscope available at the usual online retailers for $40. This camera is mounted on a wooden base with a USB hub allowing the camera to be plugged in along with a few USB LED lights and a USB fan for a rudimentary form of fume extraction.

The results are impressive – even at 11x magnification, [techpawpanda] can put paste on pads and place even the smallest SMD parts. All this in a device that is small enough to fit in a shoe box, or be tucked neatly away whenever it is not needed.