A visually accurate replica of the MCM/70 computer, an all in one system with a keyboard, dual cassette drives and a small one line display

MCM/70 Replica Embodies Proud Canadian Heritage

When a vintage computer is all but unobtanium, software emulation is often all that remains. Unless you are [Michael Gardi], who saw an opportunity to reproduce Canada’s home-grown MCM/70 microcomputer using a combination of software emulation and modern hardware.

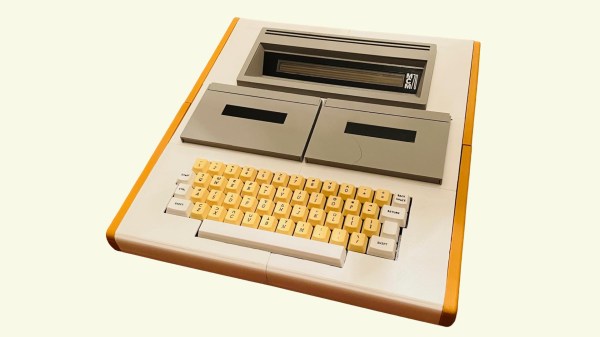
Short of building a brand new MCM/70 from the original schematics, this faithful facsimile of the MCM/70 does everything it can to pay homage to the original machine. The foundations of this project can be attributed to the York University Computer Museum (YUCoM) MCM/70E emulator, highly regarded for its “historical accuracy”. The MCM/70 used dual cassette tapes for storage and a funky 32-character dot matrix plasma display, which is all reproduced in software (other versions dropped one of the cassette drives for a modem, bleeding edge innovation for 1974 microcomputing).

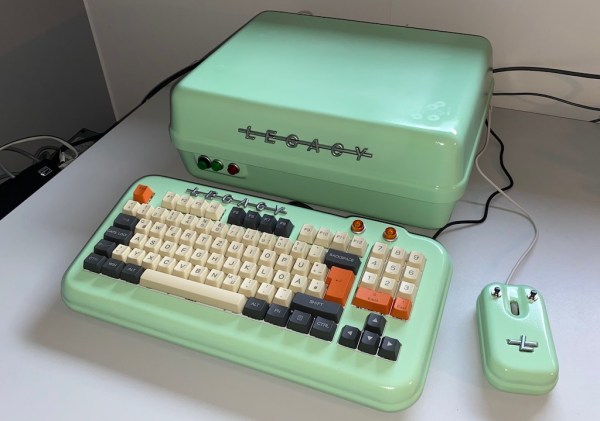
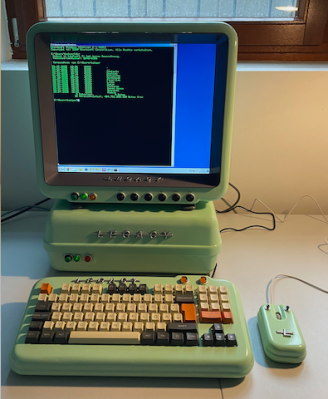
From here, [Michael] set off to assemble the various physical components of the original computer. The chassis itself was built from scratch using a mixture of 3D printing and traditional woodwork. The high-voltage plasma display was recreated using four HCMS-2972 dot matrix modules, which minor compromises. The original computer used display memory as extra storage when executing instructions, which created a sporadic blinkenlights effect on the original display. This new display unfortunately won’t reproduce this ‘thinking’ pattern, but it’s a small sacrifice.

Similarly, the original keyboard was going to be challenging to replicate with 100% accuracy, so a brand-new recreation of an Ohio Scientific computer keyboard was used instead. The layouts are extremely similar, and anyone except your most committed Canadian retro computing enthusiasts probably wouldn’t notice the difference. Being a modern recreation of a vintage keyboard, this was relatively easy to source. A set of custom-made keycaps with APL legends really helped sell the replica.

And while working dual cassette drives would have brought this project home, it’s commendable that [Michael] has created ‘working’ cassette drives using 3D printed cassettes and some magnetic magic using hall effect sensors to identify the loaded cassette. The emulator incorporates three virtual cassette tapes which made this solution possible.

If this all sounds familiar, it might be because this project was based on a superb Hackaday writeup of the MCM/70. A truly innovative computer for its time, the story behind Micro Computer Machines (not to be confused with the toy cars) is a fascinating tale, and the write-up is worth a read if you haven’t seen it already.

Continue reading “MCM/70 Replica Embodies Proud Canadian Heritage”

Showing the vintage PC, painted in 50s color scheme, matching custom-built keyboard and mouse next to it

Workbench PC With A 50s Twist

[HolGer71] had a Mini-ITX Intel Atom-powered mainboard that he found useful for its vintage interfaces like COM and LPT. On a whim, he decided to give it even more vintage of a look – transforming it into a device more akin to a 50s home appliance, complete with a fitting monitor, mouse and keyboard. The project, dubbed Legacy-PC Computer Case, imitates the sheet metal construction masterfully in its 3D-printed design. That’s not all there is to it, either – everything is open-source, and there is enough documentation that you can build your own!

[HolGer71] starts with general printing and finishing advice, and goes through every part of the setup from there. The mainboard-holding case builds around a small miniITX case frame, enclosing it and adding extensions for connectors and lightbulbs. For the monitor, he built a new frame around an old VGA-equipped 17″ desktop screen – most certainly easy to find. The keyboard‘s an inexpensive one yet equipped with mechanical switches, and the mouse‘s an old Fujitsu-Siemens, but of the kind you’d see manufactured under different labels. All in all, this combines quite generic components into a trusty and stylish device for your workshop needs.

Equipped with Windows 7 as, apparently, the earliest supported version, this machine is now on desk duty – ready to run obscure software for old programming dongles, and look absolutely fabulous while doing so. It’s rare that we see such effort put into creating designs from scratch and sharing them with the community – most of the time, we see PCs built into already existing devices, like this vintage radio, or a benchtop logic analyzer.

TRS-80 Model II Lives Again

A lot of people had a Radio Shack TRS-80 Model I. This was a “home computer” built into a keyboard that needed an external monitor or TV set. Later, Radio Shack would update the computer to a model III which was a popular “all in one” option with a monitor and even space for — gasp — floppy disks. But the Model II was not nearly as common. The reason? It was aimed at businesses and priced accordingly. [Adrian] got a Model II that was in terrible shape and has been bringing it back to life. You can see the video of how he’s done with it, below.

The Model II was similar to the older “Trash 80” which had been used — to Radio Shack’s surprise — quite often by businesses. But it had more sophisticated features including a 4MHz CPU — blistering speed for those days. It also had an 80×25 text display and a 500K 8-inch floppy drive. There were also serial and printer ports standard.

There were a few interesting features. The floppy drive’s spindle ran on AC power and if the computer was on, the disk was spinning. In addition, there was bank switching so you could go beyond 64K and also you didn’t have to share your running memory with the video display. In theory, the machine could go beyond 64K since half the memory was bank switchable. In practice, the early models didn’t have enough expansion space to handle more than 64K physically.

Continue reading “TRS-80 Model II Lives Again”

Compaq 286 Laptop Gets Raspberry Transfusion

We know, we know. A lot of you don’t like projects that consist of gutting a vintage computer (or anything else, for that matter) and replacing its internals with modern electronics. But can you really look at the clunky Compaq LTE 286 laptop that [Dmitry Brant] hacked a Raspberry Pi into and honestly say it’s a machine worthy of historical preservation? The 30+ year old laptop had all the design cues of a saltine cracker, and the performance to match. At least now with a Pi under the hood, you can play some newer games on the thing.

Besides, [Dmitry] says the machine was damaged beyond the point of economical repair anyway. The only stock hardware that’s left beyond the case itself is the keyboard, which he was able to get talking USB thanks to a Teensy microcontroller. It’s not immediately clear if any attempt has been made to get the switches above the keyboard working, but we imagine it wouldn’t be too hard to tie them into some spare GPIO pins on the MCU for a bit of added authenticity.

The bottom half of the machine was cleared out to the point of it literally being a husk of its former self, which gave him plenty of room to hold the Pi 3B and the HDMI driver board that controls the new 9-inch TFT display. Speaking of which, the new panel was a close enough match to the original’s aspect ratio that only minor bezel modifications were required to get it to fit. The modern LCD makes for a massive improvement over the original, without looking too conspicuous.

While there’s still plenty of available space inside the Compaq, [Dmitry] has opted not to include an onboard battery at this time. Instead, power is provided to the Pi and associated hardware through a bulkhead mount USB connector on the side of the machine. It looks like it wouldn’t be too much trouble to add support for an off-the-shelf USB battery bank, as we recently saw with a particularly well engineered retro-futuristic folding cyberdeck, but far from us to tell a hacker what they should do with their bespoke computer.

A computer program written in basic next to a modular synthesizer with many switches and lights

Modular Synth Pairs Perfectly With The Apple II

We have a soft spot for synthesizers – seriously, who doesn’t? So when [Joshua Coleman] combined his retro-looking DIY modular synth with the equally retro Apple II computer, we just had to share it with you.

The two machines are paired using a vintage digital-to-analog logic controller pack. This DAC was originally used to control model trains using your Apple II – something that we now desperately need to see in action. The pack can output voltages between 0 and 2.55 V at 8-bit resolution (or 256 steps), which is plenty for a retro synth.

With the card installed in Slot 7 of the Apple II and the DAC wired through to the synth’s CV/gate, it’s then a trivial matter of writing POKE statements in Applesoft BASIC to control the synth. The video after the break demonstrates playing a simple melody, as well as how one might use the Apple II keyboard to ‘play’ the synth in real time.

If you’re interested in building your own, the video below has all the information needed, as well as helpful advice on where to find a DAC for your preferred model of vintage computer. If all that doesn’t tickle your musical fancy, make sure to check out our coverage on the Game Boy MIDI synth, or perhaps this peculiar synth and visualizer combo.

Continue reading “Modular Synth Pairs Perfectly With The Apple II”

Queen Victoria’s Secret (Teletype And COSMAC Elf)

We don’t really think anyone in the Victorian era had a COSMAC Elf — the homebrew computer based around the RCA 1802 CPU. But if they did, it might have looked like [Daniel Ross’] steampunk recreation of the system that includes an appropriate-looking teletype device. You can see the thing in a series of videos, below. There are actually quite a few videos showing different parts of the system, along with several blog postings stretching back a few months.

A magic eye tube doesn’t look out of place in this build. We especially liked the glass tube displays and the speaker, although we thought the USS Enterprise looked out of place with the technology based on stone knives and bearskins, to paraphrase Mr. Spock. On the plus side, the VFD displays have the right glowing look, although a Nixie would have been pretty good there, too.

The videos don’t have much detail, but the blog posts do if you wanted to attempt something similar. Honestly, 1802 system design is pretty easy thanks to the its on-chip DMA that allows you to load memory from switches with no actual software like a monitor. The teletype started out life as a Remington #7 from around 1900, although another newer machine donated parts to get everything working. It is a testament to how well things were built then that it took as much abuse as it did and still has working parts.

We have a soft spot for the 1802 — it was a very good design for its time. We’ve even gone as far as to simulate it.

Continue reading “Queen Victoria’s Secret (Teletype And COSMAC Elf)”

Overall view of Alta's Projects cyberdeck

Cyberdeck Running On Apple Silicon, Though An A12 Not An M1

[Alta’s Projects] built a two-in-one cyberdeck that not only contains the requisite Raspberry Pi (a zero in this case) but also eschews a dumb LCD and uses an iPad mini 5 for a display.

We need to address the donor case right away. Some likely see this as heresy, and while we love to see vintage equipment lovingly restored, upcycling warms our hearts and keeps mass-produced plastic out of landfills too. The 1991 AST 386SX/20 notebook in question went for $45 on an online auction and likely was never destined for a computer museum.

Why is Cupertino’s iOS anywhere near a cyberdeck? If a touch screen is better than an LCD panel, a tablet with a full OS behind it must be even better. You might even see this as the natural outgrowth of tablet cases first gaining keyboards and then trackpads. We weren’t aware that either was possible without jailbreaking, but [Alta’s Projects] simply used a lighting-to-USB dongle and a mini USB hub to connect the custom split keyboard to the iPad and splurged on an Apple Magic Trackpad for seamless and wireless multi-touch input.

Alta's Projects Cyberdeck Internal USB Wiring
Internal USB Wiring, Charging Circuit, and Pi Zero

The video build (after the break) is light on details, but a quick fun watch with a parts list in the description. It has a charming casual feel that mirrors the refreshingly improvisational approach that [Altair’s Projects] takes to the build. We appreciate the nod to this cyberdeck from [Tinfoil_Haberdashery] who’s split keyboard and offset display immediately sprang to mind for us too. The references to an imagined “dystopian future” excuse the rough finish of some of the Dremel cuts and epoxy assembly. That said, apocalypse or not, the magnets mounted at both ends of the linear slide certainly are a nice touch.

Continue reading “Cyberdeck Running On Apple Silicon, Though An A12 Not An M1”