Resurrecting A Cellphone With Blown USB Circuitry

[Script] is pretty lucky. One of the engineers who designed his cellphone included over-voltage protection in the circuit. Of course you probably wouldn’t know about this if there wasn’t a service schematic available. But a bit of searching around let him resurrect the fried USB segment of his Nokia N900.

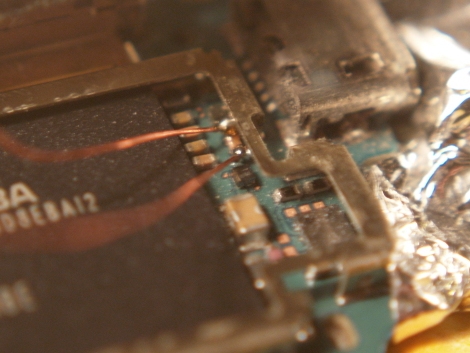
Now [Script] has been experimenting with portable solar power like the system featured at 25C3 a few years back. Unfortunately he made an error which routed 12V into the USB connector’s 5V rail. After this unfortunate mistake the phone would not longer connect via USB, or charge the battery. Luickly the N900 is a favorite with the hacker community (you can see all kinds of N900 related projects here at Hackaday) and [Script] found his way to their N900 Schematic page. Digging into page four he found part F5300 which is labeled 2.0A. He removed the PCB and shielding, and tested the part with a multimeter to confirm it was blown. A quick wire bridge got the phone charging again, but [Script] plans to position a new fuse as soon as he can source the part.

Who says these devices aren’t user serviceable? If we could just get our hands on more service schematics perhaps our gear would last longer.

Collecting Radon Data In The Name Of Science And Safety

radon-data-collector

When [Chris Nafis] built an addition onto his historical home he found that a Radon problem, previously mitigated with plenty of concrete, seemed to rear its ugly head yet again. He eventually resigned himself to installing a Radon fan and detector – the latter of which offered no way to store measurement data. He wanted to get a better feel for the short and long-term Radon measurements in his house, in hopes of finding some correlation between temperature, moisture levels, and the total amount of Radon emitted from the ground.

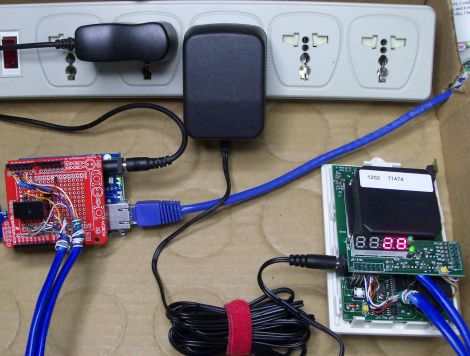
To do this, he disassembled a pair of Radon detectors located in different parts of his house, each of which he wired up to an Arduino. Using his oscilloscope to determine which PCB leads controlled the different LED segments on the displays, he quickly had the Arduinos scraping measurement data from the sensors. [Chris] figured the best way to keep track of his data was to do it online, so he interfaced the microcontrollers with Pachube, where he can easily analyze his historical readings.

An additional goal he set for himself is to trigger the Radon fan only when levels start rising in order to save a little on his electric bill. With his data logging operation in full swing, we think it should be a easy task to accomplish.

Building An Artificial Heart With Ferrofluids

Here’s something we thought we’d never see on Hackaday. [Chris Suprock] is developing an artificial heart he calls Steel Heart. It’s an artificial heart powered by electromagnets and ferrofluids.

The idea behind [Chris]’ artificial heart is ingenious in its simplicity. An elastic membrane is stretched across a frame and a magnetic liquid (or ferrofluid, if you prefer) is poured across the membrane. An electromagnet is activated and the membrane stretches out, simulating the beating of a heart. Put a few of these together and you’ve got a compact, biologically inert pump that’s perfect for replacing an aging ticker.

[Chris]’ plan to use ferrofluids and electromagnets as an artificial heart give us pause to actually think about what he’s done here. Previously, artificial hearts used either pneumatics or motors to pump blood throughout the body. Pneumatic pumps required plastic tubes coming out of the body – not a satisfactory long-term solution. Motor-driven pumps can rupture red blood cells leading to hemolysis. Using ferrofluids and an elastic membrane allows for the best of both worlds – undamaged blood cells and transdermal induction charging.

Not only is [Chris] designing a freaking artificial heart, he also came up with a useful application of ferrofluids. We were nearly ready to write off magnetic particles suspended in a liquid as a cool science toy or artistic inspiration. You can check out [Chris]’ indiegogo video with a demo of the ferrofluid pump in action after the break.

Continue reading “Building An Artificial Heart With Ferrofluids”

[Aaron] Shows Us What Life Would Be Like If [Bob Vila] Started Hacking Headphones

construction-headphones

[Aaron Horeth] had a pair of headphones that had seen better days, and before he tossed them out, he realized that he could use them to build a set of custom cans. He had always wanted a pair of headphones with a detachable cord to prevent damage when tripped over, and thought that his old set would be the perfect donor.

He swung by his local hardware store to peruse their collection of construction earmuffs, eventually finding a set that looked decent and didn’t cost an arm and a leg. Using construction earmuffs as the framework for his headphones gave him the durability he was looking for with the added bonus of being designed to deaden extraneous noise. Once he got them home he pulled the drivers from his old set of headphones installing them into the earmuffs, but not before he wired them up to support a breakaway input cable.

There’s no doubt that the modifications are simple, but we imagine they come in pretty handy when tinkering around the shop.

Fool Me Once… Or As Often As Possible

There was a time when posting a fake story was fun for all involved. But in this age of constant trolling, it’s near impossible to pull it off with our savvy readership. Instead of letting you down with a really poorly advised how-to, we’re putting in a call to hear what you’ve got in your own bag of pranks. Consider this another holiday theme and tell us what you’re planning for April Fools’ Day.

As always, we’re looking for your own posts on the topic. We always want to give credit where it’s due so post your prank on your blog or other favorite corner of the interwebs and send us the link. Don’t have a place to put it? You can always start a thread in our project log forum, or check out this for additional spots to stake your claim.

In case you need some help coming up with something, we’ve got a few examples to get you thinking. You can go the route of fake video demonstrations like this Gmail gestures hoax, or the more recent Human BirdWings Project. But those require a lot of production time and a clever seed idea. Perhaps something really simple will go a long way with the roommates. We’re thinking soap covered in clear nail polish to prevent sudsing, or perhaps you want to reconfigure your router to render pages upside down. We can’t wait to see what you come up with!

Brute Force A Password Protected PDF Using The BeagleBone

The biggest benefit to using the BeagleBone is it’s 700 MHz ARM processor. If you’re just messing around with basic I/O that power is going unused, but [Nuno Alves] is taking advantage of its power. He built a PDF password cracker based on the $85 development board.

We recently saw how easy it is to perform basic I/O using the BeagleBone. Those techniques are in play here, used to drive a character LCD and sample a button input from the breadboard circuit. [Nuno] even published separate posts for each of these peripheral features.

The password protected PDF file is passed to the device on a thumb drive. Since the BeagleBone is running embedded Linux you don’t need to mess around with figuring out how to read from the device. A click of the button starts the process. Currently the code just uses a brute force attack which can test more than 6000 four-character passwords per second.  This is quite slow for any password more than four or five characters long, but [Nuno] does mention the possibility of running several ARM processors in parallel, or using a dictionary (or rainbow table) to speed things up. Either way it’s an interesting project to try on the hardware. You can see his video demo of the device after the break.

Continue reading “Brute Force A Password Protected PDF Using The BeagleBone”

Digital Gaming Table Made With No Smoke, Just A Mirror

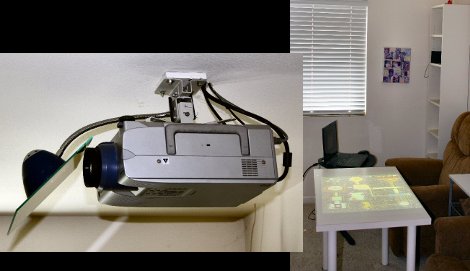
The concept of having a digital gaming table got stuck in [RobotGuy’s] mind over the weekend and he managed to whip this up in no time using materials on hand. He already had a ceiling-mounted projector which just happens to reside immediately above the space occupied by his coffee table. By swapping that piece of furniture out for a white Ikea table, and adding a mirror to the projector he now has the virtual gaming surface he was looking for. The mirror mount is nothing more than a desk lamp that includes a spring clamp and flexible neck. He hot glued the piece of mirror to this, and attached it to the projector’s ceiling anchor. Since rear-projection screens are common, all digital projectors have the ability to mirror and rotate the image being displayed so that it appears on the table in the correct orientation.

We love the look, but this is really only one portion of a digital gaming project. We think the table needs some interactivity. We often see this done using infrared light processed by a webcam. That multi-touch option is not going to work with a standard table since the camera needs to be on the opposite side of a translucent surface. But if you don’t mind using a stylus this IR whiteboard technique would work.