Driving A PSP Screen With An FPGA

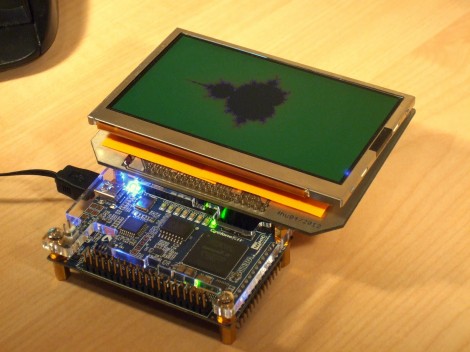
Here’s [FlorianH’s] setup for driving a PlayStation Portable screen with an FPGA. He’s using the DE0-Nano board to do this, and the first order of business was to establish a way to connect the two. He did a great job of etching his own breakout board, which has some traces that are less than 10 mils thick. Soldering the connectors for the screen was a bit of a challenge, and he shared several pictures of the process for your enjoyment.

With everything hooked up he fired it up with just a couple of lines of code to draw a test pattern. From there it was on to building a more intensive driver. [FlorianH] mentioned to us that he’s just starting to learn about FPGAs after having worked extensively with 8-bit microcontrollers. He’s been documenting his work on his site, and finds himself frequently referencing his own material so remember how he did things. Our vicarious enjoyment is an unintended (but welcomed) consequence of that habit.

Shake Phone To Start Scooter

This scooter starts right up with a shake of your Android device. This shake must be done from front-to-back, because a side-to-side shake is reserved for unlocking the saddle ([Brad] stores his helmet within).

Connectivity is facilitated over Bluetooth, with a rocker switch near the left handle bar to disable the receiver so that you don’t run down the battery. You can see the locking panel hanging open on the front portion of the scooter. Inside he installed the driver board which patches into the ignition system and drives a solenoid for the seat latch. It sounds like the latching mechanism used a bowden cable whose handle was inside that locking panel. By adding a solenoid and generously lubricating the cable he  managed to get it functioning from the driver board.

Check out the video after the break for a proper demonstration. The phone is running a Python script via SL4A, which takes care of the user interface.

Continue reading “Shake Phone To Start Scooter”

Motion Sprinkler Chases Away Defecating Dogs

Don’t want dogs pooping on the front lawn? You could put up a sign, your could chase them away like a crotchety old miser, or you could build a motion detecting sprinkler system. It’s pretty hard to line up for a doody when you’re getting sprayed in the face (or worse) with cold water.

The setup is pretty simple. The bump-in image above shows the view from a webcam. The server monitoring the video is running software that detects motion between one frame and the next. When it sees something in the right position it signals an Arduino to trigger the solenoid which has been holding back the water. Check out the movie after the break which shows [Phil Tucker] tramping across the grass to trigger the  trap.

Sprinkler hacks are always a lot of fun. This variable-range sprinkler is still one of our favorites.

Continue reading “Motion Sprinkler Chases Away Defecating Dogs”

Toaster Oven Reflow Project Goes Way Overboard

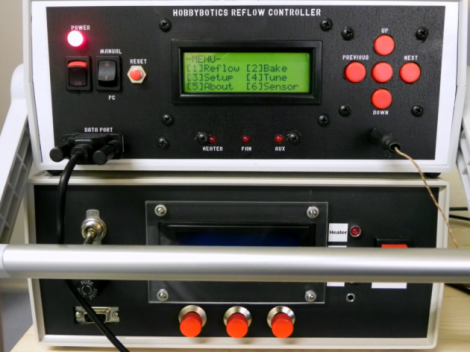
This project may take the cake on high-end reflow retrofits. It’s a HUGE project which uses a toaster oven to reflow surface mount circuit boards. And the fact that it bursts with features makes us giddy.

So what parts have we come to expect on these devices? Obviously a heat source which usually comes from a reused toaster oven. Then you need a way to switch the heating elements on and off based on feedback. Since solder profiles have precise timings and temperatures a clock is usually involved. All of this can be done with a temperature probe on a multimeter and a smartphone as the timer. But what we have here is full-automation and then about a thousand more features.

The driver above has a full user interface. It’s got its own PID routines which help to ensure proper holding temperatures and accurate ramping when going from one temperature to the next. The cable exiting the controller below the red buttons is providing feedback via a thermocoupler.  So program in your solder profile and let it go. But wait, don’t you want to record and graph what actually happened during this reflow run? Well that’s what the serial connection is for. In fact, you can even load new profiles and control all aspects of the device from a PC interface.

Switching for the toaster oven is done in a different way as well. Instead of just switching mains power, the circulation fan and the heating elements have been electrically separated. This way the fan can run whether the elements are on or not.

New And Improved Potentar

We like what we’re seeing and hearing with [Dorian Damon’s] newest version of the Potentar. This is revision 2.0 of the instrument we saw in a December links post. He calls it the Potentar, since it uses a linear potentiometer in a way similar to how the frets on a guitar work (Potentiometer + Guitar = Potentar).

The first thing you should notice is the case upgrade. The original used what looked like unfinished scrap wood, but finished wood of this case really makes the thing look like a traditional instrument. With this design he loses the Arduino in favor of a standalone ATmega328 chip. You’ll notice knobs and a switch on the face of the body. This allows for selecting a couple different kinds of scales and turning the power off. The linear potentiometer and sewing machine button are the same as before. After the break you can catch his description and a quick performance thanks to the audio jack for patching it into an amp.

Continue reading “New And Improved Potentar”

Building A Bug-zapping Lightsaber

[youtube=https://www.youtube.com/watch?v=w0a34ivs0xo]

I have heard the joke several times that a light saber would make a great bug zapper. However, when [Ricky Sumbody] requested it on Facebook, I thought “why not?”. [Ricky] made a common mistake, he thought the bulb was the part that actually zaps the bugs. A quick google search revealed that many people had the same thought. I decide that, even though building a functional bug zapping light saber might not look as cool, I was going to do it anyway.

If you’re going to follow these instructions, be aware that this is a device that is literally designed to shock things to death.  It is dangerous.

Continue reading “Building A Bug-zapping Lightsaber”

A Game Of Skill For The North Carolina Maker Faire

The North Carolina Maker Fare was last weekend, and over the course of the festivities  [Dave] was asked for the documentation for the arcade game he built. It’s a neat build, so we’re very glad he chose to share it with us.

Anyone who has been to an arcade in the last 15 years has seen the game [Dave] was inspired by. The object of the game is to hit a button when the sequentially illuminated lights are in a particular position. [Dave] built his own version out of 90 LEDs and a very tiny FPGA dev board.

The 90 LEDs are controlled by the FPGA using charlieplexing, and are illuminated in sequence when the game starts. A heavy-duty emergency switch button modified into a momentary push button takes a hit whenever the player thinks the LED will land in the ‘jackpot zone.’  If the player wins, a buzzer sounds and much excitement is had by all.

Seeing as how the arcade version of this game is a complete rip off and is impossible to win, we really like [Dave]’s version. You can check out his demo video after the break.

Continue reading “A Game Of Skill For The North Carolina Maker Faire”